A Month in and Out the Shop
Published 17 Jul 2023
Tags: 3d-printing, älgen, amsterdam, carving, hästen, liverpool makefest, spraying
Ouch, where did the last month go? This is a bit of a catch-up, covering the run up to Liverpool Makefest, and the event itself, and then a little bit a crazy 3D-printed thing I saw since.
I have to confess, I started writing these notes the day after Makefest, now a couple of weeks in the past, but it was such a busy and overwhelming day that I needed to let it all sink in for a bit longer, as what I wrote then just didn’t do it justice. In the mean time I spent a week in Liverpool and a few days in Amsterdam, and suddenly I see that time is rushing past! So I’d best get on with it then…
Älgen
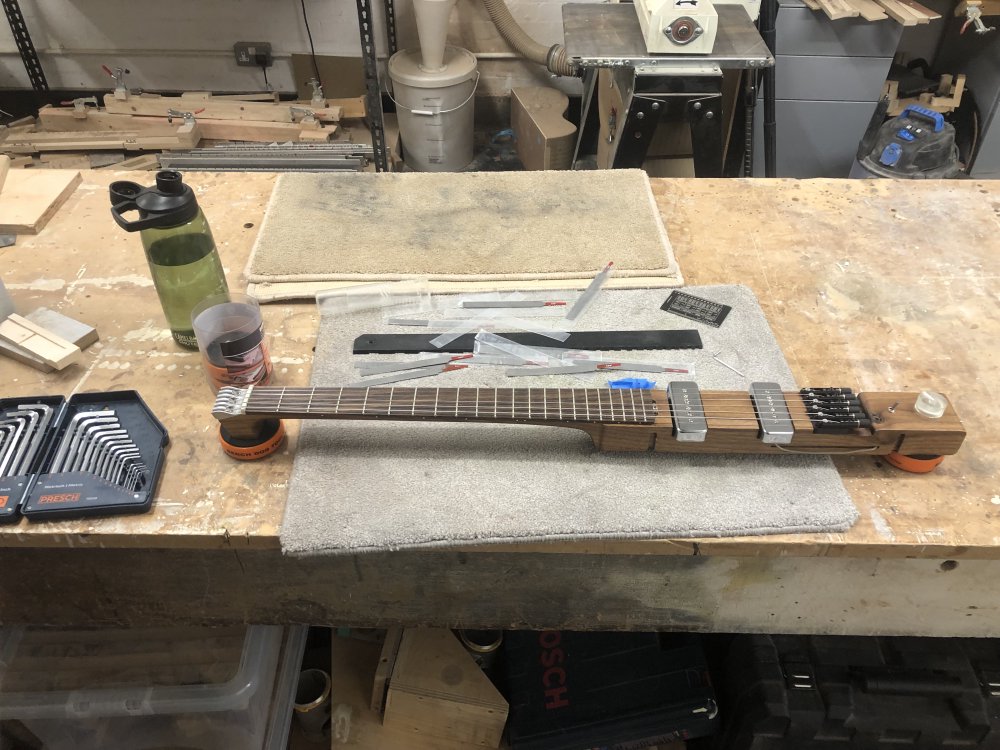
In the week before Makefest the main focus int the workshop was to get Älgen ready for the show at the end of the week. I had two tasks I wanted to do: I wanted to get the guitar re-assembled, putting back on the 3D-printed wings after their week of resting after applying acrylic lacquer, and I wanted to give it a final proper set-up to make it as good a guitar to play as I possibly could.
A proper set-up on a guitar can make a world of difference; these days if asked what mods should someone do to a guitar, my first recommendation is get it set-up by a guitar tech. When I got back into playing guitar in 2016 after a long, long hiatus, given I’d not touched my Fender Telecaster much for over a decade, I took it to be professional set-up and it was like another instrument: the way the instrument felt to play was nicer thanks to having things like the nut cut properly for the strings I use, the relief in the neck set right, and the sound was improved by having the pickup heights set, and so forth. The cost was only £40! It’s easily the best value for money thing you can do to a new guitar, particularly a more budget instrument where the setup will have been skipped at the factory to save time.
For the last couple of years my main focus as a builder has been to improve my fretwork to a much higher standard, and now that I feel that the effort there is starting to show, I feel getting the set-up right is where I next want to level-up. If I look at what it is that elevates the instruments built by my professional workshop-mates such that they’re in a different league from your high-end shop bought guitars, it’s how well their instruments play, and that’s down to both the fretwork and the set-up.
There’s several things you want to achieve with a set-up: ensuring the strings are in tune, both open and when fretted, that the amount you have to press the string on a fret is good and doesn’t cause the note to change, and it feels right to the player. Some of this is subjective depending on player preference, or will depend on style (slide players will want higher action typically than regular players), but the key thing here is trying for a consistent base-line when it leaves the workshop. In the past I’ve done what I thought was okay, but I didn’t have a a rigorous/quantifiable approach to it, and now I want to have it so that I know why a guitar feels good to play so I can do the same thing on each guitar that passes over my workbench.
To get this process down, I’ve been grateful for guidance from my workshop-mates Jamie and Matt, and from some internet tutorials I’ve been following. I’ll start with one bit I got from Philip McKnight’s YouTube channel, which is the order in which you should do the set-up, using the acronym TRAIN:
- Tune - get the guitar in tune as it is first.
- Relief - is the neck bowed too much one way or the other?
- Action - how high are the strings over the fretboard?
- Intonation - are the bridge saddles in the right place to keep you in tune as you go up the neck?
- Nut - are the nut slots cut to the correct height?
I think I first got this from his podcast, but he does coverer it here on his YouTube channel also:
Whilst I think the process is slightly more iterative than this acronym applies, as say adjusting the nut will change the action, it serves as a good starting place.
Älgen was already somewhat set-up, as I had been playing it for a bit in its mostly built state as I kicked the tyres, but I definitely wasn’t happy with some aspects of the setup. But I’d find it hard to tell you why - it just felt off a bit somehow. This again is why it’s nice to have a process to run through until you find why things are not quite as they should be.
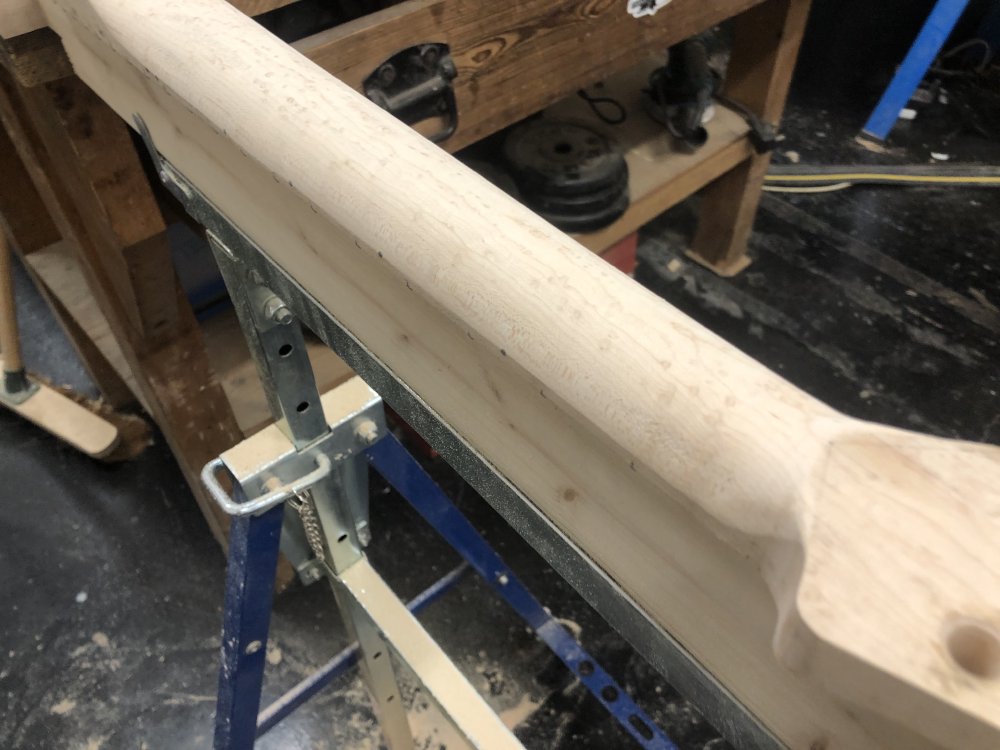
Tuning - easily done, and whilst I have some concerns about the bridge-style tuners I’m using on Älgen, I will readily admit they do tend to be quite tuning stable. I checked the relief using the notched ruler thing you can see in the above picture - the notches let me put it on the fretboard rather than on the frets - and that was good too.
To check the action I finally got empirical and bought a little action checker card, the small credit-card sized thing you can see in the top right of the photo. It’s just a metal rectangle with printed on what the action should be for various instrument types at the 12th fret on both the high and low E strings and some lines marked to make it easy to see how high a given string is. With that I can look up that the general recommended action for my strings, and check that they’re roughly right, which they indeed were as I had checked this when installing the strings first time (just using a ruler that time).
So, leaving aside intonation, which is to do with the accuracy of the sounds rather than the playing feel, this meant I was running out of things that I could adjust, and indeed it was the nut that I need to put some more work into. Jamie gave me some guidance, which you can see given here similarly in the below video: if you fret a string at the third fret, then there should be only the slightest gap between the string and the first fret, which you can verify by pressing down on the second fret - if things are correct you should see the string hardly moves over the first fret at all:
On Älgen there was still a reasonable amount of movement here, so I’d found my culprit! I broke out my nut files and set about getting the strings down to the right height:
Cutting the nut slot to the right depth was a process of slackening the string, cutting the slot a little deeper, tightening it up again, testing the height at the first fret, repeating until happy. With the bridge on Älgen being where the tuners are, this is a little more fiddly than on a standard guitar, but not too much effort, but I suspect this tuning and untuning was the cause of some issues I hit later, which I’ll discuss in due course, but at this point I was just pleased that once I’d got all the nut-slots cut to the right depth the play-feel of Älgen was substantially improved and finally I felt like the playability matched the rest of the guitar’s build quality.
Whilst doing the nut-slots, I also did adjust the intonation. The intonation is about how accurate the notes are when the strings are fretted - if the bridge saddle isn’t in the right position, although the open note may be tuned correctly, fretted notes might to too sharp or flat. So in general intonating a guitar involves adjusting the saddle position on each string so that when you have the string tuned open, it also hits the same note perfectly one octave up on the twelfth fret. Usually adjusting the saddle position involves releasing the string tension, which is why I did it as I cut the nut-slots, given I was repeatedly slackening and tightening the strings already.
With the body of the guitar now properly set-up, I went and recovered the 3D-printed wings that had been left to have the acrylic lacquer I applied two weeks ago to cure properly.
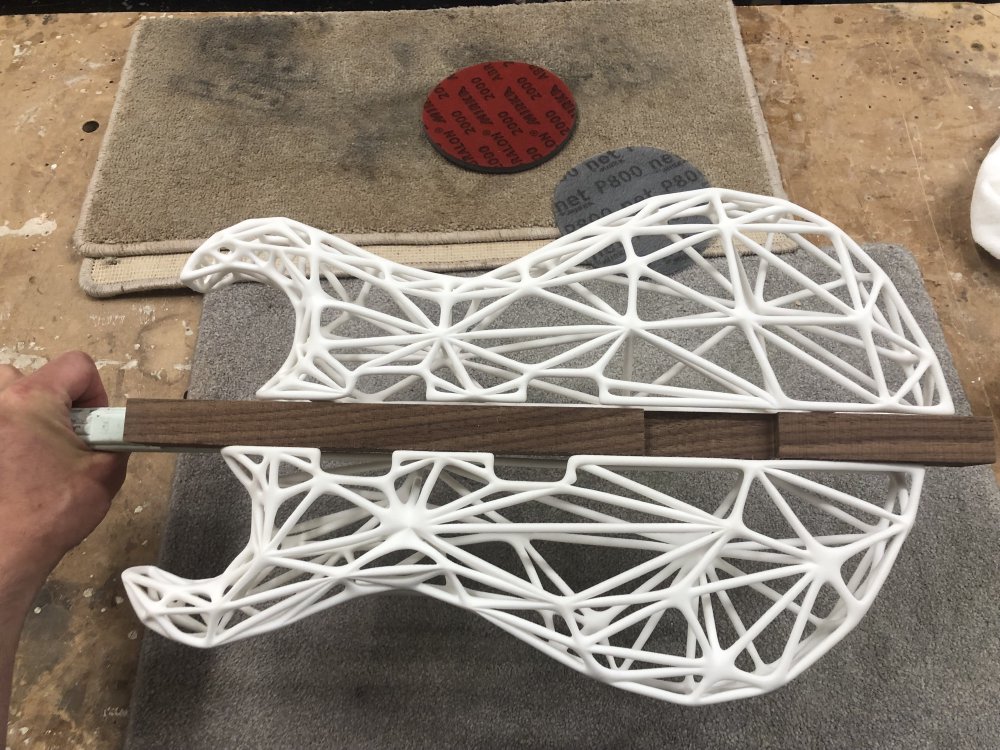
Initially it’s hard to tell that I applied any lacquer at all, but once I removed the wings from their temporary home, you can see a nice outline of where the lacquer didn’t get to:
I gave this the lightest of light sanding using high grit pads just to get it smooth to touch again before mounting the wings for one last time. And with that, Älgen was finally ready to be seen by the world for the first time:
Now it was ready to head out to Liverpool Makefest.
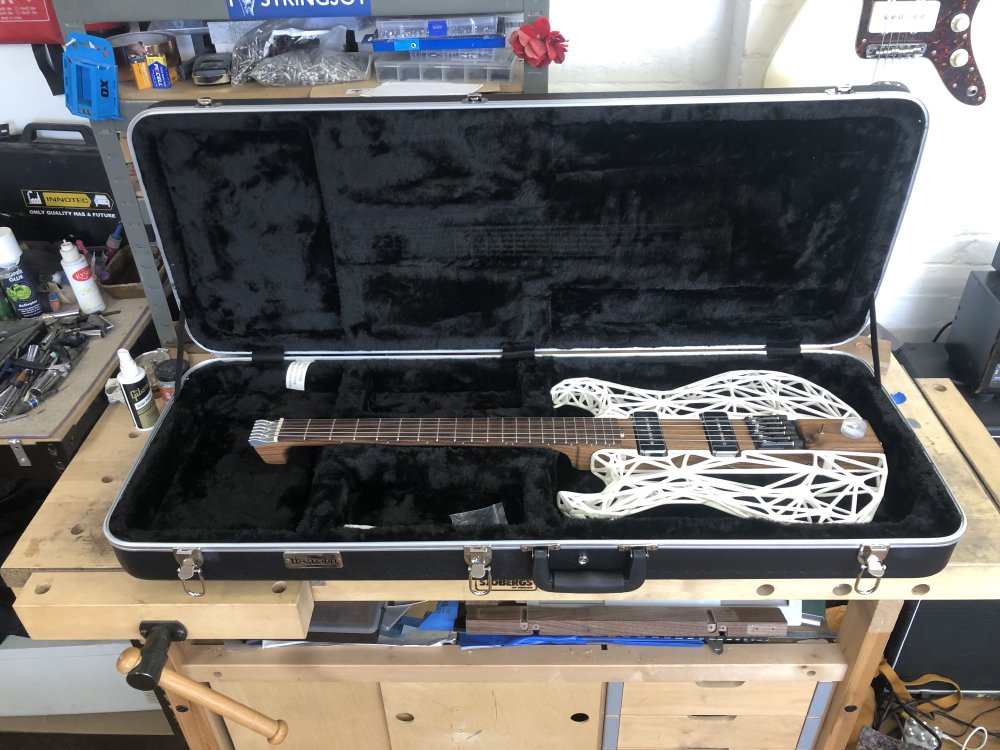
As a slight aside - I did the classic move of not thinking about the case before I designed the guitar. Whilst the guitar looks a little like say a Gibson SG in that it has a double cutaway, it’s actually slightly wider than the SG, and indeed most guitars, and so I struggled to find a hard-case for Älgen, with most being too narrow. Thankfully Thomann, the German music store, have detailed internal dimensions listed for all their own brand cases, so I was able to model them all in Fusion 360 until I found one that would fit!
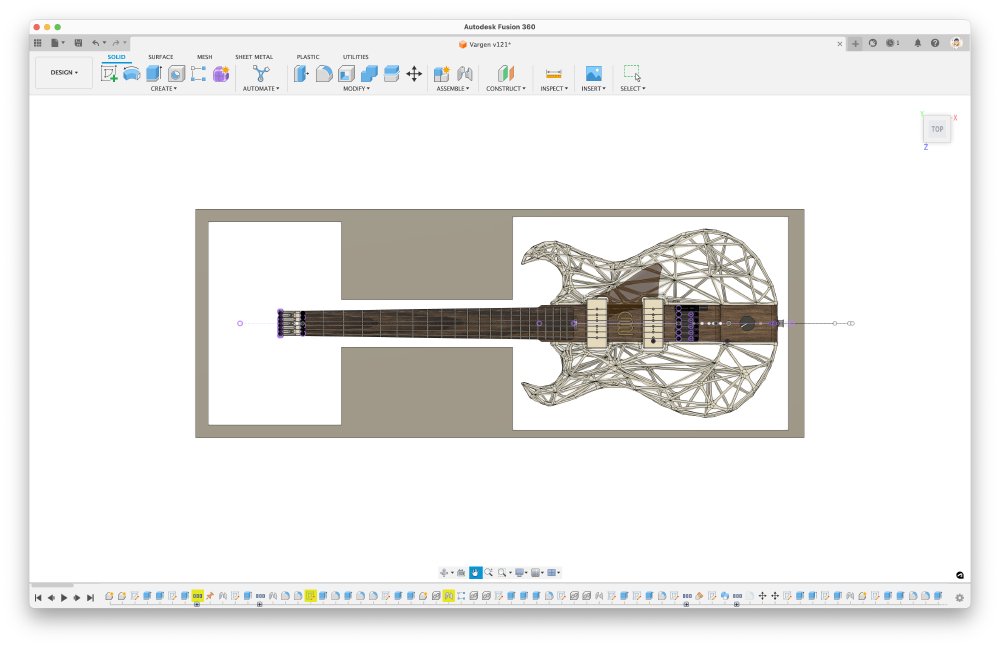
So another thing to add to the list when you’re designing a guitar, unless you also fancy getting into case making :)
Hästen
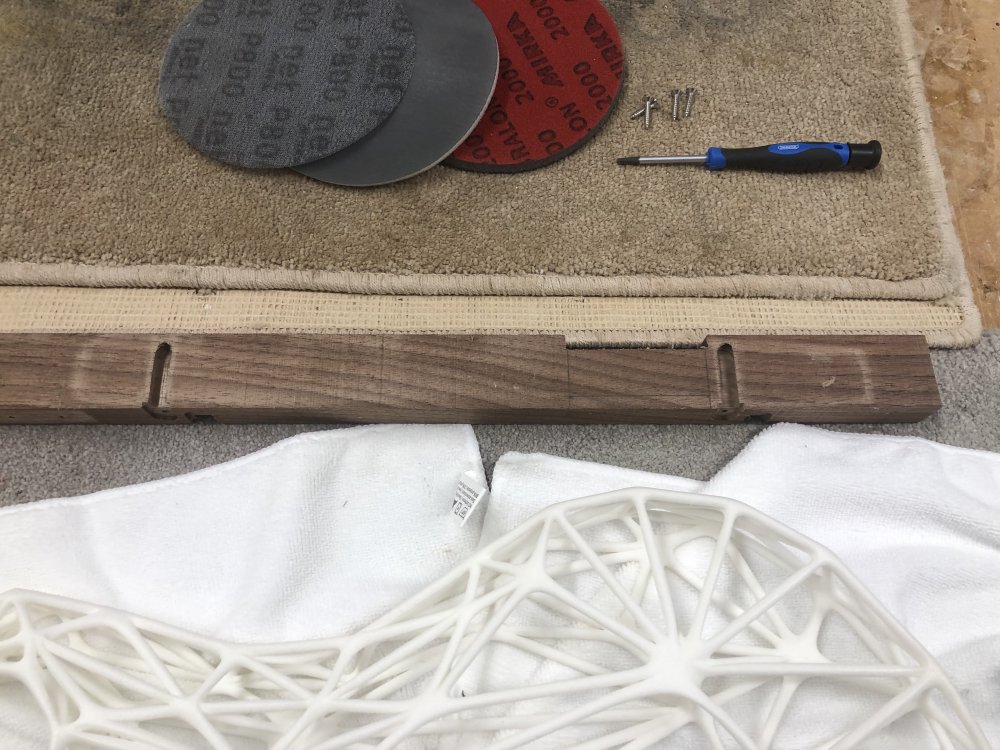
With Älgen “finally” done (for now - I’m sure there will be tweaking based on player feedback), I went back to the neck I was carving when last in the workshop for Hästen. When last in I’d got the first set of facets cut on the neck, and now I needed to cut the next two facets in along the centre-line:
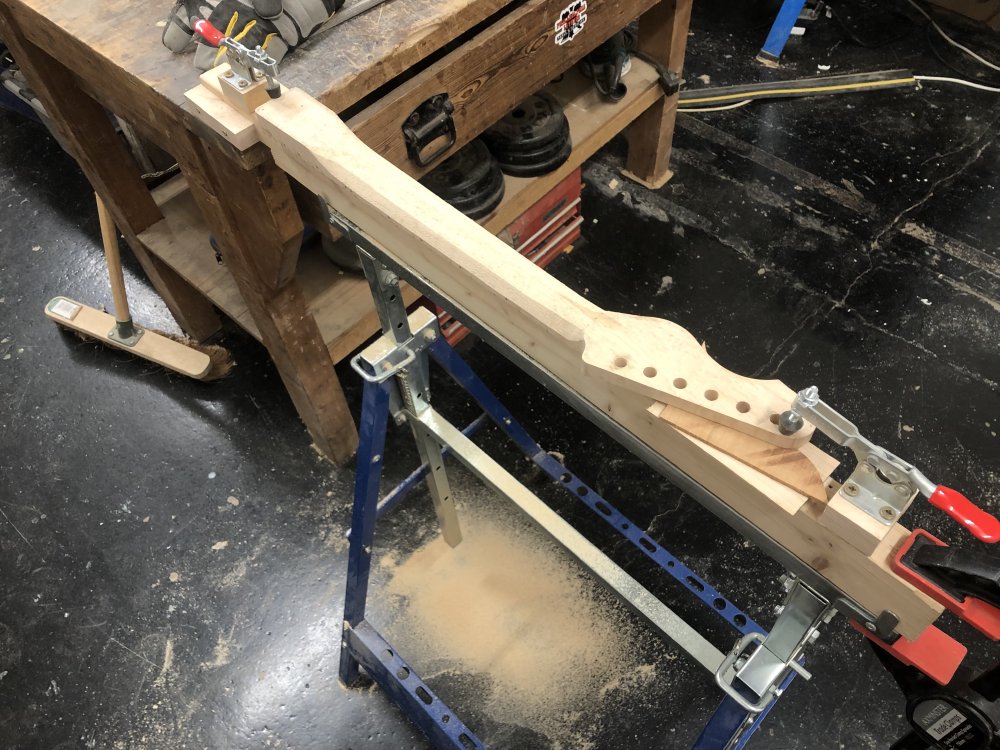
With these cut you can now start to see the neck’s shape starting to emerge:
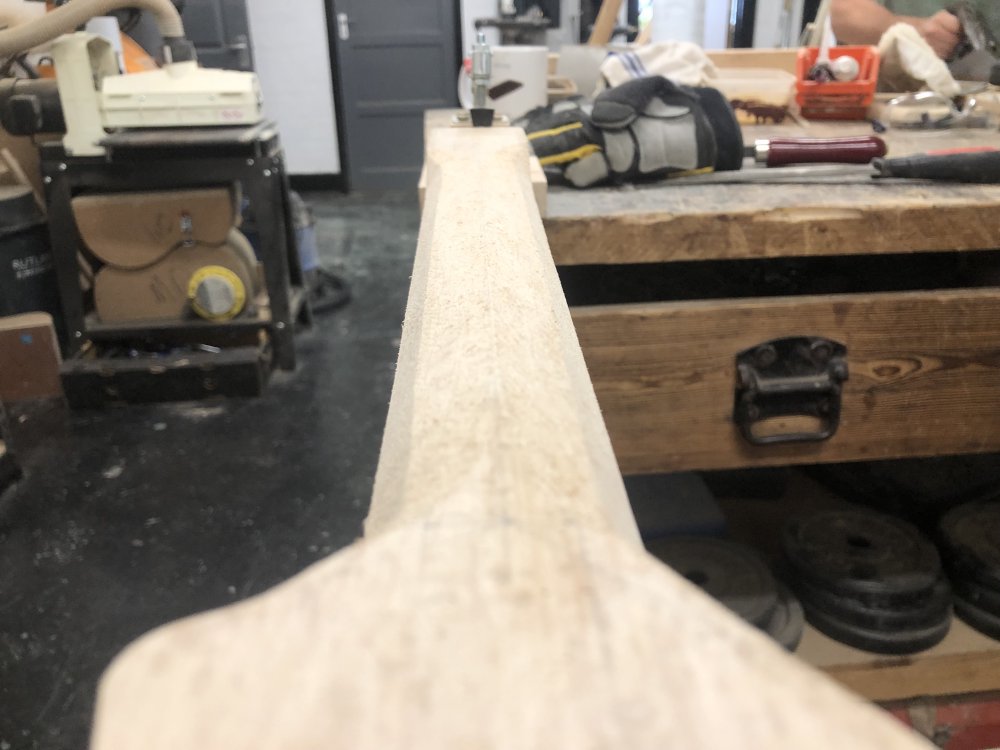
I did a little run the with the rasp along that pointed centre-line to level it out a bit, and then it’s over to using a fabric-backed band of 80grit sandpaper that I drape over the neck and pull down on each side like I’m shining a shoe in an old movie, which then smooths out these facets into a nice curve:
I have to confess, I got most of the way through this before having to give up as my hands started to cramp from holding the ends of the sandpaper for so long at an odd angle - I feel there must be some sort of clamp/handle I can attach to the ends to make this job a bit easier. Still, progress is progress, and I’m pleased that this neck is coming along nicely.
Liverpool Makefest
At the end of the week I bundled Älgen, one of my other guitars, my Blackstar HT20 amp I have for demonstrations, and a box full of prototype parts to act as props and headed up to Liverpool for Makefest. Saturday morning first thing, with the assistance of my wonderful other half, I got everything set up and ready to go:
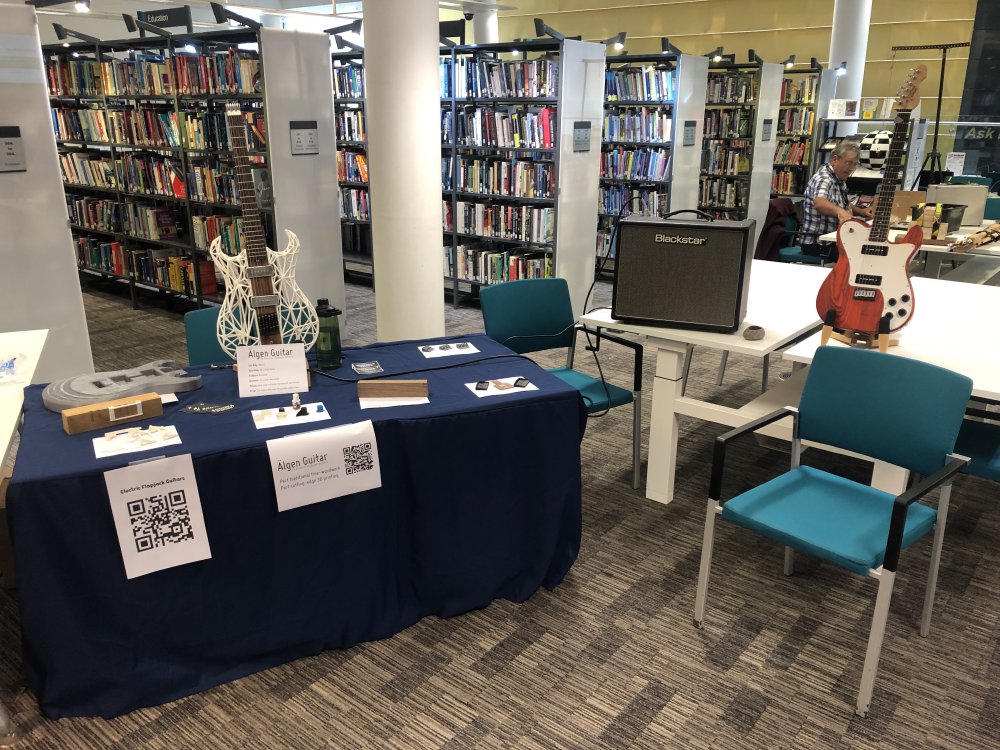
And then, as ever at this event, it was a solid 8 hours of talking to general public about guitars, 3D-printing, music, and making. Most people who stop by at Liverpool Makefest haven’t had much or any interaction with either luthiery or additive manufacturing, and so it’s great being the one to open their eyes to new possibilities. It was also nice to give Älgen to as many people as possible to see what they made of this unusual looking guitar. Here is Joe Hinchliffe (aka concretedog, one of the other makers of the day, who is also an experienced jazz player, putting it through its paces:

Joe was the only person to comment that the strings were too light :) I had tens on, and so quite a few people commented the other way, as I suspect 9s are more common on off-the-shelf guitars these days.
One of the joys of building guitars is giving them to other people to play and hearing what they can do with your creation and seeing what it inspires them to play - it’s a sort of duet between the player and the builder, and makes up for the fact I’m only a mediocre player myself :) It was lovely to hear people play it, no matter what ability level, and to hear it played through different styles from blues, rock, jazz, and classical.
Feedback from those who stopped by was overwhelmingly positive and supportive, which given the usually conservative portrait painted of guitar players not wanting anything not designed in the 1950s, I didn’t take for granted. I’d expected some people to not really dig the look, but every single person had a kind word to say, which was (and I appreciate I’m over using this word now) lovely.
That said, there were a couple of technical hitches on the day, so before I go too far on the positive, let’s deal with some of the gremlins that hit me.
Twice I had to deal with strings breaking as a result of people (not unreasonably) going for very high bends. This should be expected, blues players in particular are drawn to this style of playing, and on other guitars I’ve had at shows I’ve never had a failure rate like this.
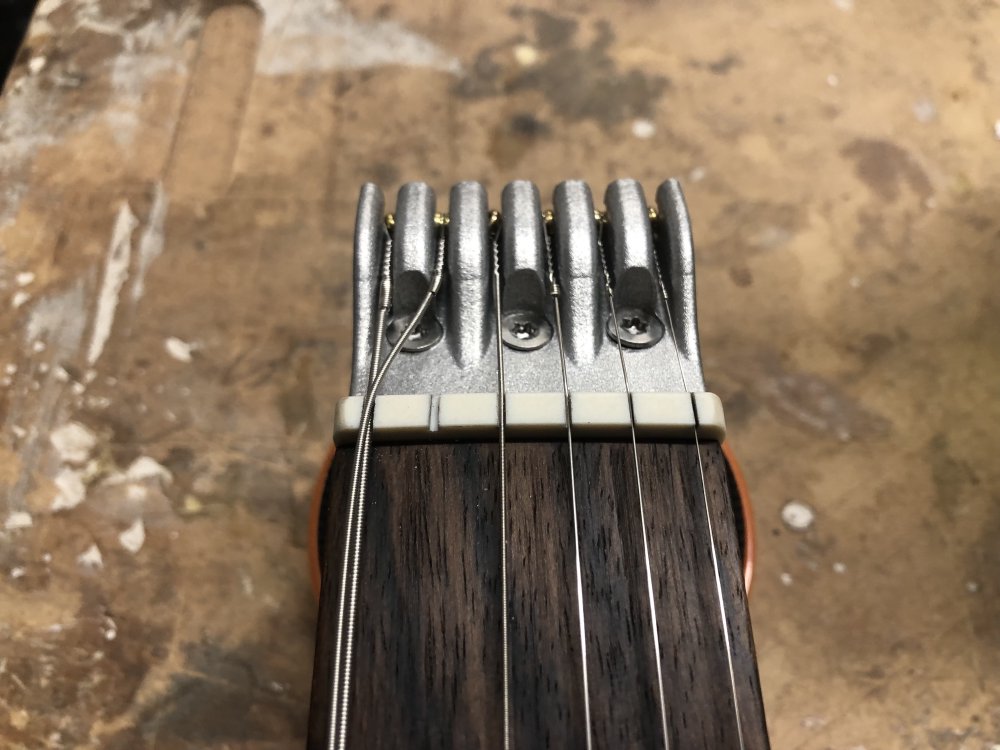
So why the high-failure rate? In part I think I could have avoided this had I put on a fresh pair of strings before the show, because as mentioned I spent a chunk of Thursday repeatedly de-tuning and re-tuning the guitar, which I suspect causes the strings to wear out with this style of bridge more so than regular tuners, due to how the strings are clamped under a grub screw, as it’s that clamp point where the string broke.
But I also suspect this style of bridge I’ve ended up with isn’t really good for Dave Gilmour style bending - though I’d love to be wrong on that. The bridge traps the end of the string under a pointed grub screw into a small conical recess, which holds the string in place against the tension of tuning it up. However, strings do seem to break under that point after a while, and so I’m concerned about this arrangement. Also, on a regular guitar you have more spare string to help feed the bend, and I don’t know if that helps. On Älgen there’s about an inch of string either side of the nut or saddle, whereas on a regular guitar you have three or four times that amount of string that isn’t active, but will be stretched into play somewhat as you do a bend, and I don’t know if that also is a factor.
Ultimately, I need more data, but it was a bit frustrating having to replace two strings during the show. They were different strings that I had to replace, so that makes me think that it was in part my activity on Thursday that didn’t help, but it was still annoying, and something I need to investigate more.
I coincidentally learned that if there’s one thing worse than playing guitar in front of people watching it’s re-stringing a guitar in front of people watching :) A huge thanks to Snoof for lending me a hex-key set and Laura for her leatherman, as I’d failed to pack the required tools for a re-string in my rush to get ready.
That snafu aside, everything went well. There were two comments I could multiple times that really made me proud of what I’d achieved with Älgen, that made me feel proud of both what I’d made and how I’ve improved as a builder.
Firstly, calling back to the set-up work earlier, I had several people tell me that it was the most playable guitar people had played, and indeed I had a couple of enquires about could I do set-ups for people (alas, not being local I had to decline). Given how much effort I’d put into this aspect of the guitar before the show, it was delightful to have people pick up on it despite all the other distractions on the guitar - at the end of the day I’m making an instrument for people to play, and for people to pick up on how nice it was to play is the best complement a builder can get I think.
Secondly, I had quite a few people express delight at the light weight of the guitar. I had a couple of people talk about how they used to play guitar but had issues with things like rheumatism, and so a lighter guitar like this could be a game changer for them, which was not something I thought about when designing it, and but I could totally see being something that aligns well. Similarly, I had someone who used to play guitar who was in a wheel-chair, and I was frustrated that I didn’t have the tooling to hand to just remove one of the wings to let them play it, but the modular design could potentially help there.
It was, genuinely, an overwhelming day, and I have to give a huge thanks to all that stopped by to chat or to play, and a similarly huge thanks to the organisers who put on a great festival once again. I was nervous before the show about how Älgen’s first outing would go - taking an unproven guitar design and just handing it to members of the public to have a go at, but it went great overall, and I learned a bunch both from the technical issues and the feedback I got. And it was just awesome to see people play it.
I didn’t get time to leave my stand, which is standard Makefest behaviour - one year I’ll learn to organise a stand in so I can see the rest of the show, but thankfully other people did see the show and write it up, so you can get a flavour of the rest of the event from this post by Andy Piper.
I did meet a couple of other luthiers during the day, including one who was also into experimenting with guitar design techniques, and had been doing experiments with carbon-fibre inserts on acoustic guitars. He was quite excited by the 3D-printed carbon-reinforced hard-tail bridges that I’ve been making of late, and so I gave him one that I’d brought along as a prop. Unfortunately I lost his contact details, so if you’re reading this please do get in touch!
After the event I was working at DoES Liverpool for the week, and had some interesting discussions with Nanette Mellor of Drake Music, an organisation that helps enable and promote disabled musicians. I chatted to her a bit about the feedback I got on the day about Älgen as being a platform for making guitars for people who find regular instruments not something they can play, and we also got talking about sustainability of instruments, something else I’m interested in: Drake do commission custom instruments for people, and as an organisation are expected to make reports on their environmental impact, and she wondered if I might be able to help (given I also work in environmental things for my day job). I certainly think it’s something I could help with, so I hope between those two avenues there’s some potential for collaboration there.
MX3D 3D Printed Bridge
If I had any delusions that Älgen was the biggest 3D-print around, my trip to Amsterdam put paid to that, when I visited the MX3D Bridge, a 3D-printed bridge over one of Amsterdam’s many canals:
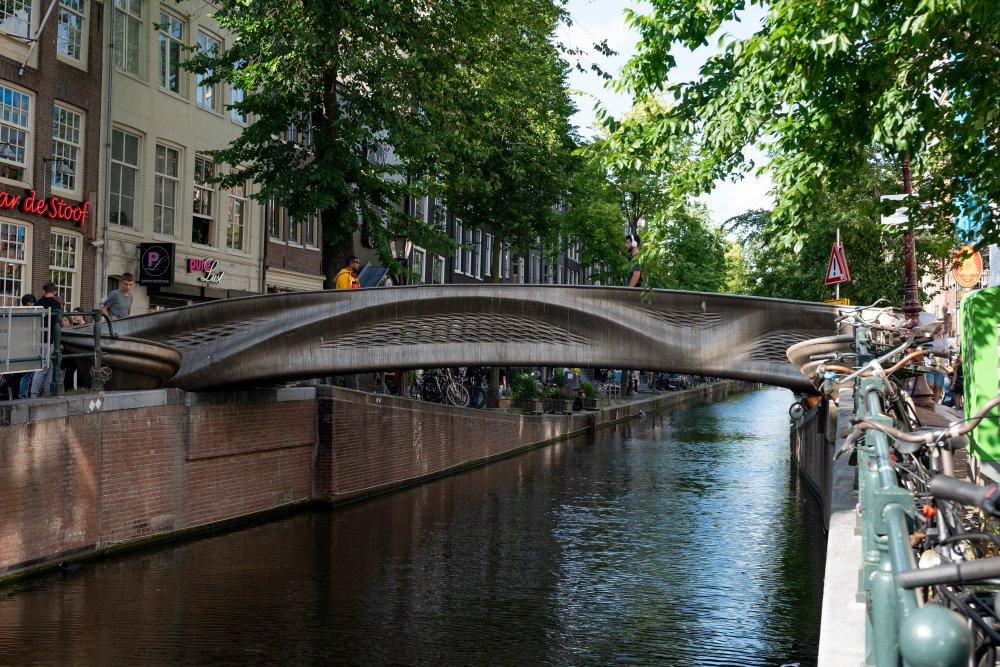
It has a somewhat alien appearance to it as you approach, lacking much in the obvious straight lines and arcs you expect of a traditionally built bridge. When you get up close you can clearly see how it was 3D-printed with what in 3D-printing terms is quite a course filament (and indeed that it wasn’t a single print, but is made up of several smaller prints welded together):
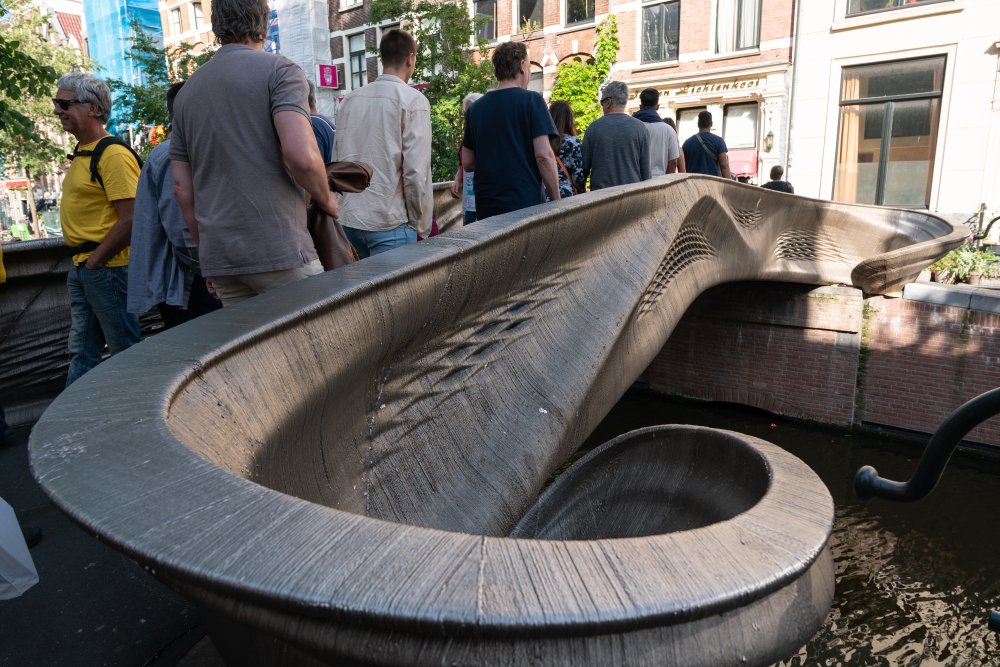
I have to confess, I expected to be wow’d by this bridge, but I left somewhat underwhelmed. I found the obvious filament ridges quite ugly once I got close, but then perhaps they left that texture deliberately to show it was 3D-printed rather than cast? It just seems such a shame to have nice elegent lines from afar, as I do with Älgen’s body, but then to have it look a bit, erm, rustic, when you get close.
I think also the context didn’t help. Whilst the bridge alone is a piece of the future, it doesn’t exist alone, and thus in context has to be a fusion between the old world of Amterdam’s narrow city lanes and the bridge itself, in the same way Älgen has to mix traditional woodwork for the playing surface with 3D-printing for other parts. But the MX3D bridge doesn’t feel like it really belongs - it stands in contrast to its surroundings rather than in harmony.
I think mostly this just shows you how lost in 3D-printing I’ve got :) This bridge really is quite amazing, but I now take that such things can be made for granted - I want to already be at the next stage of the evolution where we’re building amazing impossible things where the point isn’t that we 3D-printed it, but rather 3D-printing is just an enabler for us to make some other interesting functional or aesthetic point. A reminder for me that as I build instruments like Älgen I can never just rest on the idea that it’s good because it’s differently made, it has to be good because it’s a good instrument, and that all the parts work together harmoniously. I like to think Älgen pulls that off, but I realise that’s a subjective and biased opinion, and you dear reader will need to decide that for yourself :)
Still, if you’re looking for 3D-prints, this certainly is the largest one I’ve seen, and it is one that is in regular use, so worth seeing if you’re in the area.
What’s next
Now that I’m mostly done travelling around, I’m looking forward to getting back into the workshop. I have three more guitars to get wrapped up - one commission (Hästen) and two new design prototypes. Once the prototypes are done I can then start trying to find smaller guitar shows to exhibit at, and see if I can find an way to make this endeavour a bit more sustainable.
I do have one event lined up at the moment, which is I’ll be talking at the Open Source Hardware Camp at the end of August, which is part of the Wuthering Bytes festival up in Hebden Bridge. This is a sort of follow on talk to the one I gave at the main festival day back in 2019, but I am a little unsure about what angle to take for it. Whilst I work in the open, via this blog mostly, most the tooling I use is closed, and so I’m not quite sure how to talk about Älgen (which is the topic) to this audience. I suspect I’ll focus on the manufacturing side of things, but if you have any suggestions for what you think you’d want me to explain in a talk, do let me know!