Workshop Catch-up: Verkstaden
Published 15 Feb 2024
Tags: painting, spraying, verkstaden
To complete the trifecta of catch-up-notes about the guitars in progress, we’ll finally turn our attention to Verkstaden, a 25.5" scale length instrument that will hopefully serve as the basis for a regular model, if people like it.
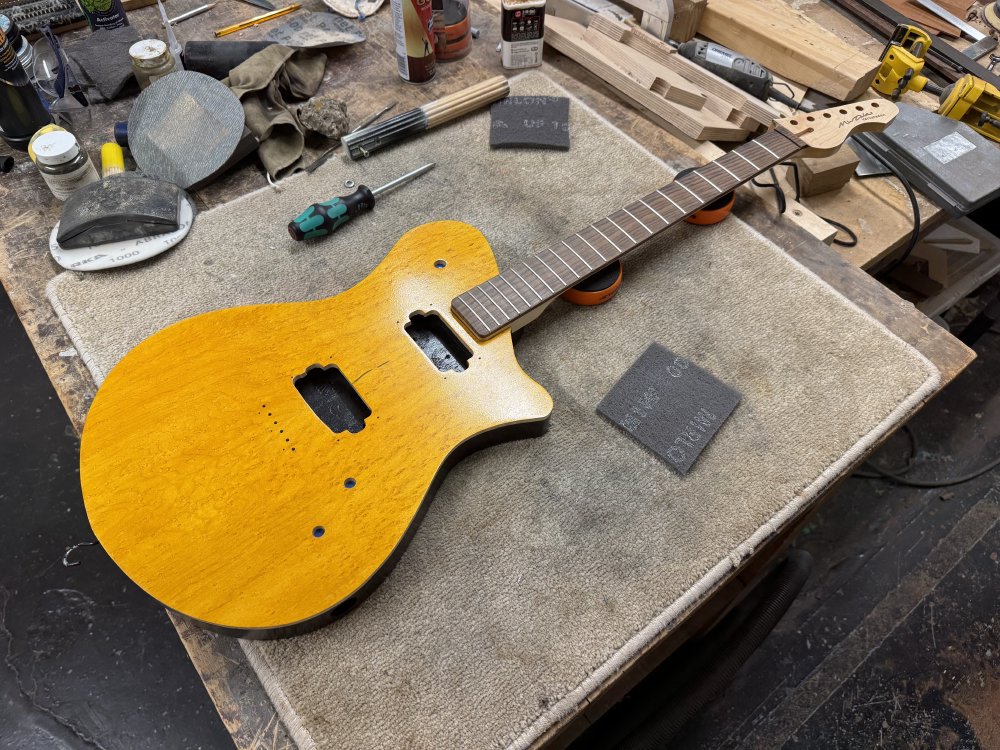
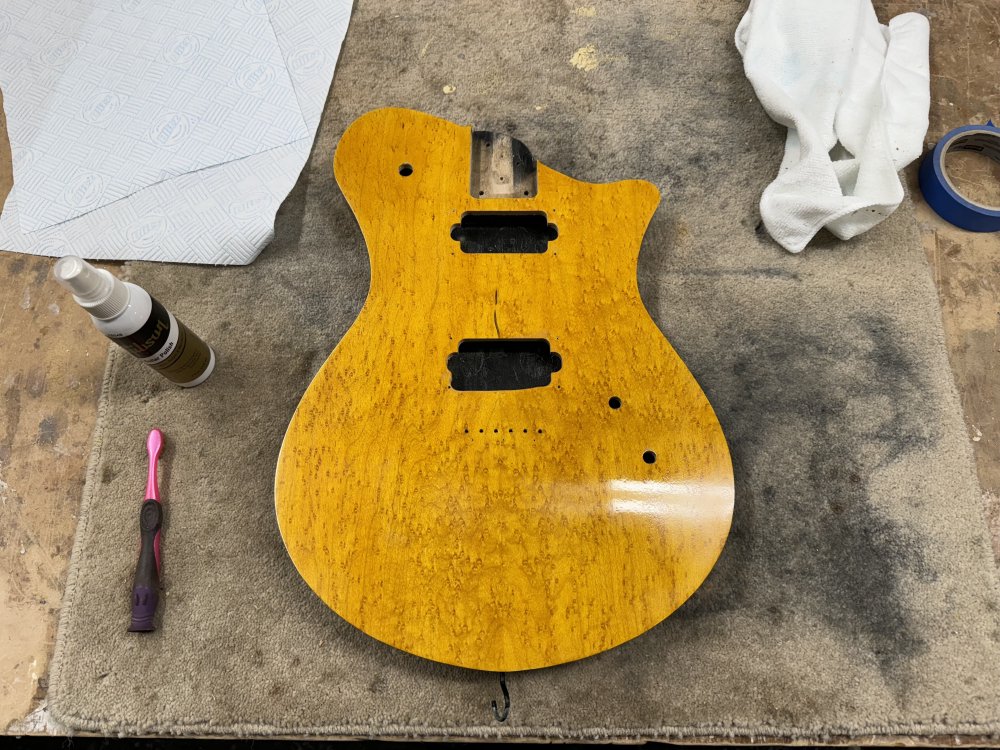
The name means “the workshop” in Swedish, named because it was a build I started when I moved out of the maker space I used to use, as this build was to let me try work out if I had everything I needed in the new workshop. But at the same time it’s been a way for me to try out some new things technique wise too: it has a maple cap on a poplar body, whereas all my other guitar bodies (älgen aside) have been just a single wood type with a join along the middle; the poplar turned out to be so soft that my normal finishing technique wouldn’t be tough enough, and so I opted to try painting this, but I didn’t want to lose the nice maple texture, so I went with paint on the back, stain on the front, and a gloss lacquer over both. And just because I don’t know when to reign myself in, it seemed an opportunity to try a “natural binding” whereby the transition from the front to the side leaves the top edge on the side a natural finish rather than stained or painted - this is a really nice look that you see on most of PRS guitars, and I though I’d give it a go.
Originally Verkstaden had slightly different shape, but over the last year it changed to be a bit more like Delfinen, so there’s a more obvious linkage to my guitars (at least the conventional ones). My hope has been that I’d be able to start taking Älgen, Delfinen and Verkstaden to shows this year as demonstrations of what I can build for people in order to drum up some new commissions.
So that’s bunch of context, which will hopefully make some of what follows make more sense. These notes will not only conclude the catch-up, but hopefully conclude the tales of woe from the spray-booth: this week includes quite an expensive mistake 😬 So let’s get to it.
Putting the gloss on
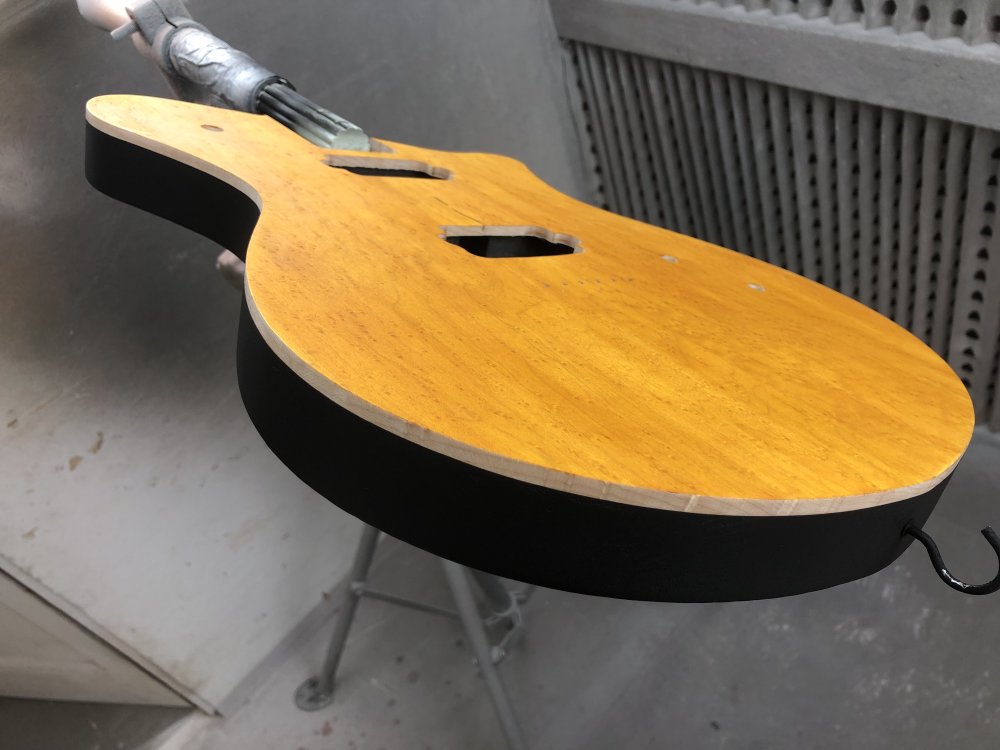
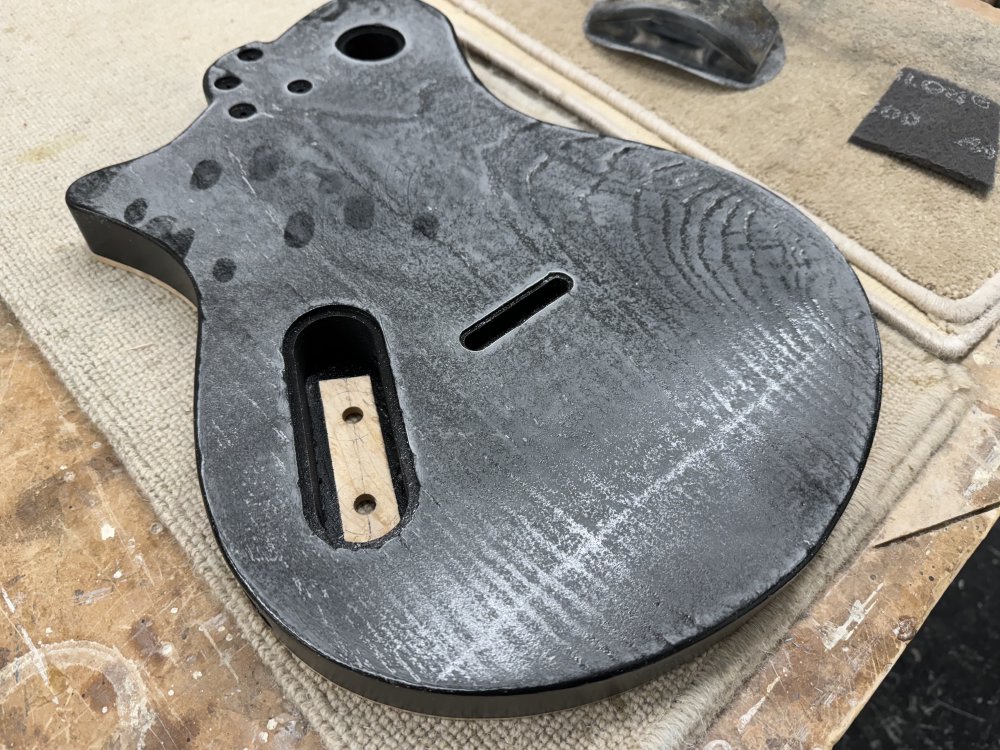
When we last saw this guitar I was still applying black paint to the back of the guitar, a process that necessitates a complicated masking of the front to protect it from paint, whereby I apply a layer of strong gripping masking tape over the edge of the cap for the natural binding effect, and then tape on a cardboard mask to the front to protect the bulk of it. This works fine, but is quite fiddly to set up and take down each time I need to sand back the previous two coats.

As I mentioned in the opening, I’d never intended to go for a complicated finish on this guitar when I started the build, but I really like the look this guitar has ended up with, with the vibrant yellow with the birds-eye maple texture, the natural side, and then the black rear contrasting with the front. It’s just as well really given the effort it has taken, but up to this point in the process I felt the effort has been worth it.
The rest of the painting went fine, as much as it does per last week’s notes, and then after two sessions with primer, and two or threes sessions with black paint, it came time to apply the clear-coat that will give this guitar a glossy finish. This means I can stop taping up front at last, as the entire thing is getting the gloss finish:
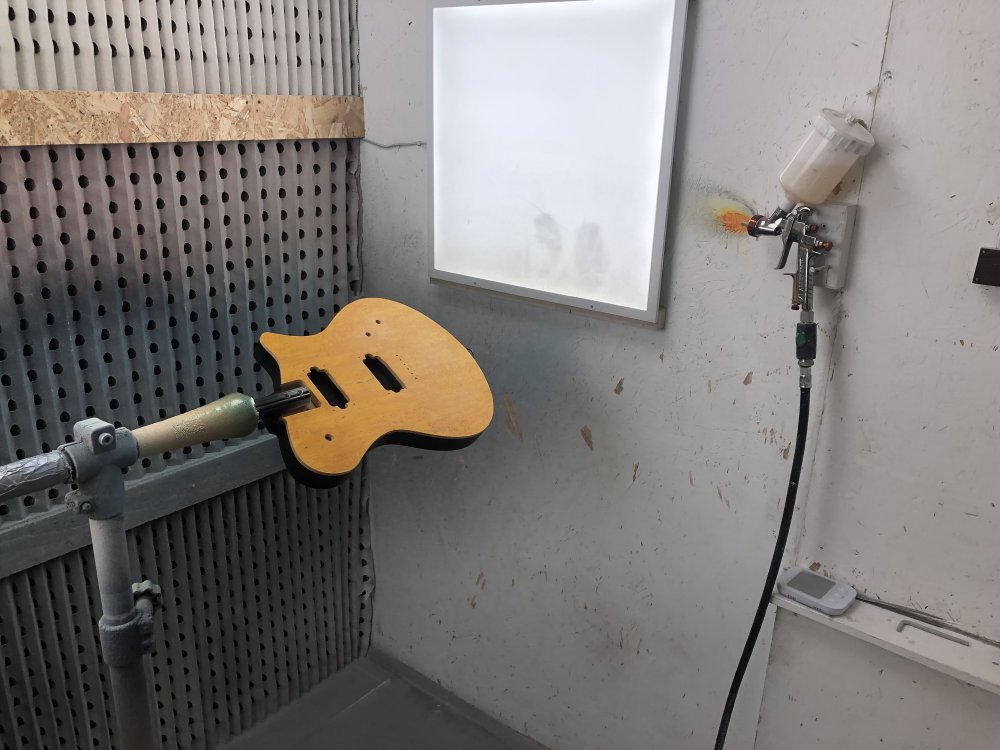
In addition to swapping paint for clear lacquer, the other change at this stage is that I’m using a different spray-gun from the one I have used thus far for both primer and paint. Both my workshop-mates Matt and Jamie individually keep a separate gun for the clear-coat finishes on their respective instruments. Partly this is so that the clear layer has no chance of being contaminated with any paint, and partly because this gun has much finer controls and can cope with giving very fine layers where necessary. It’s also, as a result, quite an expensive spray-gun compared to the others…
By this point I’d been spraying for a few sessions, and so I felt comfortable coming into the workshop on my own to do spraying, which is what I did the first time I used the clear-coat. I checked with Matt earlier in the week what tins I should be using for the clear-coat and what thinners to use, and so felt fully equipped to just get on with things. Unfortunately things did not go to plan: despite thinking I did everything right, I ended up ruining the spray gun. 🤦🏼
I’d like to document what I did wrong, but despite thinking I’d followed the instructions (which worked subsequently, so it’s not a problem of the instructions), I managed to mess up either mixing the lacquer or in the cleaning, and I ended up clogging the spray-gun, ruining it for fine work use. Not a great first experience of clear-coating.
To make things more awkward, I hadn’t realised at the time what I’d done: the spraying didn’t work, and so I aborted it, but I put that down to general technique incompetence on my behalf. There’s so many variables to get right in spraying: air-pressure in the compressor, distance you hold things at, the ratio of lacquer to thinner, etc. I just assumed I’d messed one of those up, rather than clogging the gun, and so just cleaned things and left it for my workshop mates to discover what I’d done, which was definitely not a good look, and they were justifiably upset when they tried to use the gun and it wasn’t up for the job.
The moment it was flagged I did what I could to get my workshop-mates back up and running by replacing the ruined equipment, as I’m very aware that this is their livelihood, but it wasn’t a good process to have to go through even though it all got sorted. Hopefully by acting fast to replace stuff (they were back up and running in a couple of days) I have (touch wood) avoided any lasting damage there. Something I treasure more than the cost of replacing any equipment is the atmosphere in that workshop: Matt and Jamie are both generous with their time and knowledge, and this isn’t how I want to repay that.
So, not the best day I’ve had, and yet another reason to add to my already long list of why I dislike the spray-booth.
Getting back on the horse
Thankfully, when I went back in the workshop after my messing up, I was encouraged to get back on with it by my workshop-mates. So after double checking everything with Matt, I did finally manage to get some clear-coat on. I got three sessions (so six layers) of clear-coat on the guitar, and then left it to cure over the xmas break. Once it had a couple of weeks to cure, and as documented for Hästen in the previous catch up, it was time to try get the lacquer up to a smooth and polished finish, only this time going even further (Hästen having just a satin finish rather than a gloss finish).
The start is using 600 and 800 grit disks dry, with a 1500 grit merlon pad after each, which looked fine on the front:
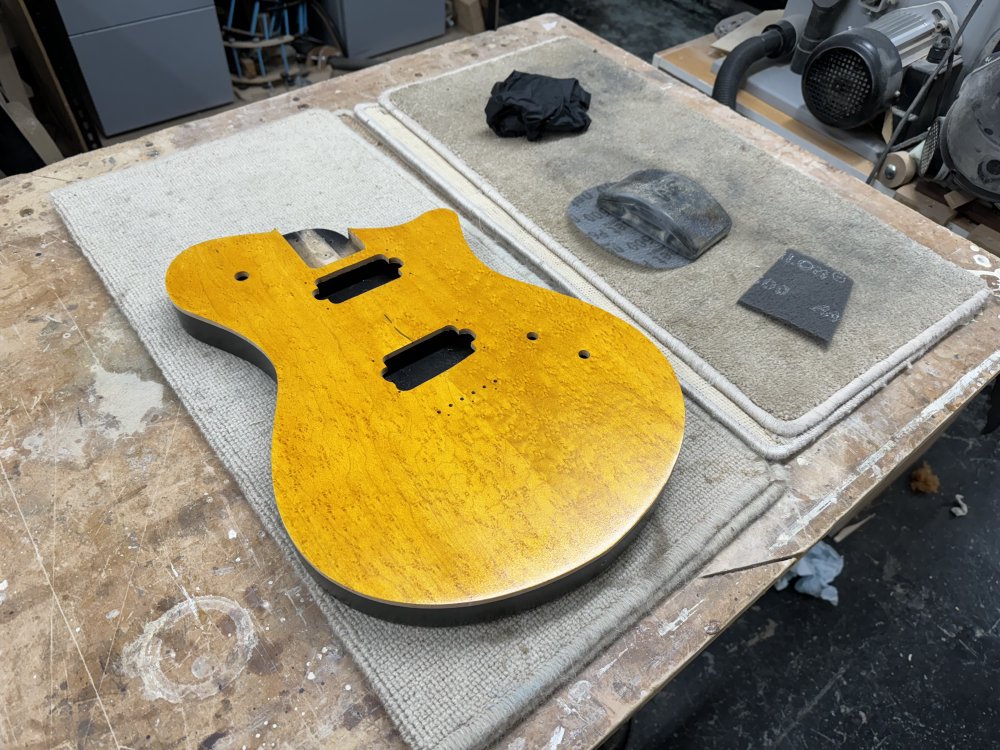
but it was somewhat terrifying when I started on the back and it clouds over!
As the fingerprints tell you, most of this is just surface dust, but at this level the abrasion does cloud the surface somewhat until you reach the much higher grit levels later. And as I’ve mentioned before, paint and gloss really show up any shape defects that are in the wood in a way staining and oiling does not: you can see that rather embarrassing snipe line in there from when I thicknessed the poplar, which wasn’t visible before I started spraying. Thankfully we now have a thickness sander in the workshop that we use to take wood down to the final thickness which should eliminate this kind of thing.
This whole final process did not go particularly well alas. I wasn’t starting from a great place, as I’m still not that skilled with the spray-gun, and so I had quite a textured starting point (I think down to me not setting the air-pressure in the compressor high enough), meaning it needed quite a bit of sanding to get smooth. But at the same time I’d been warned that sanding near edges tends to take off more than you expect, and so I was very timid sanding hear the edges, particularly that front edge which is quite well defined and if I go through that I’ll take off the yellow stain from the front. After my experience sanding through the top layers on Hästen accidentally I really didn’t want to push my luck and end up back in the spray-booth. All of which is a long way of saying that after doing the sanding it wasn’t nearly as smooth as one would hope from a professional finish.
Once I’d done as much as I dared, I then went over to the buffing machine, which is the point at which we diverge from the process I documented last time as Hästen’s satin finish didn’t need brining up to a shine:
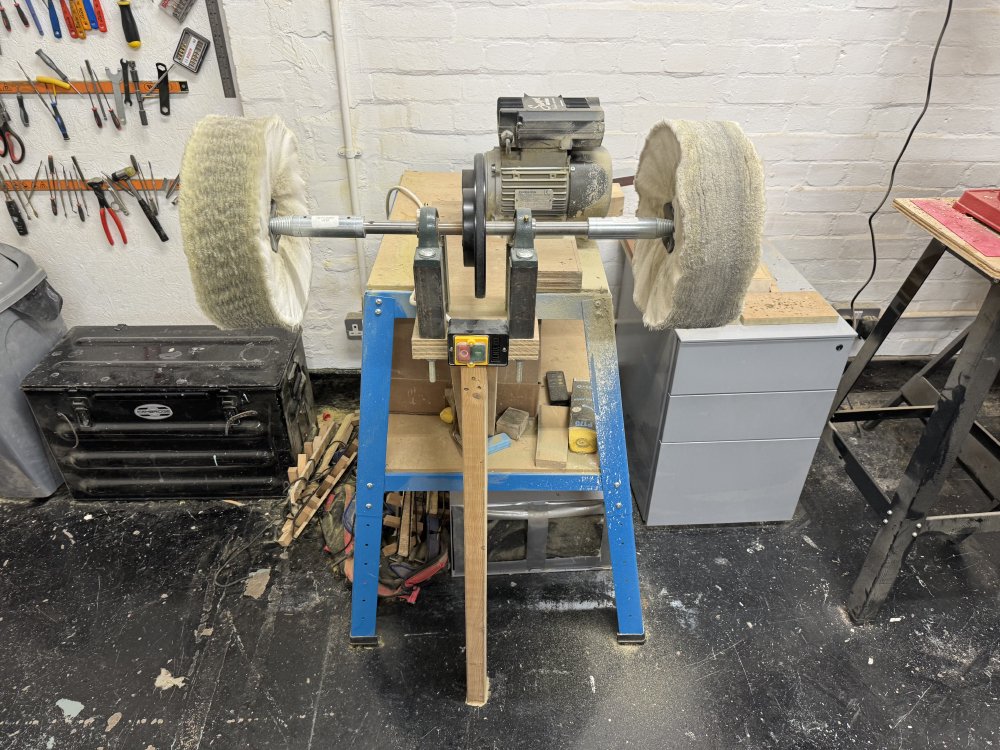
I’d never used one of these before. On each side there is a spinning pad, with the one of the right being more course than the one on the left. You turn the motor on, they start spinning, and then you apply some abrasive compound from a block by holding it against the spinning outer edge, and as you do that you can see the pad change colour as it picks up the yellow compound. Once you’d applied that, you then gingerly apply the spinning edge to the guitar in what you hope is a smooth motion across the surface. This takes some work, as the edges on the guitar-body will catch on the edges and be grabbed from you, so you really have to hold it tight when doing this, despite it just being a soft fabric pad. One I’d worked my way over the guitar on one side, I then went over to the other pad, and repeated.
At this stage the guitar is somewhat dirty with compound, but the heat will have made the lacquer soft, and so advice was to leave it a few days before cleaning up. Before I did that, I got this photo, which made me quite happy: Hästen reflected in the surface of Verkstaden:
Despite that picture, there was a bunch more cleaning to do. You can see here on the back the build up of the polishing compound:
This was repeated for any edges where I’d caught the pad, and in any grain texture of the underlying wood that made it through to the surface. It is also just generally over all the surface, giving the gloss finish a slightly smeared look. To get this out I followed Matt’s advice and used a combination of a soft bristled toothbrush and microfibre cloth along with some Gibson Guitar Polish liquid, which he’s found to be the best thing for getting rid of the compound.
The finish(ed) result
So, after all that heartache of spraying: the paint runs that had to be sanded back, the tedious process of having to repeatedly mask and un-mask the front as I sprayed the back, the destruction of a spray-gun even, was it worth it?
Yes and no. The learning, as ever, is invaluable: I know so much more now than when I started on this process, and I’m hugely grateful for all the mentoring and tutelage Matt has given me to get me here. I now know so much more about how to finish guitars thanks to his guidance, and so from that point of view it’s totally been worth it.
The guitar did get a finish on it, and has made it through the process, so technically it’s also a success, but I am a bit let down by the quality of the finish I’ve achieved, which isn’t at a level where I can present this at a show as an example of what I can do, for that I’d need to do a better job. This video I took whilst doing the final polishing reveals it:
You can clearly see how timid I was around the edges, nervous as I was going through the finish on that sharp edge. On the back it’s got a more uniform polish because I wasn’t so scared of the edges, those being rounded over and thus less likely to catch the sanding disk, but black it turns out is the worst colour to put gloss on, and in the finish I can see lots of scratches I missed when working up through the grits (if you look closely in the photo of the back with the polish compound on it, you can see scratches there). But at this stage, I don’t want to repeat the sanding process as there is only so lunch lacquer I can remove, I suspect I’d need to add more before I could take away more.
Finally, on the back I left the wood-grain texture, as I wanted that link to the wood below. Whilst I feel that’s worked on Hästen, on black gloss it just looks a bit poorer, as it just catches the light randomly, and doesn’t say “look, I’m wood” it says “look, I’m a sloppy finish”. It isn’t sloppy, as it is what I thought I wanted, but it runs out that it’s not a great look that particular combination.
Part of this is just first time out, and now I know what I know, I can see how more work at earlier stages would save trouble at later stages. A good few years ago I had the fortune to attend a track driving course. It was on a small technical track, and towards the end of the lap there was a series of S bends, which I’d take each in turn, focusing on just the turn ahead. Whilst I executed each turn well, I was still quite slow, and my instructor helped me realise that how I set up the car into that first turn had an impact on every subsequent turn, as it was that which enabled me to get the car in the right place/speed for the second turn, which then set me up for the third turn, and so on. Finishing is like that: you can see the marks I failed to spot at the sanding stage before I started, by not rubbing back earlier layers I made later layers more uneven, and so forth. To correct the poor finish I have here I’d have to go back and set myself up properly knowing where I was going to end up.
The other part of this is me trying to do too many firsts at once: my first go at lacquering, my first cap with a natural binding effect giving me all that extra work and making it harder to work. Had I just done the lacquering or just done the natural binding I suspect I’d have something closer to being something I wouldn’t be embarrassed to show people. But I like learning and trying out new things, so I just kept piling on challenges, forgetting they also interact with each other.
I had hoped Verkstaden would become a demo guitar for shows, but no, not with this finish. But that’s also okay: I’ve learned a lot so far from this guitar, and I’ll learn a bunch once its finished about the design: it’s a new guitar shape, and I’m really keen to make it into an instrument so I get a feel for how it plays. But for demos for a show, that’ll probably need to wait until the next iteration.
And to be clear, I do love what I tried to do here, with the yellow top and the black sides with the natural binding, at a distance it looks stunning, so I’ll definitely return to this look at some point.
Next steps
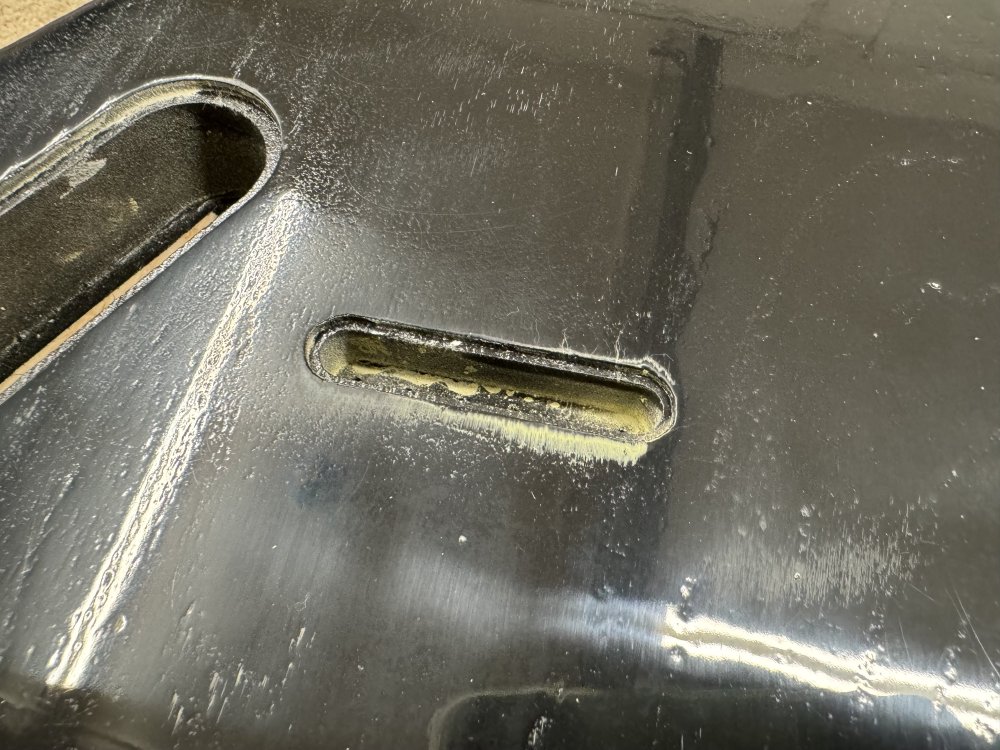
The body is now nearly done, so it’s close to assembly time. I still need to laser-cut the covers and pickup mounts (more on this next week hopefully), and like with Hästen I need to clear our the cavity on the rear for the ferrule-block, as the paint and lacquer has made it so the block no longer fits in the pocket I made:
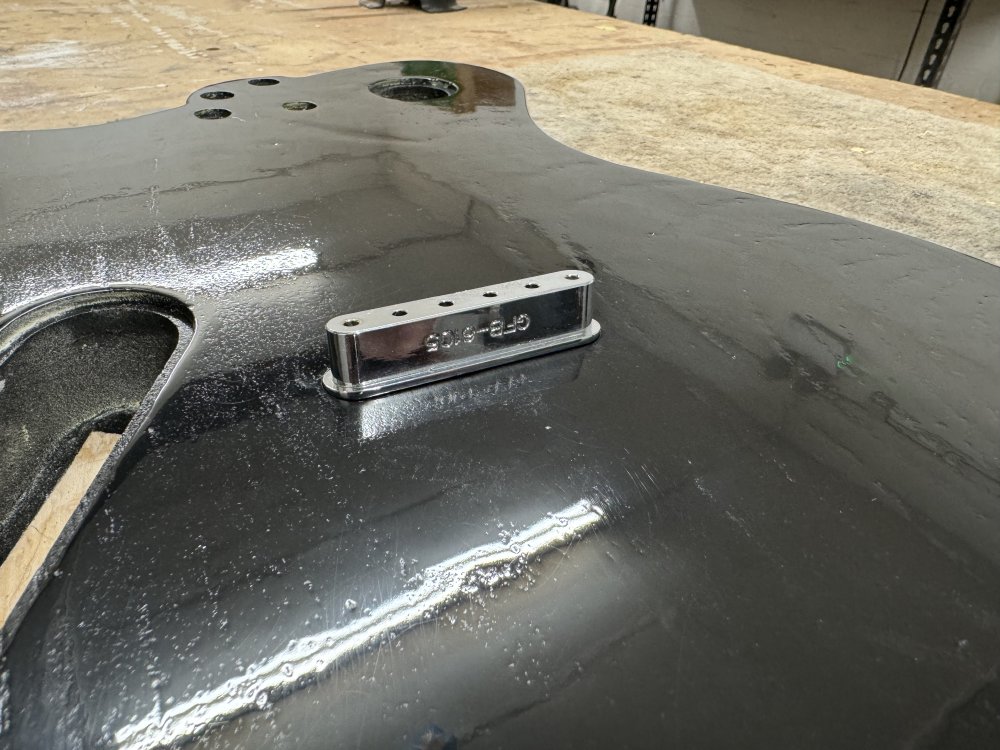
That photo shows the lip not fitting in the recess, but the same is true for the main part of the block in the pocket too. The neck is nearly done, it just needs a nut cut (hopefully more on that next week too), and the rosewood fretboard needs treated. So getting there, and I’m looking forward to playing it even if I wouldn’t want to shout about it: it’s still a guitar at the end of the day, and they’re made to be played, and I’m definitely keen to get others to play it on a one-off feedback basis after they sign a disclaimer saying they’ll ignore the finish :)