A week in and out the shop: Liverpool Makefest edition
Published 4 Jul 2022
The week was a week in two halves: a frantic time in the workshop at the start of the week, and then a jaunt across and up the country to Liverpool for the return of Makefest, where I’d be showing off Älgen to the public for the first time.
In the shop
In the previous week I’d managed to get Älgen mostly through rough shaping and getting frets installed (though not yet levelled and dressed). I realised that the chances of getting the guitar strung up before Makefest were slim, so I wanted to concentrate the little time I had on getting the guitar at least looking the part for the show, which meant installing as much of the rest of the hardware as possible.
The first job was to make the recesses for the bridge and the pickups. Normally I’d use a router for this kind of activity, but because the fretboard is already installed, it would be quite hard to get the router where I needed it, so instead I opted to try a new technique that I’d seen done before but never tried myself, swapping the router for a bandsaw and a chisel :)
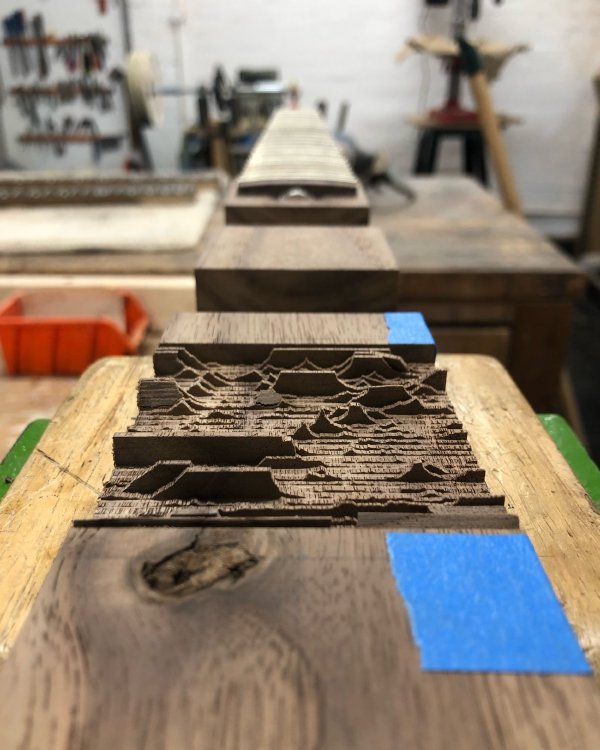
The main thing to note is that whereas on a regular guitar you’ll make a pocket for pickups to sit in, on Älgen we’re making more of a notch shape for the pickups and bridge to sit in, as you can see here:
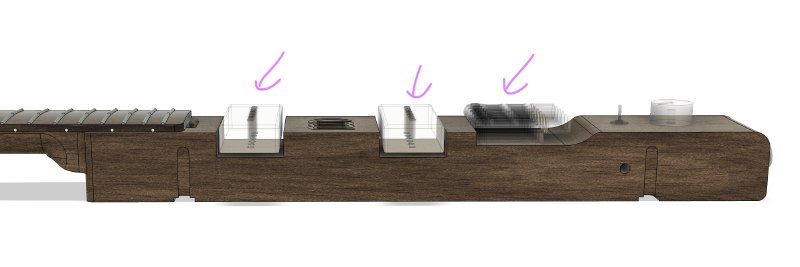
This means we have more options open to us in terms of how we cut these notches vs a traditional pocket where a router would be the only real tool to use. The technique that I wanted to use involved putting the body on its side and then cutting a fine comb pattern using the bandsaw, after which I could snap out the comb ”teeth” that remain, and tidy it all up with a chisel afterwards. If that sounds confusing, hopefully it’ll shortly make more sense :)
As ever when trying a new technique, I tried it out on some scrap first:

Here you can see the wood after I’ve sliced into it repeatedly using the bandsaw. I make sure that the cuts at either end are right at the ends of where I want my notch, and then just keep making cuts to the desired notch depth all the way along, getting them as close together such that they’ll just snap out when pressed. Once I’ve snapped them out they’ll leave a ragged edge, but one that’s very easy to clear up with a chisel:
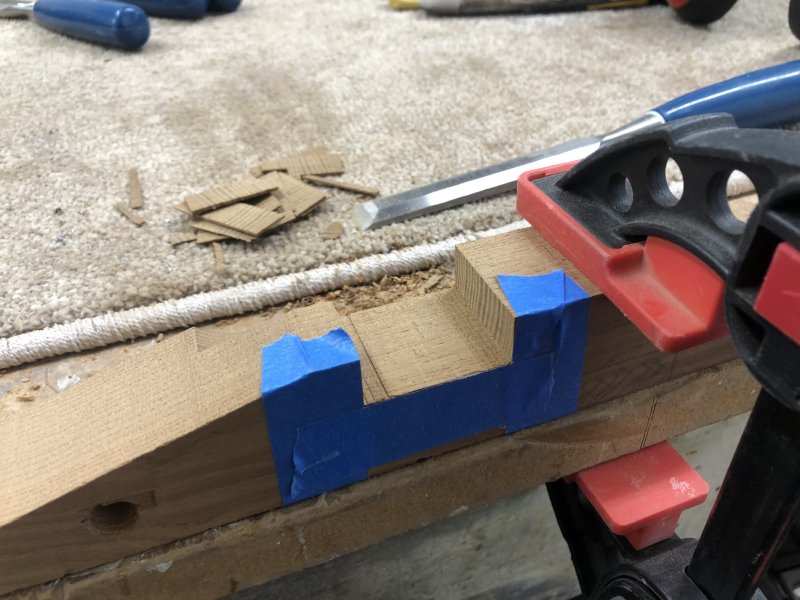
This is quite a neat little technique I think. Again, people tend to think of a bandsaw as a roughing tool, but if your blade is well tensioned, and you’ve taken time to make sure everything is true, then you can do quite precise cuts with it. That said, it doesn’t make this technique any less nerve-wracking when you imagine the consequences of slipping and bisecting your workpiece :)
Speaking of which - here we are, ready to go with the real thing!
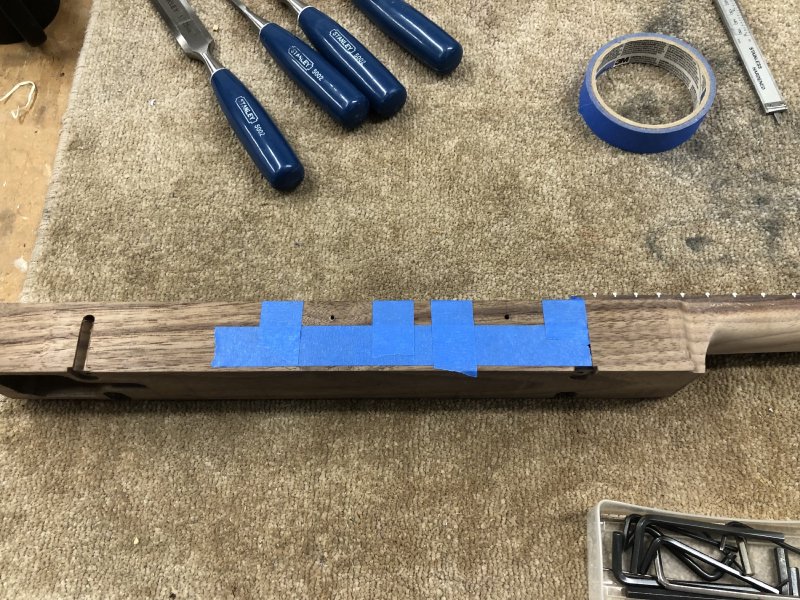
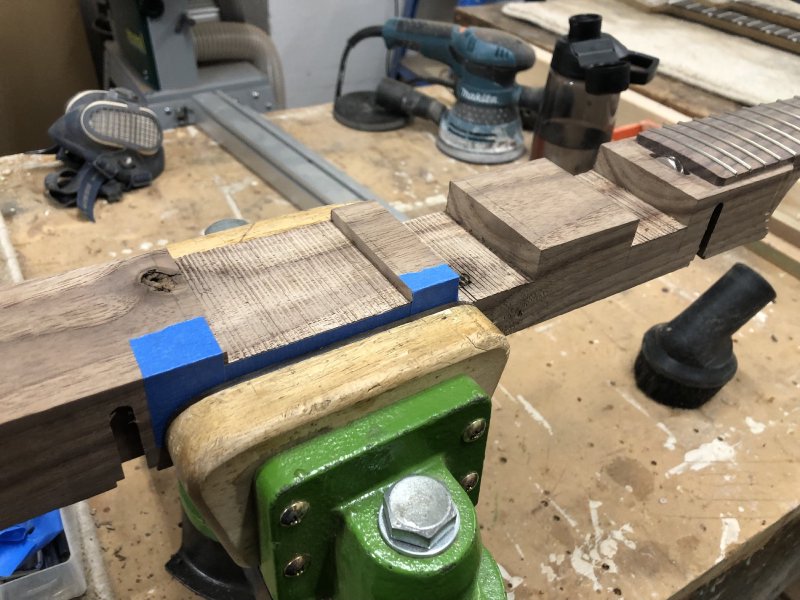
Slowly and steadily I cut all the notches down to my marks. The masking tape here is purely for visibility: it’s a lot easier to see where the tape edge is than it is to see pencil marks on the walnut. A tense few minutes later, and we seem to have made a 3D barcode:

You can see how thin some of these walls are - as I say, a well set up bandsaw can do quite precise work. As before, I then broke the individual blades of wood by hand, and set about with the chisel to make the bottom of the notches relatively flat.
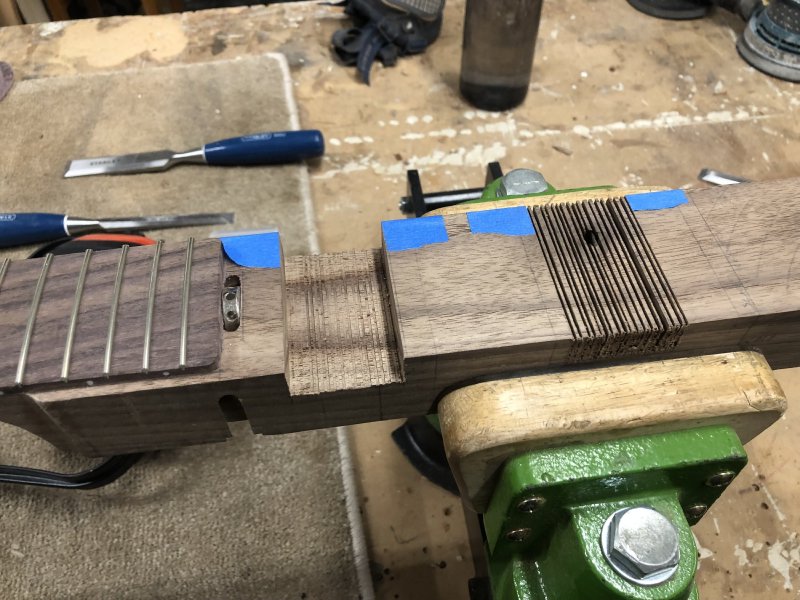
I was on the clock here, and you’ll not see the base of these notches once the pickups are in, so I didn’t bother getting them perfectly flat for now (though I must confess I actually like the aesthetic of the ridged sections, so may leave them that way).
With the pickup cavities done, it was now the turn of the bridge recess. On a normal guitar you’d not recess the bridge, because on a normal guitar the fretboard stands proud of the face of the guitar body, but given this is one piece I don’t have such a step naturally. So another careful five minutes on the bandsaw:

I didn’t have enough hands to take a picture of the cutting process, but I am using the mitre fence here to guide me when I cut. You can’t really use a clamp to fix the guitar body to the fence as you have to shift it along a little for every cut, and it was only afterwards I realised how hard I’d been clutching the guitar when my hand got cramp immediately afterwards; I didn’t really need to be holding that tight, but the idea that one slight slip would leave me with two bits of guitar where there should have been one is a hard one to let go of :)
The shorter blades on the bridge recess didn’t snap out so well, which did lead to a nice New Order cover moment:
A bit of chisel work later and we’re ready to install some hardware:
I did round off the back wall of the bridge recess a little with the spindle-sander, but I didn’t go for the gentle slope you see in the CAD model above, as I was concerned about access to the tuners, and in particular access to the hex bolt on the underside that will adjust the intonation. Thus I went for a more squared off look that I’d originally planned in order to ensure there was more space for making adjustments.
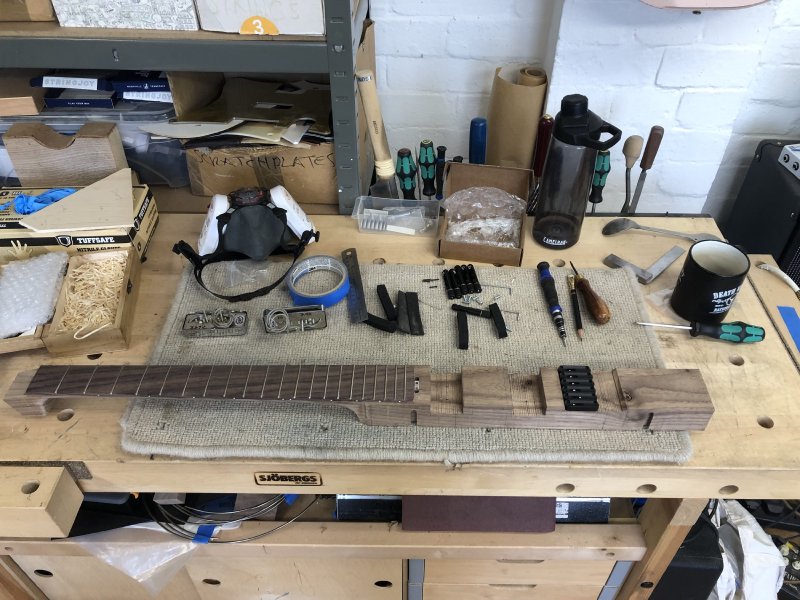
The Mera Guitars Submarine III bridge I’m using here is designed to work for multi-scale instruments, where each string is tuned to a different scale length, and thus you end up needing effectively an individual bridge per string. This means I have to install six individual bridge bases, each of which needs four screws to hold it in place:
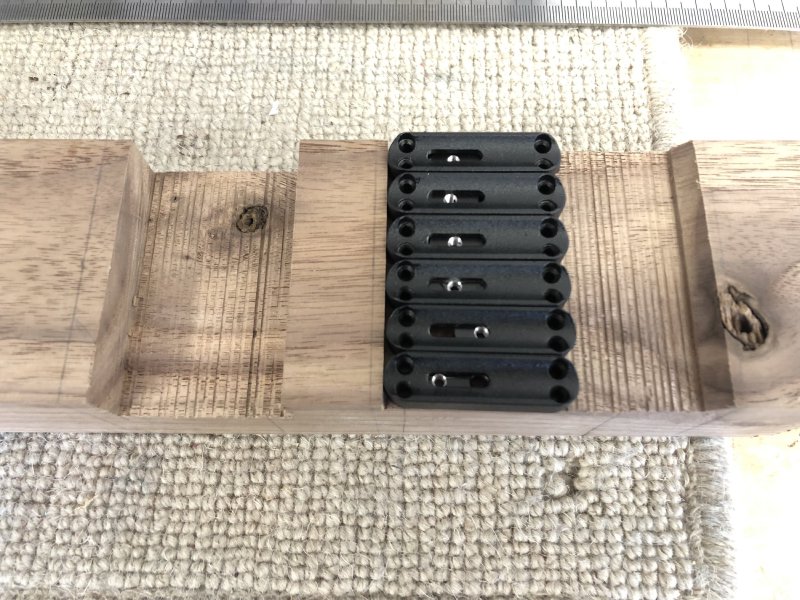
So I had a lot of pilot holes to drill!
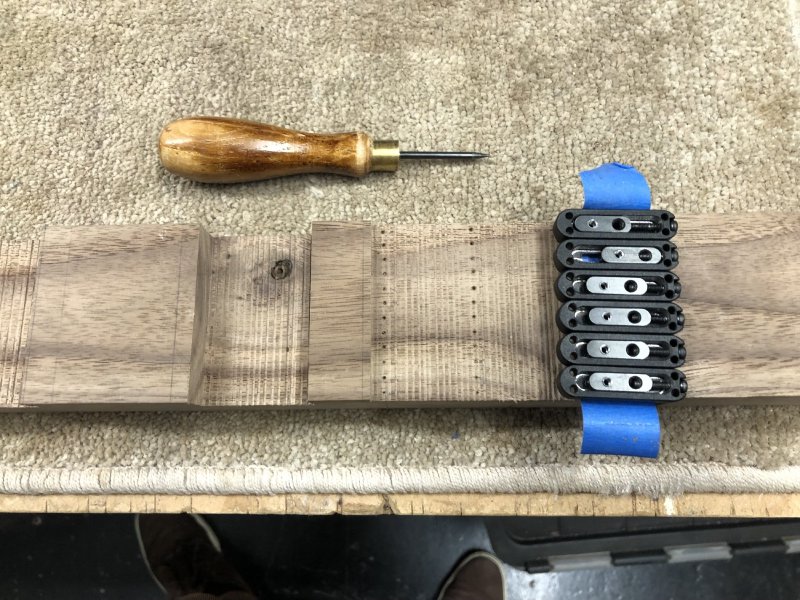
The Mera bridge comes with Philips screws for this job, and normally I swap out such screws for Torx equivalents, as they’re harder to damage, but I couldn’t find any small enough Torx screws of the right length in time, so I had to stick with the Philips screws, and this why I was being paranoid about drilling pilot holes. Thankfully the effort paid off and the bridge bases went on fine, with the Philips screw heads remaining intact.
Unfortunately I then hit a problem re-assembling the bridge: the screws used to attach the top section wouldn’t go back on properly on one of the units. I was worried I’d managed to damage it, or that the unit itself was defective, which this close to the show would have been a disaster. But thankfully it just turned out that the paint on that particularly unit had just dried on a little thick, which was stoping the screw getting through the slot it needed to. A few minutes with a small file and I was good to go again:
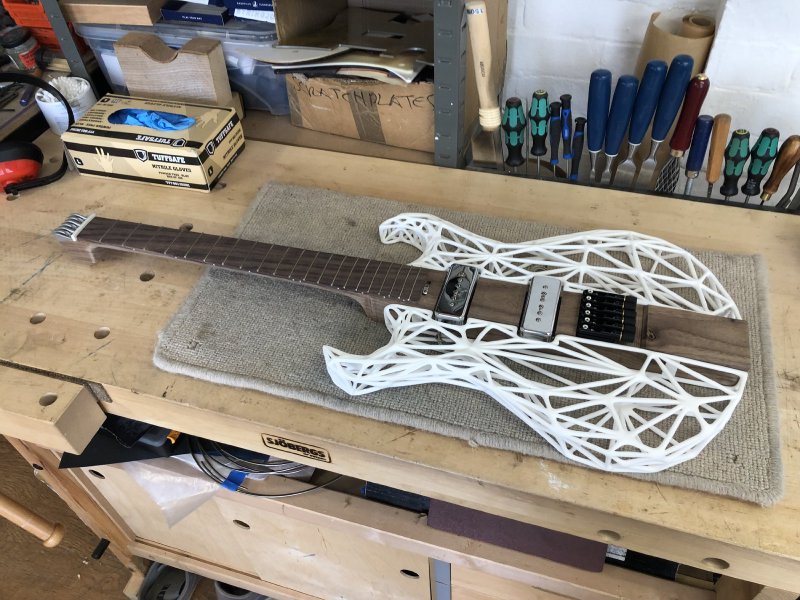
As the afternoon progressed it was nice to see the pile of hardware slowly shift from my workbench and onto the guitar:
The pickups went on with any issues, which then just left the 3D printed headstock:
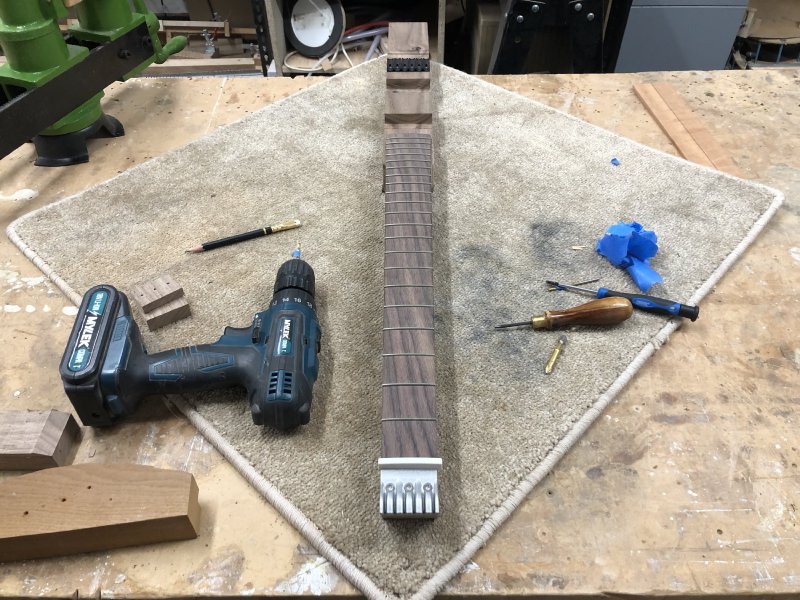
This stage didn’t go as well as I’d hoped for two reasons. Firstly, it was optimistic that by hand I’d be able to get three screws to precisely line up and to do so in a way that the edges of the bridge would be perfectly aligned with the edges of the neck. In the end it’s pretty darn close, but not close enough for my perfectionist side, so in future I’ll need to use a jig of sorts to get those close, and probably leave the headstock slightly oversized such that I can then sand it down to match the bridge perfectly.
The second annoyance was I discover that the edge of the bridge that sits against the nut isn’t perfectly straight, which it should have been. On the plastic test prints I did of the bridge that part was straight, but the aluminium print has a slight bowing, with the middle sticking out further than the two edges. I’m not sure if the sides have shrunk slightly when it cooled, or the middle spread when printing, but it’s visually annoying given it abuts the white nut, leaving an obvious gap (even though the gap is otherwise less than 0.5mm at the edges). I’ll need to reach out to shape ways and see if this is expected, and if so what the best way to proceed is: should I have compensated for this in my 3D model? Is it just that I need to file the part when I get it?
It was a bit frustrating to learn this just as I was hitting against my deadline hour, as there wasn’t much I could do about it. In the end I didn’t have time to even file the nut for width or height, this is where the guitar finished up for the week:
In my head I could hear those fateful works that Robert Llewellyn shouted near the end of each episode of Scrapheap Challenge telling the teams time was up and to put down their tools :)
I have to confess, after a great start to the day, with all the woodworking bits going so well, I ended the day on a downer having lost time to hardware that didn’t behave as I’d expected. I was grateful to workshop-mate Matt for trying to raise my mood as I left the workshop frustrated - a silly mood to be in, as I’d made pretty good progress that day, and certainly Älgen looked more obviously like a guitar now than it had done at the beginning of the day.
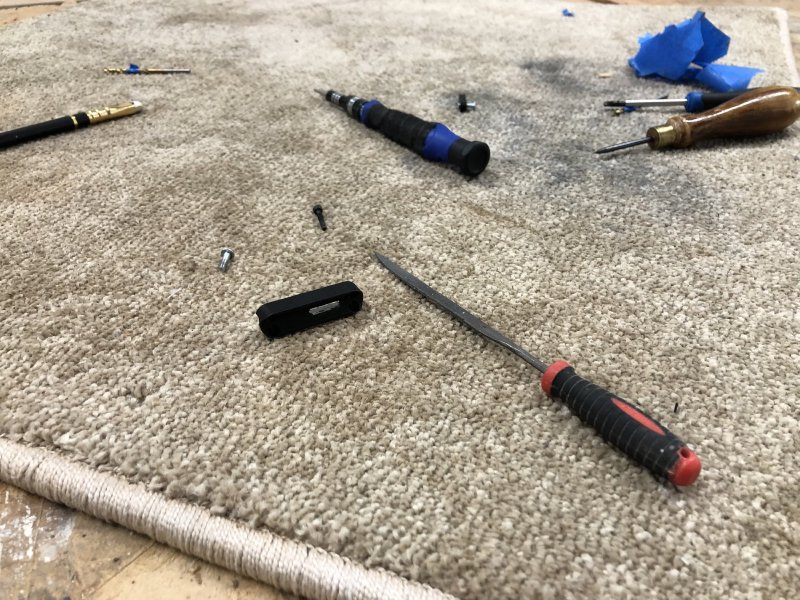
Just to wrap up on the workshop, I mentioned last week that the jack I’d ordered was too big for the electronics cavity, and so I’d needed to order a replacement one that was smaller. That did turn up, and indeed is a much better fit:
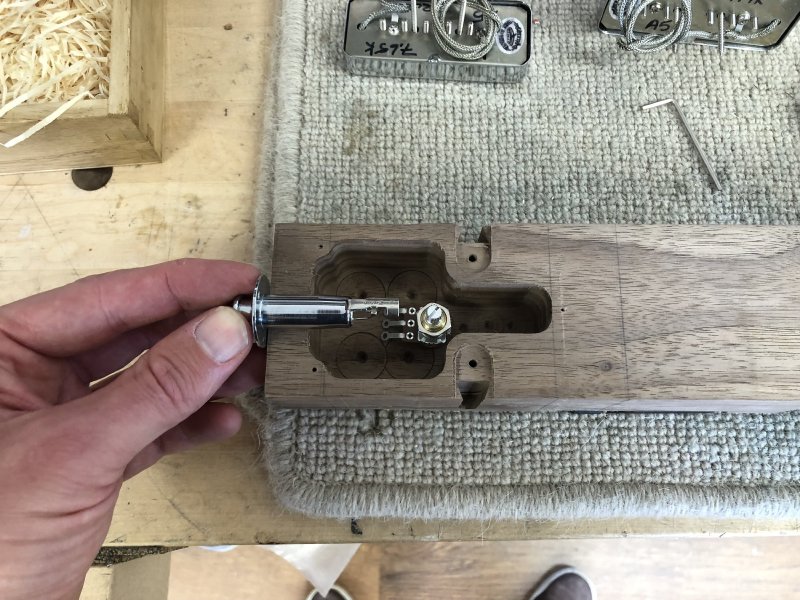
But, as is hopefully obvious, I ran out of time to actually fit it :)
Liverpool Makefest
The next challenge was to work out what I was going to present at Liverpool Makefest. I’d been so wrapped up in trying to get the guitar as closed to finished as I could that I’d not really planned for what I’d present on my table: given it’d be impacted by whether I got the guitar strung up or not, it didn’t feel worth planning too far ahead.
Whereas in the past I’ve tried to emphasise the woodwork in building a guitar, in the end I decided to lean in to the 3D printing side of things this year, and I also made a conscious decision to try keep the stand simple, rather than having a wealth of guitar building bits that I’ve brought in previous years.
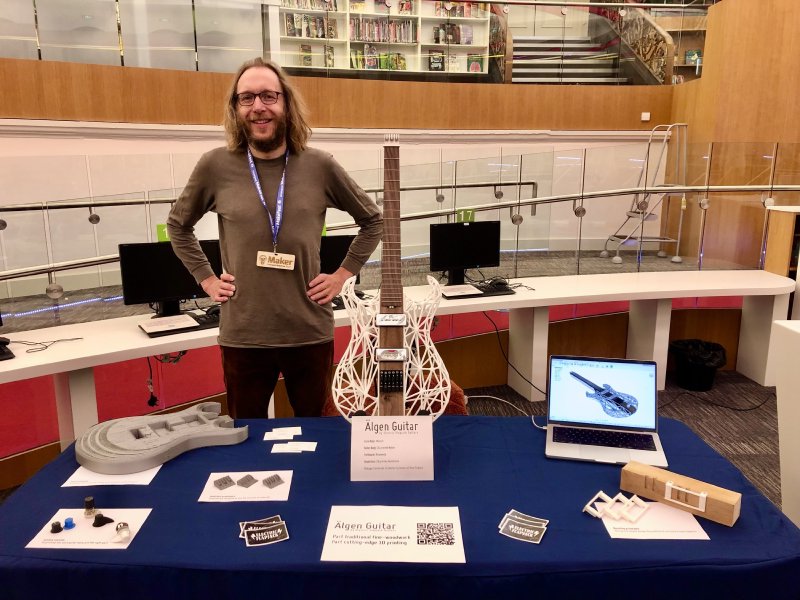
Besides Älgen, I took the full sized guitar body 3D print that Liz Bishop made for me at Warwick University back in 2019 that acted as a key inspiration for this build; it might not be immediately obvious, but the guitar body design on that large print you see on the left of the bench is the same shape as the one on Älgen today, albeit it’s since been processed quite differently. I had my test pieces to try and communicate the 3D print prototyping workflow, and I had the original 3D printed controls I made for my more traditional earlier guitar builds to show that you don’t start with something like Älgen - ideas like this usually have humble beginnings.
Whilst Makefest was definitely a little quieter than it had been in pre-pandemic times, once the doors opened and people started coming in it was pretty non-stop: I was talking guitars, 3D printing, and general music and making to people for about 7 hours straigh. As in prior years, I totally failed to get to see most the other stands in show because we were all so busy.
It was wonderful to be back and engaging with people about making again.
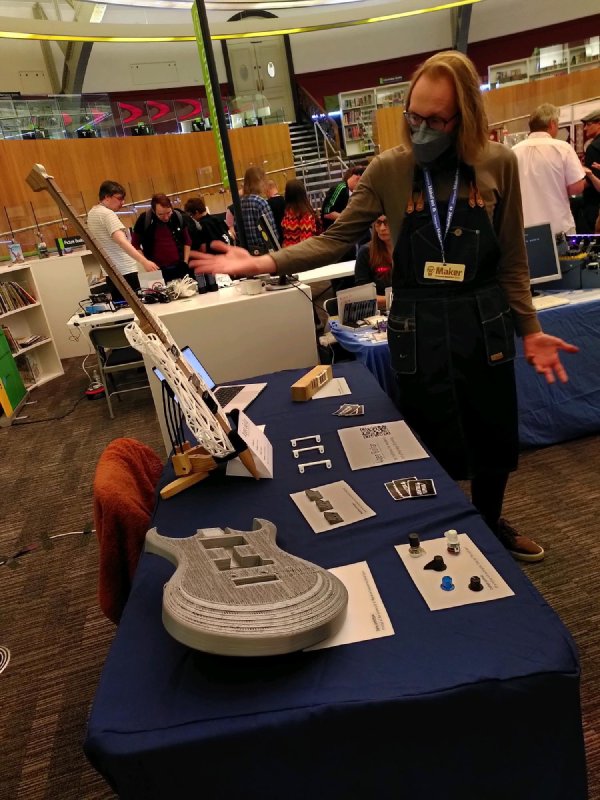
A huge thank you to Denise, Caroline, Mark and the rest of the Liverpool Makespace crew, and to the people of Liverpool who stopped by, it was a great day.
As might be expected, I was a little sad that the guitar was just a prop, and not playable, but I think that didn’t matter really in a show like this which is as much about the process as anything else. It burns me that this isn’t an instrument yet, but for most people viewing it that’s a foregone conclusion, so it didn’t really impact the conversations we had. But I do have a few people to whom I’ve promised to return next year with Älgen so they can put it through its paces.
I was worried that its looks might be a bit marmite, but reaction was pretty universally positive, and that was across all player types. I’d expected it to appear to a rock type guitarist, but I was pleasantly surprised when I had a couple of different classical style guitarists stop by who loved the idea that in terms of weight and feel it was closer to the instruments they played than a regular off the shelf guitar and might be a better route to electrification for them.
The Sunday there was a Maker Brunch at DoES Liverpool, the local maker space, and I went along to catch up with my fellow maker given I’d not managed to do so on the day. It was a nicely quiet and chill morning with friends, as I think we’d all been a bit out of practice at doing events like Makefest, so we all just sat and had a quite cuppa together. But it was nice to know that the experience was similar for all of us: we’d all been kept busy by keen visitors, and overall the event had been a success.
Älgen reflections
One last note from the last few days, which is just how I feel about the guitar now that I’ve lived with it for a few days as a somewhat assembled object. When I left the workshop to head to Liverpool, as I mentioned, I was not in the best moods with the guitar, but having carried it around, sat with it, seen it not as a CAD model, but as an physical object that as depth and personality, I came to realise how excited I am for this instrument. It feels right, in a way that’s hard to articulate. The weight distribution is really nice, it’s almost more like a classical stringed instrument to some degree (from what little I remember of my time playing violin at school), and ergonomically it feels good to hold. As a guitarist I’m really excited to get to play it now - I don’t just want to finish this project so I can start trying to solicit commissions, I’m excited to get to play it and to see others play it.
I’m not good at writing lyrical prose, so the above all sounds a bit flat probably, but it was nice to just have Älgen out the workshop for a few days to convince me that this project is worth all the pain, and knowing that you’re making something that really is going to be more than you expected it to be. I’m going to finish it not out of obligation, but out of excitement. I really do hope that others will feel excited about it too, and the comments from Liverpool Makefest do seem to share that sentiment, but no matter what others will think, I’m really really pleased with how Älgen is growing into a real thing.
So Makefest has come and gone for another year, but I still have good reason to get back into the workshop in the coming weeks as this guitar is going to be really awesome.