A Week in the Shop
Published 8 Aug 2022
Tags: älgen, delfinen, ef1, inlays, setup and repair
A mixed set of activities in the workshop this week, as I worked on three guitars: trying to move one through the last stages of a build, getting another through the early stages, and a final one that’s in for some setup TLC.
Älgen
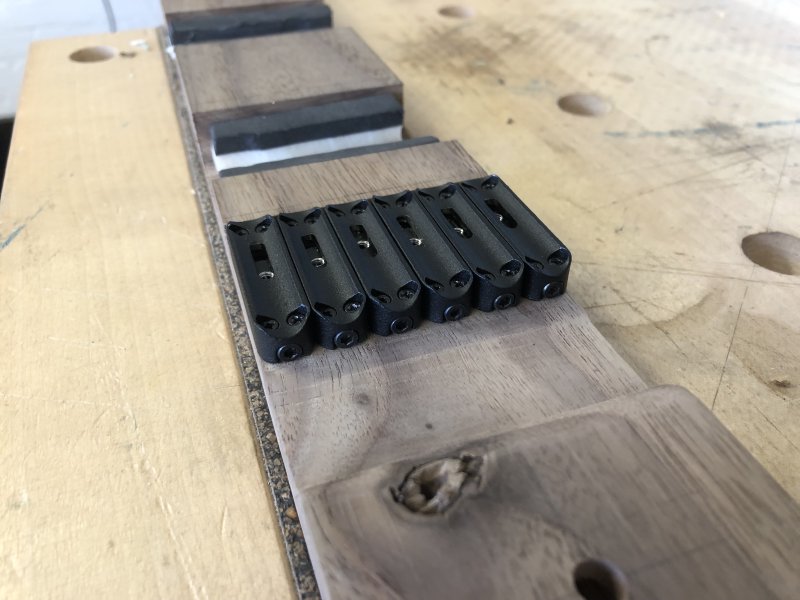
In the previous weeknotes I wrote about how I’d had to lower the bridge recess on Älgen, but hadn’t been able to re-install the bridge because some of the holes for the high-E bridge piece needed plugging and re-drilling due to the holes not being perfectly straight:

I’m embarrassed to admit I had to do this twice: the first time I re-drilled the holes I didn’t first mount all the other five bridge pieces, and messed up the alignment. Thus I had to re-plug them and drill them a second time (if the editor I used to type these notes up let me insert a facepalm emoji here I would have done so). Still, second time I’d learned my lesson and they went on fine:
Unfortunately I hit an issue re-stringing it again. I suspect the issue might be compounded by my trying to re-string the same set of strings I had on before, but I’ve found that I’ve now managed to ruin two D strings, which (at least in most common sets of guitar strings) is the smallest diameter wound string. What seems to happen is that as you tighten up the string the winding is stripped off the string and it becomes un-tunable. I tried to take a picture of this with my phone but focus failed me here: but basically imagine the end of a wound string where the last 5mm is just the inner core.
As I say, it’s perhaps because I was trying to re-use the same string as I used last time, and the original clamping breaks the windings, such that if you don’t get it perfectly aligned then you are clamping behind the damaged section and as the string stretches the damaged winding gives way - that’s a theory, but I’ve no real proof. But it is interesting that it’s happened on both sets of strings I’ve used and both times on the D-string. Not a great endorsement of this kind of method of clamping strings. I don’t think there’s anything particularly wrong with the specific model I’m using, I just feel that it’s the grub clamping that is the problem here - my workshop mates had similar gripes about some locking tuners they’ve used too. As I said last week, it was probably a little naive of me to just assume that “tuners are tuners” and using an entirely new style of tuner didn’t require any practice or thought.
Unfortunately I was out of D-strings at this point, and so Älgen had to go back to waiting again as I wait for more strings. This is not a cheap exercise! I use reasonably good strings on my guitars, and so that I can compare Älgen to guitars I like to play, I’ve been using the same strings, but they’re £12 to £15 a set, and so I suspect until I’ve understood this issue I just need to buy some cheaper strings I can burn through without so much wallet-ache, and then switch back to the nice ones once the problem is licked.
Delfin
So, with Älgen frustrated for another week, I turned my attention to the Delfin, the more conventional guitar new guitar design that I also have on the go. When it last graced my weeknotes I’d just completed the binding on it:

The next stage is to start making making the holes, pockets, and cavities in this body that’ll turn it into a guitar. The first of those is the neck pocket, as that’ll define the position of where the bridge and the pickups go. I marked out the pocket area in pencil first, then removed most of the material with the pillar drill using a forstner bit:

After this, I stuck on my template that I made using the laser-cutter, ready to get the correct shape using a plunge router:

I bit of careful trimming later, I had a nicely defined neck pocket:

What you can’t see from that picture, and I unfortunately failed to get a picture of, was that the binding trimmed nicely too. I was worried that on the left hand side, as you see it in the above picture, the direction of cut might pull the binding away from the wood, but everything held great. The wood did cut a little deeper than the plastic though, so I’ll need to trim the binding to match, but taking away is always easier than adding back.
With the neck pocket cut, for the first time I got to see the Delfin put together in the flesh! Always an exciting moment:

Give that the Delfin model is just a variation on my Corvette build from last year, there weren’t too many surprises, but it was interesting how just a little change can impact how things look.
As a concrete example of that, I placed on the bridge and pickup rings to get a sense of space:

Here I’m using pickup-rings designed for mini-humbucker pickups like I used on the Corvette. However, they felt a bit more lost here and when I swapped them out for regular sized humbucker pickup-rings the proportions felt better, which is kind of the inverse process of what I went through with the Corvette - so it’s definitely the case that a small change can really impact how things hang together.

I’ll not commit either way at this point, but I will at some point spin up Fusion and do a CAD model with some full sized pickups to see if I still like the look there.
With the neck pocket done, I turned my attention to the neck, which I next want to get trimmed so I can measure the nut placement to let me position the bridge, and to check if I’m happy with the neck pocket’s depth. Before I could work on the face of the neck though, it was side-dot time.

Taking a leaf from Älgens book, I figured that rather than try putting the side-dots along the join line betwen the maple and rosewood, as I’d normally do, I’d instead put the dots in just the fretboard wall. The motivation is twofold: firstly getting the dots spot on the line is quite hard, particularly if you have one wood that is softer than the other so the drill bit likes to wonder into the softer wood; and secondly it feels like it’d give me some design consistency between the two guitars - although clearly very different in terms of design, it’d be nice for them to have some linking details.
That said, I’m not sure I was to be doing dots longer term, but I just haven’t had time to come up with a design I like. Workshop-mate Matt, aka Fidelity Guitars, does the nice clay markers that wrap around the edge and so are visible from both the front and the side:

He’s able to do these in part because he uses a CNC-router to get the basic profile of the fretboard cut, at which point he can also machine those inlay shapes. Not using a CNC-router for my fretboards I’m not sure how I’d achieve the same effect, though I do think how I made the fretboard for Älgen would actually have been better done on the CNC-router, asssuming I could make a jig to let me then cut the fret-slots on the table-saw with jig combo we have, so perhaps this’ll be possible if I go that route with more Älgen style builds.
Other brands like Richenbacker do something similar. I also love how Millimetric Guitars do theirs, with a thin veneer that echos the look of a ruler. All great designs, which both look great, but also remove the need to get a drill bit to line up with an edge ten times reliably, and let you have one inlay for both the front and the side. Obviously I don’t want to copy what someone else has done, and with all the emphasis on 3D printing I’ve not had time to think about how I can solve this for myself. Thus I’m doing dots yet again, and just skipping the front side dots.
Anyway, back to the dots. I drilled and filled all ten of them:

I have to say, that I think it was easier getting them to look aligned better when I drilled them along the line. Even though you get some wander, in the side there’s a less obvious reference for drilling, and just the grain pattern makes it look less aligned even when it is.
Still, after trimming all the dots flush with a chisel (an oddly satisfying job) this neck is now ready for radiusing next week.
EF1
It’s been a while since my first guitar build has graced these notes, but I brought it back into the workshop for a bit of a setup and service. I’ve been playing it less of late, preferring to use my other regular guitar, and I think that’s just because that guitar has a lower string action which I’ve come to prefer. Thus I wanted to see if I could get EF1 (a guitar never named, as it was never expected at the time I’d need to distinguish it from other guitars I built) to the same feel.
First up, I measured the relief in the neck, and saw there was a truss-rod adjustment required to take some of that out. Annoyingly this meant removing the neck: I bought unfinished parts for the most part to make EF1, and I naively got a vintage style telecaster neck, where the truss-rod adjustment is done via the neck heel:

There’s a reason they don’t make them like this any more :) Still, at least I have vintage style tuners on this one which makes removing and re-inserting the strings dead easy - vintage style guitar tuners are my favourites by a long way as they’re so easy to use. I’ve no idea why the idea died out.
but even with the truss-rod adjusted, I needed to lower the outer strings some more. I’d already re-cut the nut whilst on The Prepared lunch call earlier in the week:

So now I had to turn my attention to the bridge saddles. Telecaster bridges have quite chonky saddle blocks, and I couldn’t lower them any more than they already had. I could in theory find less-chonky ones, but I decided this was a good opportunity to try filing them, which is something people do and I’d not tried. I always have a fear of working metal things, and it seemed I should try do more to get over that. I think mostly it stems from not knowing which metal will win - metal-on-wood has an obvious outcome, metal-on-metal less so. But a chat to my workshop-mates convinced me that my files would survive this interaction, so I set about first lowering the low-E string:

And then the high-E string:

The one thing you need to be careful of doing here is that you’re moving the intonation point as you do this. That is, as you lower the string’s exit point from the channel you’ve made, the string is now a little bit shorter, which is why (at Matt’s advice) I’ve cut the slot at an angle to try minimise this.
And after a little back and forthing as I look a little off at a time, I got down to having the strings where I think I want them. The proof will be in the playing over the coming weeks!
website
I kinda finished the website revision I started last week. It’s still not perfect, but there’s at least a home page now. I also did something I could never do on Squarespace, which is I’ve finally managed to host the fretboard desgin generator on my own site, rather than having to host it as a static page somewhere else. I still need to add back a contacts page, and a pseudo store page, as I want to try selling the guitars I was holding onto for demos before the pandemic, as I feel Älgen and Delfin will become the new demo guitars that represent me going forward. But still, a little at a time.
And finally
And finally, I figured out what bench vices really are for: giving you extra room to prop your laptop on when you’re checking design measurements but don’t want to clear your bench…

Perhaps that signals it’s time to wrap these notes up :) See you all next notes!