Pushing forward the design of the new guitar
Published 2 Sep 2021
Tags: 3d printing, älgen, dying, fusion 360
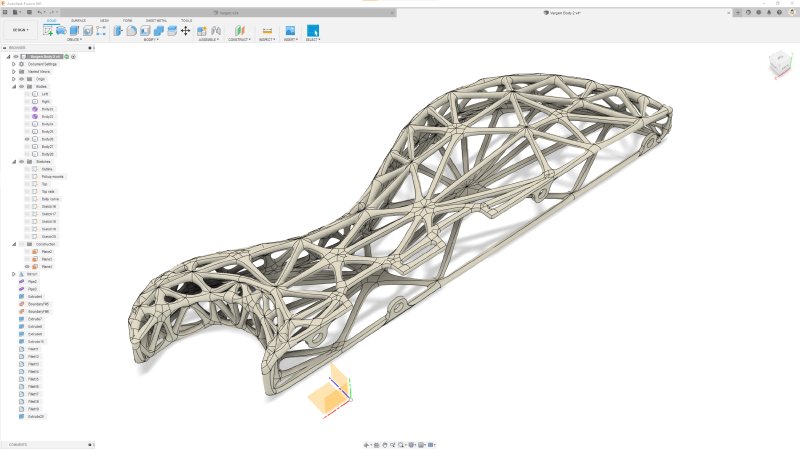
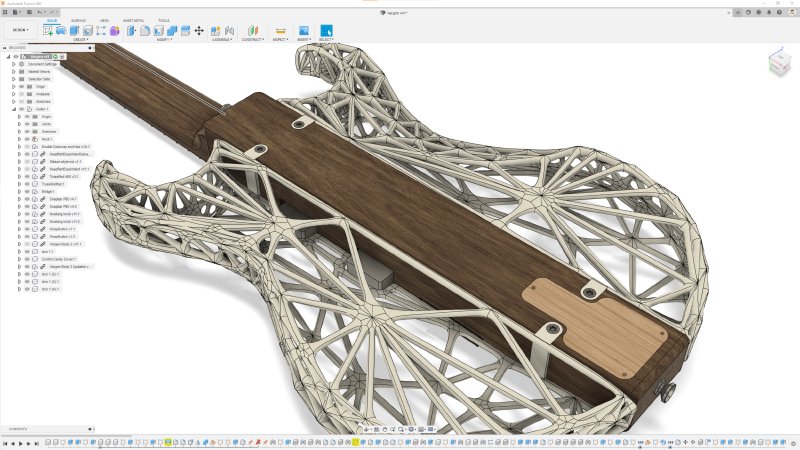
The new guitar design has been sat still for the last while since I last posted about it here, as I focused on other things, but this week I spent some more time on trying to push it towards a position where I was ready to prototype it. Here’s where the current design sits:

Superficially it looks exactly like it did last time I talked about it, but one important step has been made: I now have a plan for how to attach the 3D printed body parts to the wooden core.
Truth be told, I’d procrastinated a little over this stage, as I didn’t really know where to begin, but I finally just sat down and spent some time iterating various ideas between my sketchbook and Fusion 360, and I finally feel I’ve made some progress on this. It is somewhat ironic perhaps that this new design was meant to free me up to spend more time working on building the necks rather than the bodies, but all it’s actually achieved so far is to cause me to spend more time out the workshop as I figure out how to make it.
There’s two normal ways to join things together with a guitar: glue and screws. If I was making a through neck guitar like this with wooden wings, then I’d be using glue. I don’t really want to use glue for this for several reasons: if the 3D printed part is damaged it’d be nice to be able to replace it, or if you wanted to go for a new look later even. Also with through neck guitars you tend to glue before shaping, and I suspect reliably gluing irregular shaped sides like these to line up would be a frustrating experience.
Still, I did consult the wonderfully named and useful This To That website, which lets you pick two materials and then lists the glue you should use to join them together. For sticking wood to plastic it did have a few recommendations, so it’s at least nice to know that there are options out there.
My initial assumption, back when I started out on this design, was that I’d screw the sides on to the main body by adding some loops to the wings like so:
But this approach has a number of problems that became apparent as I went to flesh this idea out further. Firstly, there’s the issue of access to the screws that would go in those loops: there’s no way I can guarantee that I can get a long screwdriver or allen-wrench in to the right place given how I randomly generate the meshes.
I also need to worry about aligning both sides together - I don’t want a wonky looking guitar - so I thought perhaps I’d need to use a bolt that runs through the body to either side, and that presents problems given where I plan to put the electronics in a cavity in the tail of the wooden core, as I’d need to run a bolt through it, which would be annoying and raise questions about the wall strength of the hollowed out section.
Then there was an additional frustration, which I’ve mentioned in the past with the way I generate the 3D model meshes, in that I can’t reliably get Fusion 360 to let me join regular geometries (like these loops) to points on the generated mesh where the strangs strands join together. Sometimes it works, some times it does not, and so even generating the above model was driven by trying to work out where on the two halves I could place the mount points such that Fusion was happy (awkward because I don’t want the two sides to just be a mirror of each other, I want the mesh layout to be different on each side).
So, whilst this was the most obvious way to attach things, the growing list of negatives made me look for an alternative approach.
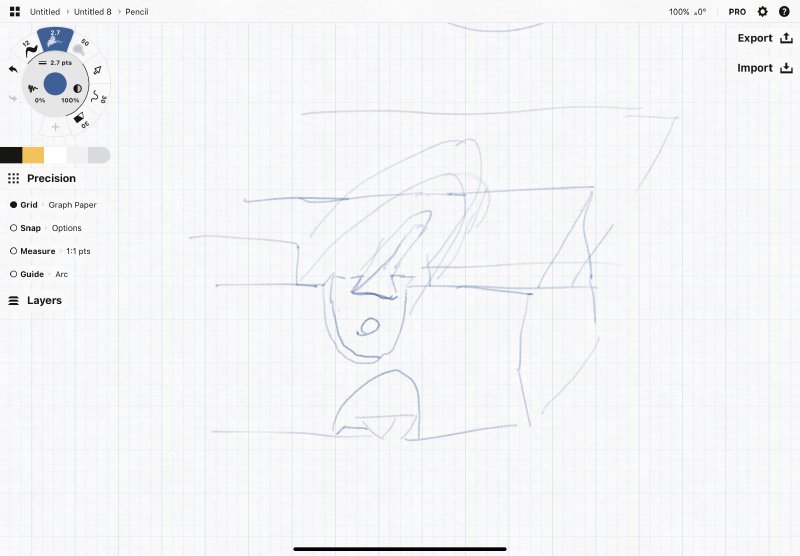
My current proposed strategy is to try using the other way you see woodworkers joining wood together: with a dovetail joint. This was my initial sketch for how I saw this working:
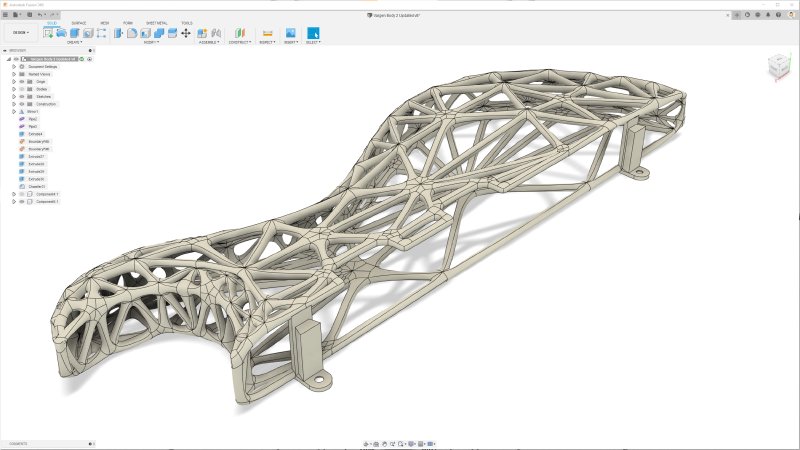
The plan is to use a router to cut dovetail slots into the side of the body, and on the 3D printed part have the inverse protrusion to let me slot it in place. There’s then a plate on the bottom of that 3D printed protrusion that let’s me screw it in place. So, the 3D printed part would look like this:
And then in the body I’ll use a hand router with multiple templates to cut the channels (I switched to colour cycling mode in Fusion to make the cuts more obvious):
With then the final assembly being held in place by some screws from the back:
As with all approaches, this one has a mix of upsides and downsides. It removes the awkward need to get tools into the mesh body, which I think is a big win. It also should result in a more rigid 3D printed part with the posts going between the front and back sides. I’ve no idea until I print this to scale whether it’ll be rigid enough anyway, but I suspect this will be a good addition based on the little flex there is on my previous Nylon 12 prints. I’ve also no idea if two posts will be enough for the same reason, but I can start here and add more if necessary.
Visually the posts are a little bit annoying, but no matter what I do to join the 3D printed parts to the wooden core it’s going to add clutter to the unfeasible initial design where they were held in place by wishful thinking. This design does however keep the front face of the guitar free of any mounting details, which I like.
The channels that I’ll need to cut in the body still get in the way a bit with the electronics cavity, but in a less annoying way. I suspect cutting the channels, along with the space for the screw plate, will be annoying, but I have to assume not impossibly so, as people have been making dovetail joints for a long time that require precise location.
Speaking of tolerances, that’s my other unknown about this: how much offset I’ll need to leave when 3D printing to get a snug but not impossible to move fit between the two parts. I suspect this is my next task: get a dovetail router bit and 3D print a series of test joints, each with a slightly different offset and see how well I can interface them.
Actually finding a suitable router bit was the first problem I had to deal with when I had the idea to do this approach, as the initial set of dovetail router bits I found were quite chonky. I found a series of much smaller ones aimed at metal work, but when I enquired on The Prepared slack if I’d get away with those, Jeffrey McGrew kindly explained why they wouldn’t work, and found some smaller wood appropriate ones for me from Amana Tools. Since then I’ve found that Trend actually do some smallish ones too, which is handy for me as I’m based in the UK, but if you’re looking to do similar and in the US then I’d suggest checking out the Amana ones.
The other thing about the router bits I’ll need to factor in is that most of the smaller ones do not have a guide bearing, so I’ll probably need to switch to using a guide bushing on the router instead, not something I’ve actually used before. Something I’ll need to factor in when designing the templates for all the
So, whilst it feels like I’ve made progress, I still have a bunch of de-risking to do still, but at least I have an obvious direction of travel now. Tasks on my todo list are:
- Pick a router bit so I have a specific size I know I’m going to use.
- Design and order some 3D printed parts with different offsets to do test fits into the dovetail cavity.
- Design the templates that’ll actually let me route this weird arrangement.
Still, I do feel now confident enough this is going to happen that I’ve ordered the wood to make two prototypes!
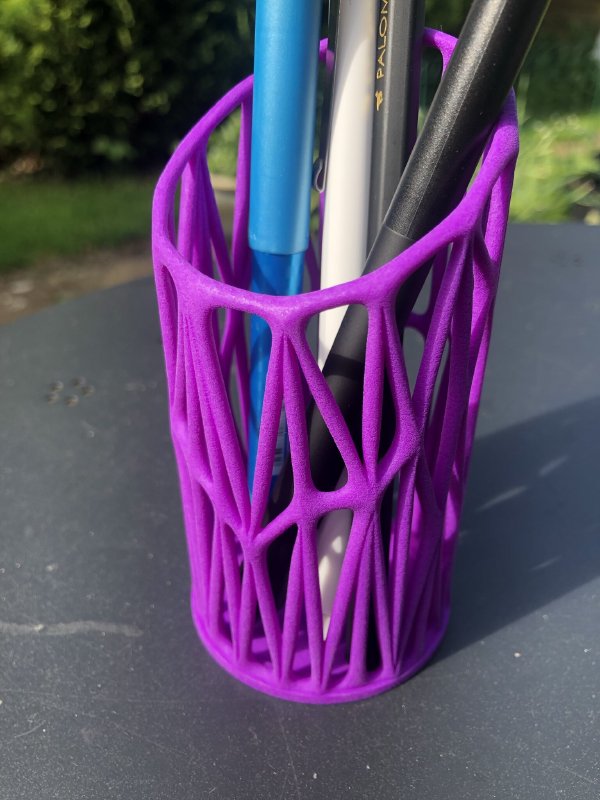
The other question that’s been on my mind is how to colour the sides. When I did my prototype pencil holder from Shapeways I was delighted to find that they would 3D print Nylon-12 in a variety of colours, including this nice purple:
But since then I’ve discovered that they can only do this up to a certain volume of print size, and for the guitar body parts I intend to print they can only ship the unfinished white colour. As a short term work around for that I switched my design to use a darker wood for the core to contrast with the white print, but longer term I’d still like to think I could offer this in different colours.
Thankfully, the maker community has really helped me out here, for which I’m most grateful.
I mentioned in a post here a few weeks that Adan Akerman had pointed out to me people often dyed Nylon 3D printed parts, and in response to that post, on my recent visit to DoES Liverpool maker-space, Adrian McEwan kindly donated to me a bunch of old white Nylon-12 3D prints that he no longer needed to let me test that out. However, he also had some examples of dyed 3D prints he’d received where the finish wasn’t that good, certainly not up the bar set by my initial Shapeways experience:

To be fair to the manufacturer of this particular part, I gather this particular print was rushed to meet a deadline, but still, it shows that it’s a process that can go wrong, and thus I was a little concerned about the kind of finish I could expect to get. Whilst Shapeways do have some notes on dyeing, the instructions are not very detailed and so I wasn’t sure how best to proceed.
However, this last week I was blessed with the good fortune to be in the presence of people who had experience on this topic. Both Cassie Lowell and Hillary Predko responded to my plea on The Prepared slack for guidance about what dyes I should be using. Both reported success using Rit dyes, and thankfully those are readily available in the UK, so I’ve ordered in a few different colours to try:
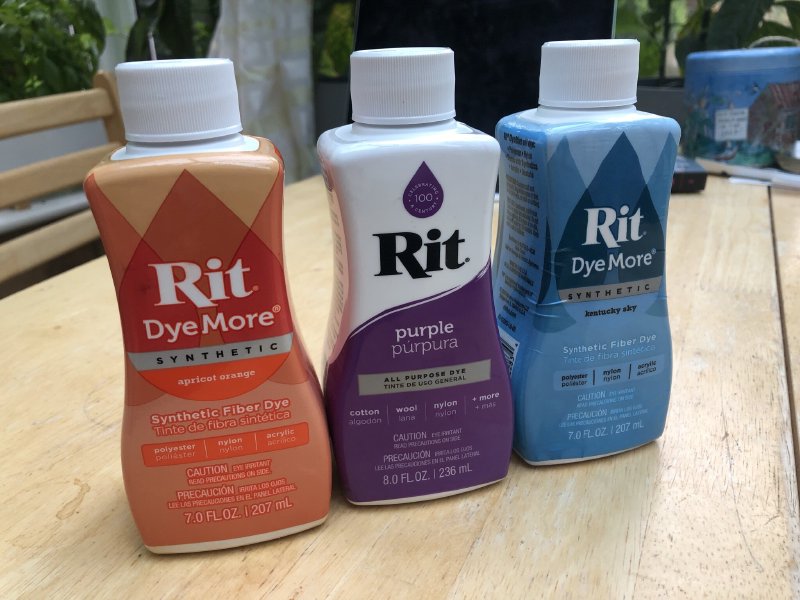
Rit dyes are fabric dyes, but both the regular and synthetic versions do list Nylon as a thing they’re applicable for. To hedge my bets I got some of each, I got a few colours to see if any worked better than others. If nothing else, at the end of this I will be making some tie-dye t-shirts :)
Cassie and Hillary’s advice wasn’t just limited to a brand of dye to use. Cassie had actually done a bunch of testing of dying Nylon 12 in the past, and sent on her notes about how dying time impacts the colour to help get me started. The Rit dies recommend 30 minutes (constantly stirring, which I’m not looking forward to), but Cassie’s notes imply that most of the colour will come after a few minutes, with longer stints getting you a deeper tone, so it’ll be interesting to see how that works for lighter prints (Cassie was using a print that was initially grey rather than white).
They also cautioned that, given the dye needs to be applied in a pan of heated water, that I really should not be using a pan that I intend to cook with again, so my one remaining task before I can start making a mess, is to get to a charity shop and pick up a pan that I can dedicate to the purpose.
All of which is yet another example of why maker communities are wonderful things, as they’re full of knowledgeable people happy to share what they know! Hopefully I’ll be able to share back the results of my dyeing experiemnts in the near future!
I have to confess, that I’d naively assumed that my original purple print was made using purple material, rather than printed white then dyed (though if you read through Shapeways’ documentation they do say that, I’d just missed it). This gives me some concern that no matter how I get to a coloured print, there is a question of how it’ll wear over time: if the guitar is rubbing up against denim or other tough fibres when being played will it wear through the dye? Will the dye stain the player’s clothes? There’s a whole lot of questions here.
I guess the one thing in my favour here is that guitarists in general seem to like it when their instruments show signs on being played - that natural patina that signals how much much you’ve being playing over the years, so perhaps even if it fades people will actually like that, depending on how quickly it happens.