Updates on my Älgen guitar design
Published 4 Oct 2021
Tags: 3d printing, älgen, dying, jigs, nylon, templates
It’s been a little while since I talked about the new guitar design: it’s slowly been bubbling away, as I find time between moments in the workshop to move it forward. It’s definitely in the research phase of R&D right now, so don your lab coat and lets go take a look in the lab…
So far, I’ve mostly been showing you CAD pictures, but it all got a little bit more real recently when some wood destined for the first prototypes turned up at the workshop
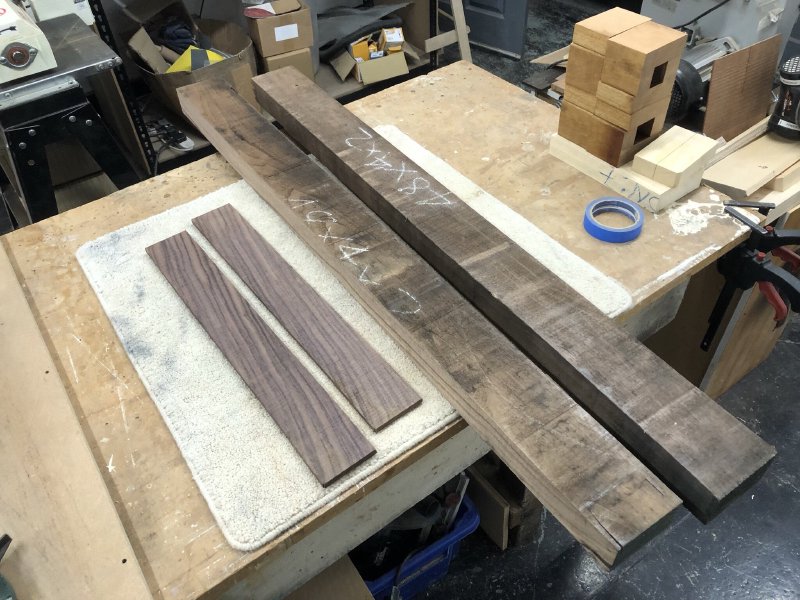
Here we have two blocks of walnut for the main body parts, and some rosewood for the fretboards. At the moment I only have enough hardware to make one full prototype, but given the postage on the wood I thought I should just assume I’ll get at least one wrong and buy enough for a second go :) And if all works out well, then I can get straight into the next one!
The walnut I picked after chatting to workshop-mate Jamie, who’s done quite a bit studying sustainable woods, which is something he takes quite seriously for his acoustic guitars. Walnut seems to be a good compromise as to a native wood for the UK that is both sustainably grown, but still has good physical properties needed for guitar necks around strength and long term stability. Jamie showed me a couple of the necks he’s made using walnut, and they looked beautiful in how the finished product turned out, so I hope I’m onto a good thing here in terms of sustainability of my instruments.
Last time I talked about the new guitar design, I mentioned that I’d bought some dyes to try out as a way to colour the body parts.

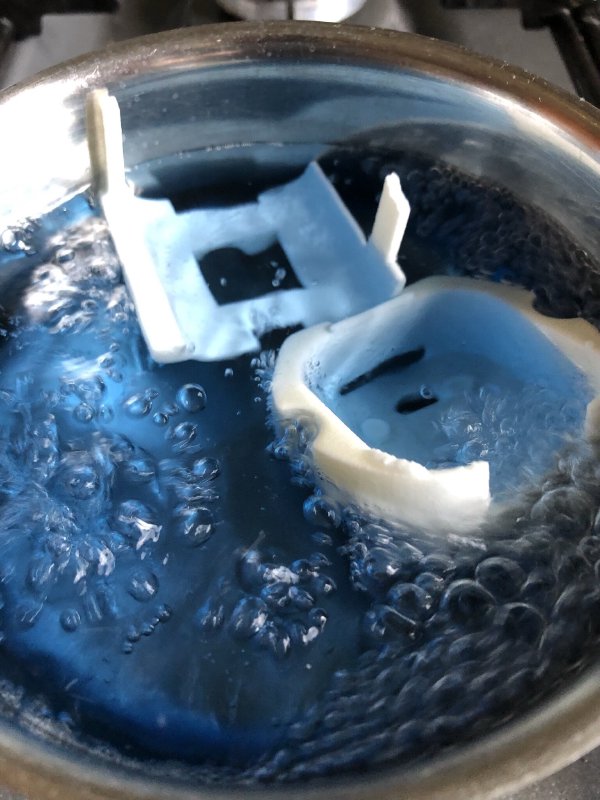
Although Shapeways will print their Nylon 12 material (which they refer to as Versitile Plastic) in colour, they only offer that up to a certain size, after which white is the only option. However, I’d like to be able to offer the guitars in different colours, so as discussed last time, I was encourage to try dying Nylon 12 myself. To this end, armed with a set of dyes, some cast-off Nylon 12 prints donated to me by Adrian McEwan up at DoES Liverpool, and a small sauce-pan I got from a charity shop, I went about dying some 3D prints in my kitchen:
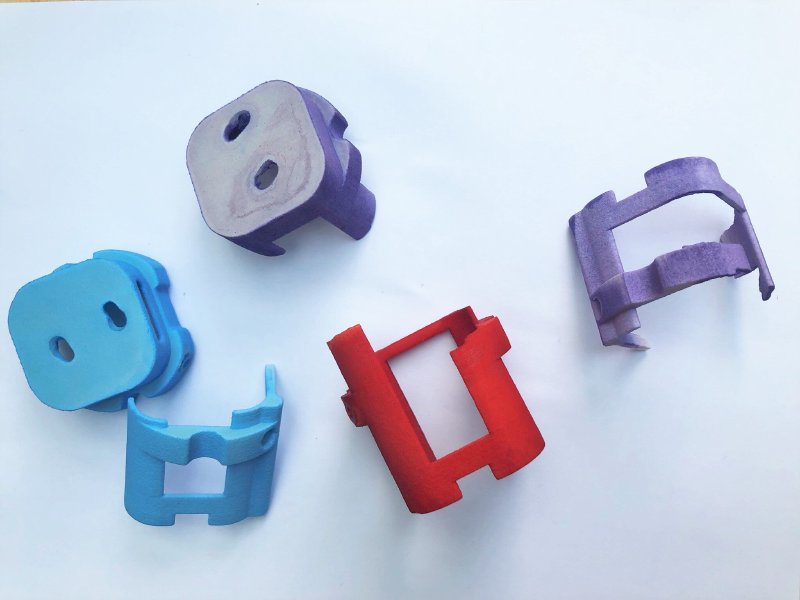
After a bunch of hubble and bubble, without much toil or trouble, I had some formerly white prints that were now nicely colourful:
In terms of process, I did pretty much what it says on the instructions: I got the pan of water to boiling, I added a small amount of the dye as per their recommended proportions, and then aimed to leave things in for 30 minutes (as we’ll discuss below, I ended up using different times for different dyes). The instructions do say for fabric dying to keep stirring constantly (for 30 minutes!?!), but for these prints I just let them bobble about on their own, occasionally topping up the water as it boiled off (top tip: I should have got a pan with a lid :).
Let me try and break down the main points I took away from this experiment. In no particular order, they are: the impact of the printing process on dying, the synthetics vs non-synthetic dies, and the speed of dying.
The 3D prints I was experimenting with were designed to be internal parts for an air quality monitor. This means that they were not specified as needing to have a high quality finish (and also were printed by a different 3D print house from the one I’m using). When I compare them to the Nylon 12 prints I’ve got from Shapeways the quality is notably rougher, which is to be expected, as I paid extra to have a better finish as would befit a product like a guitar body, but would be an unnecessary expense for an internal part like these were. The other thing to note about these more corse 3D prints is that they have an obvious layering to them, somewhat like I’d expect on a traditional extrusion print from something like an Ultimaker: there is a flatter face on two opposite sides, and then the other sides have ridges where you can see the print being built up a layer at a time.
Why does this matter? Well, if you look at the picture of the coloured prints, you can see that on the blue and purple prints the large flat face with the two holes in it absorbed much less of the colour than the sides. And it’s not just those faces, any face that was in the plane of printing absorbed less dye. I’m not a material scientist, so I’ve no real idea why this might be, other than to note that the other faces where you can see the layers being built up are much rougher, so I guess have a both a greater surface area for absorption and lots of texture for the dye to attached to, whereas the faces in the printing plane are much smoother so are perhaps more densely packed and smoother. As I say, I’m not sure what the root cause really is, but it’s definitely something to be aware of if your prints have different textures on different faces: it may well impact dye absorption.
One additional thing I will note though: although I just let them bobble about in the pan, the finish is reasonably consistent across all three parts on those rougher sides. So whilst the disparity between the faces is not something I’d be happy to ship, within a particular texture type the results are consistent enough that I’d be happy to ship them. This is promising as the prints I’ve had from Shapeways so far have had a uniform texture on all sides.
Next up, if we compare the Rit synthetic specific vs non-synthetic specific dyes, despite both listing Nylon as a fabric they worked with, the synthetic dye worked much better. The photo above doesn’t really pick out the colours well, as my phone tried to make things brigher and more vibrant, but the prints that I put in the purple dye came out much more pale than the others, even after an additional 15 minutes in the pan. If you want a pale tone, then they certainly do work, but in you want something more punchy then I’d stick to the synthetics.
At the other end of the spectrum though was the orange dye! Whereas I left the “Kentucky Sky” blue part in for the recommended time, the “Apricot Orange” dye had turned the part orange after just a minute or so. In the end I left it in for 15 minutes, and I think if you asked most people what colour the part is now, they’d say it’s red! It’s definitely not what I’d think of as Apricot (though, to be fair, I’ve never been to Kentucky, so I can’t really comment on what colour the sky is there). But this does show that you’ll need to test your particular dye to see how well it is absorbed and how quickly.
So, not a bad set of learnings for an afternoon nipping in and out of the kitchen :)
The main thing I think I need to do now is try this with some white parts printed using the same printing technique that I intend to use on the finished product, given how much the surface finish appears to impact the take-up of colour. As discussed below, I’ve ordered a bunch of test prints in Nylon 12 on order for other reasons, but I have specified them with the same finish as I plan to use for real, so we can see how that fairs in the dye test.
But overall, I’m happy that this shows promise, so many thanks to those who helped encourage me down this path and helped make it happen by supplying test parts or information.
One thing that I spent a while putting off refining the ideas I had on how to mount the 3D printed wings to the body: I hit a sort of “analysis paralysis” where I had gone from not having any idea how I’d do it, to having too many competing ones. I got some really good feedback on my dovetail joint proposal, and some good alternative suggestions (hat tip to Graeme Durant in particular), but I think to try and get me moving forward again the best thing was just to commit to the current plan and move it forward until it I need to actually change it because it doesn’t work.
So, to that end, I’ve been making a smaller test version of the joint I want to use to let me get to that point sooner.
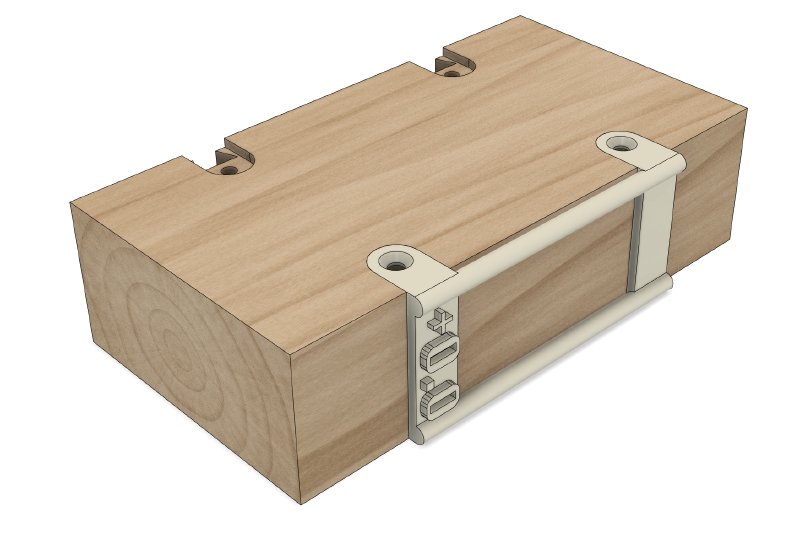
So, here is the “body” of the guitar, made shorter; the depth is the same, but the spacing between the two mount posts I’ve made shorter just to make 3D printing the test parts cheaper.
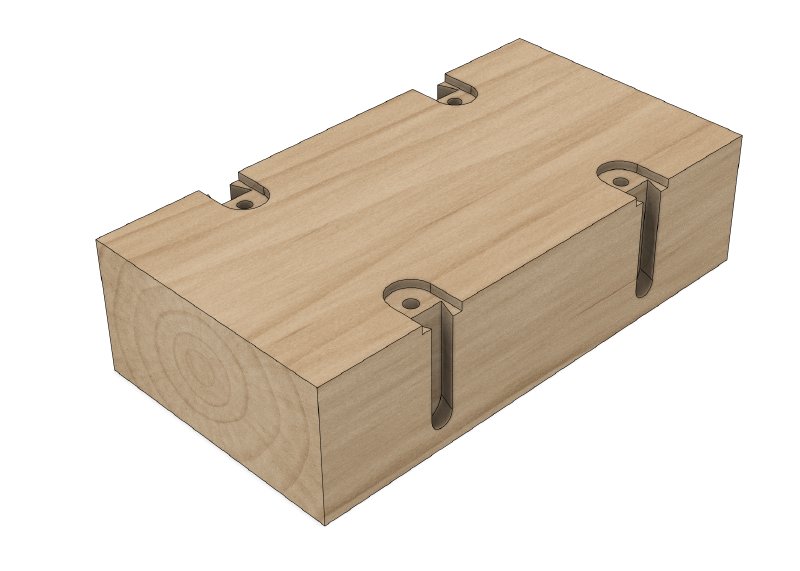
You can compare this to the pictures in the last post here to see how it relates to my plan for the full guitar.
The body wings I’m then printing test versions that just have the two posts joined by a pair of bars that match the diameter and offset of the bars in the proposed full body:
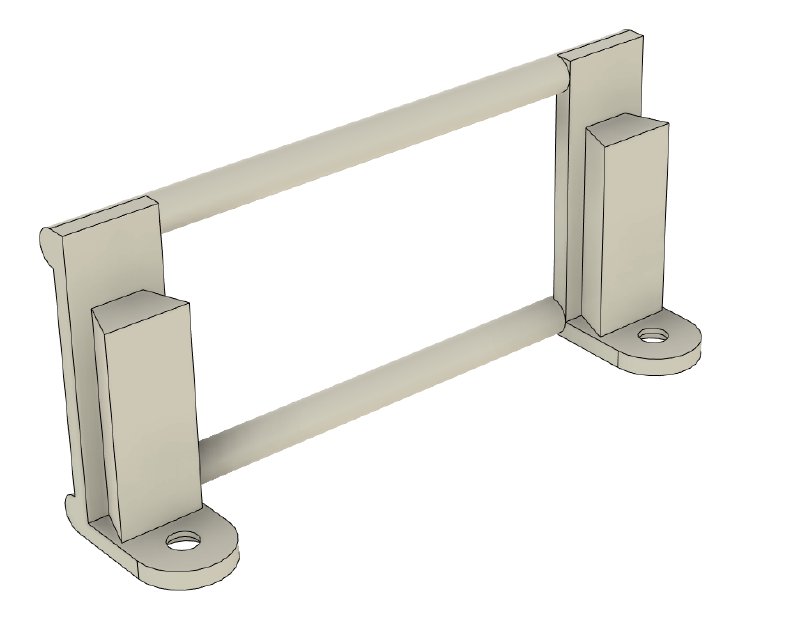
You can clearly see the dovetail edge that will go into the slot on the body, and the plate at the top where a screw will anchor everything in place.
Mated together they should just look like this (I’ll explain the numbers on the printed part shortly):
I have three main concerns I want to put to the test: how accurately can I make the slots and plate recesses match up together, given they’ll need to be machined from two sides (I plan to use a hand-router for this)? How accurately can I get the two slots in the wood spaced, given on the 3D printed part I will not be able to adjust the post spacing? And finally how well will the 3D printed dovetail edge match up to my routed dovetail slot given the tolerance of my router bit and the tolerance of the print itself?
To tackle the first two, I realised that I need to make a single jig that works in two planes. It’s a simple observation, but one that took me an embarrassingly long time to realise given that all my previous router templates just worked on a single plane.
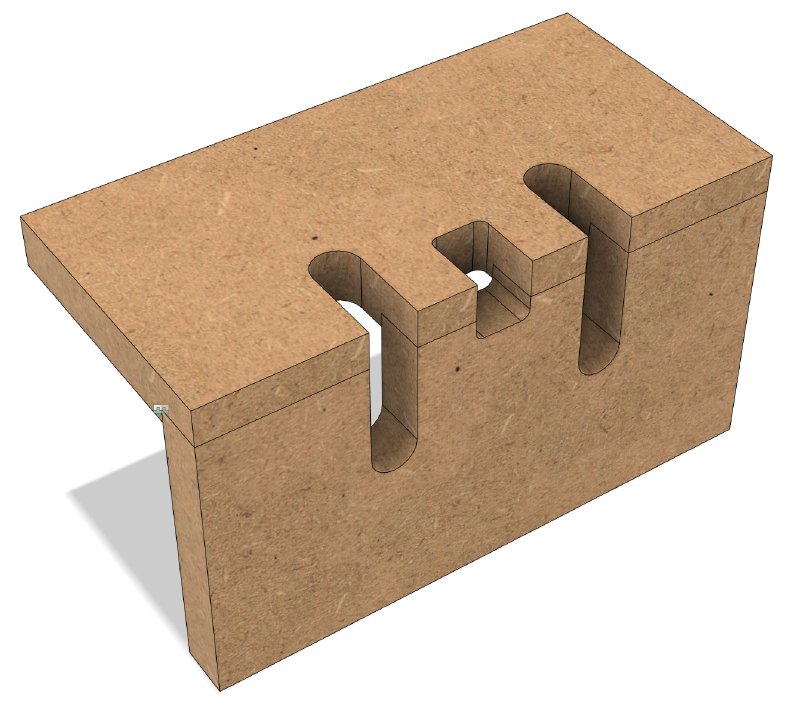
The idea is that I’ll use a hand-router with a collar on it, and use two router bits that don’t have bearings on them. Whilst it’s not a requirement that both are done this way, having both sides use the same collar diameter should make lining up the two parts of the jig easier to make when I glue them. So I’ll be using a single motion with a dovetail bit in one axis, and a single motion with a 1" wide bit in the other.
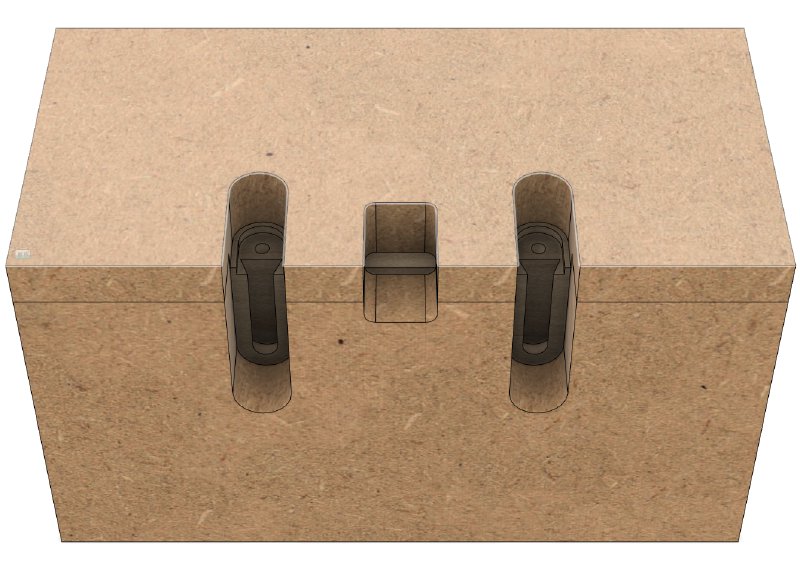
The extra notch in the middle is there as a depth gauge for each side to helt me set the height of the router bit. I’m sceptical as to how well this gauge will work in practice, but I guess that’s the point of prototyping :) I certainly I think for this I’m going to want a hand-router with a fine tune dial on it, to which end I’ve been eyeing up one of the smaller Triton routers, as the one I currently have access to lack even a working depth gauge, let alone a fine tuned one.
As for the 3D printed test parts, I’m curious to know how accurate the printing process is versus the accuracy of the dovetail router bit I’ve got. Given it’s not easy to modify the 3D printed part, I’ve done a test run where I’ve adjusted the print dovetail wedge thickness by half a millimetre in different directions:
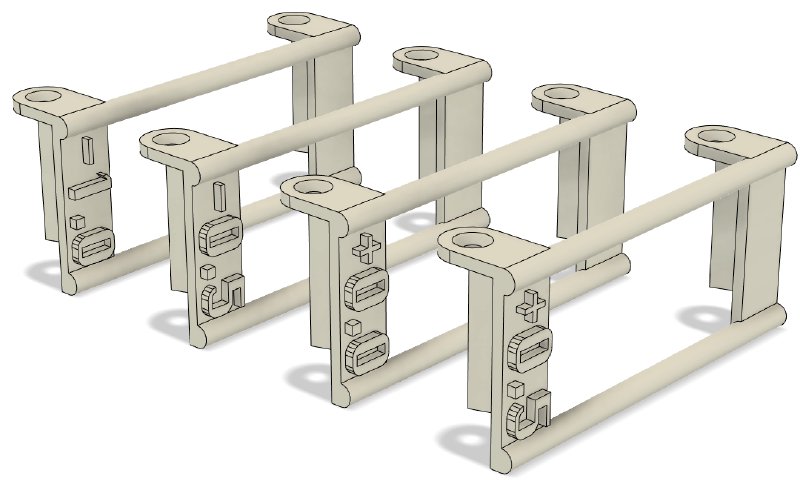
That’s what the numbers are: an offset from the nominally “correct” values for my router bit. Each print will have two dovetail edges, so I can check them for consistency with themselves too. This also gives me a series of test prints in the correct finish I expect that I can use for a stage two dying experiment - two experiments for the price of one!
These are now being processed by Shapeways, so I have a couple of weeks to get the jig make ready for testing!
So that’s it, other than perhaps admit to the working name for the guitar, as I’m fed up of not having a name for it in the blog.
The working title for the guitar is Älgen, which is Swedish for “The Moose” (one of my lockdown pass times that I’m still doing is learning Swedish). The 3D printed body has a bit of an antler vibe to it, and to the English speaker the Swedish pronunciation sounds like “alien” which also seems appropriate for such an unusual looking guitar.
But then I’m terrible at naming things, so perhaps it’ll change over time :) If you have any other suggestions then let me know!