A Week in the Shop
Published 19 Feb 2023
Tags: 3d printing, älgen, bhm, delfinen, fretwork, memphis minnie
A short weeknotes this week, as workshop time was spent doing what is the slow and patient part of a guitar build, and the rest of the time was spent interating on 3D-print work.
Memphis Minnie
The last two weeknotes I’ve opened with two black guitarists that I knew about already, but this week I wanted to push into guitar history a bit more and discover someone who I should know about bit didn’t - I feel the spirit of black history month should be more about me learning new things rather just highlighting people I’m already familiar with.
I’m embarrassed to say I didn’t know of Memphis Minnie, despite the fact that one of my favourite Led Zepplin tracks, When The Levee Breaks, was written and recorded by Minnie forty-two years before the Zepplin version (and Minnie’s name appears on the writing credits of the Zepplin version). Here’s the original, with Lizzie on guitar and her then husband Kansas Joe on vocals:
The guitar track is very different to the Zepplin version, but the lyrics are instantly recognisable to any Zepplin fan. The guitar work is very good, just a different style to Zepplin, but she was clearly a talented played. She could also sing quite well, as you can hear on this rendition of Hoodoo Lady Blues:
Both in this song and the next one her singing reminds me a little of Warren Zevon’s delivery in the Hindu Love Gods - very different sounds overall, but there’s something about the delivery that reminded me of that. This of course highlights one of the problems of listening to the ground breaking artists like Minnie, or Sister Rosetta Tharpe, which is they sound like things that have been since copied endlessly, and so they’re familiar, even perhaps dull, to our ears, but these are the the people who made that sound. I must confess I was late getting into Led Zepplin for similar reasons. But clearly Memphis Mini was setting the tone, as we can hear here on her song “If you see my rooster”:
This is a clear precursor to the song Little Red Rooster, a record more associated with Willie Dixon, and later covered by Howlin’ Wolf and the Rolling Stones. In a genre that is dominated by male figures in its history, I’m glad I discovered her now. There’s a few compilation albums of her work out there, so as ever I encourage you to give her work a bit of your time, particularly if you’re a blues fan.
Delfin
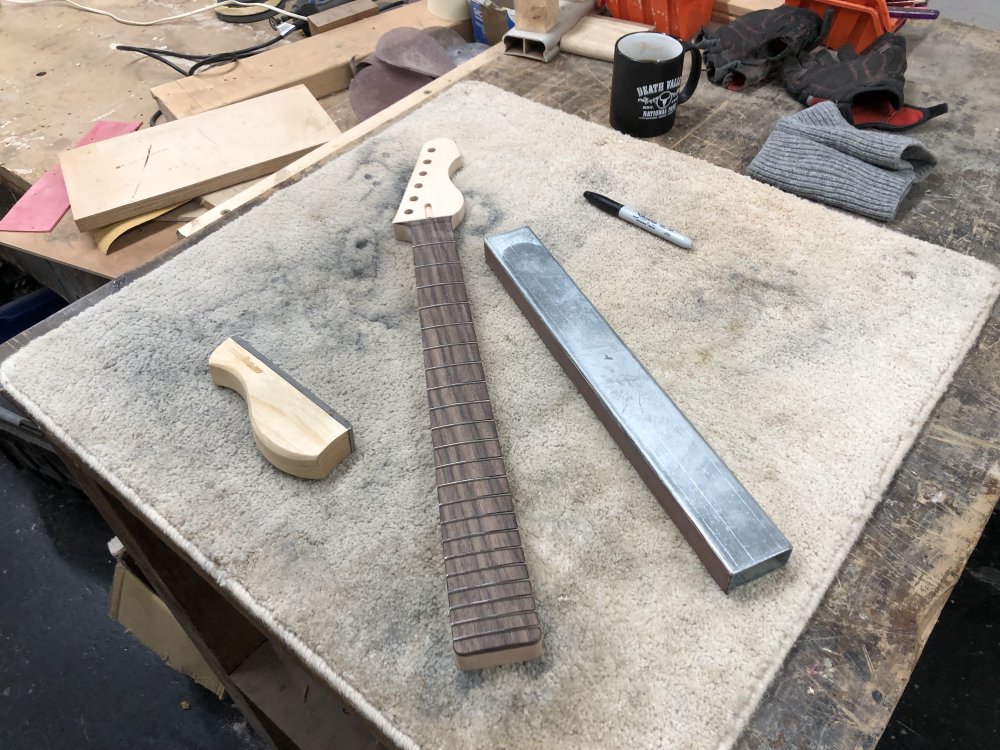
In the last set of week notes I finished carving the neck for Delfin, so this week I couldn’t avoid in inevitable next stage: dressing the frets.
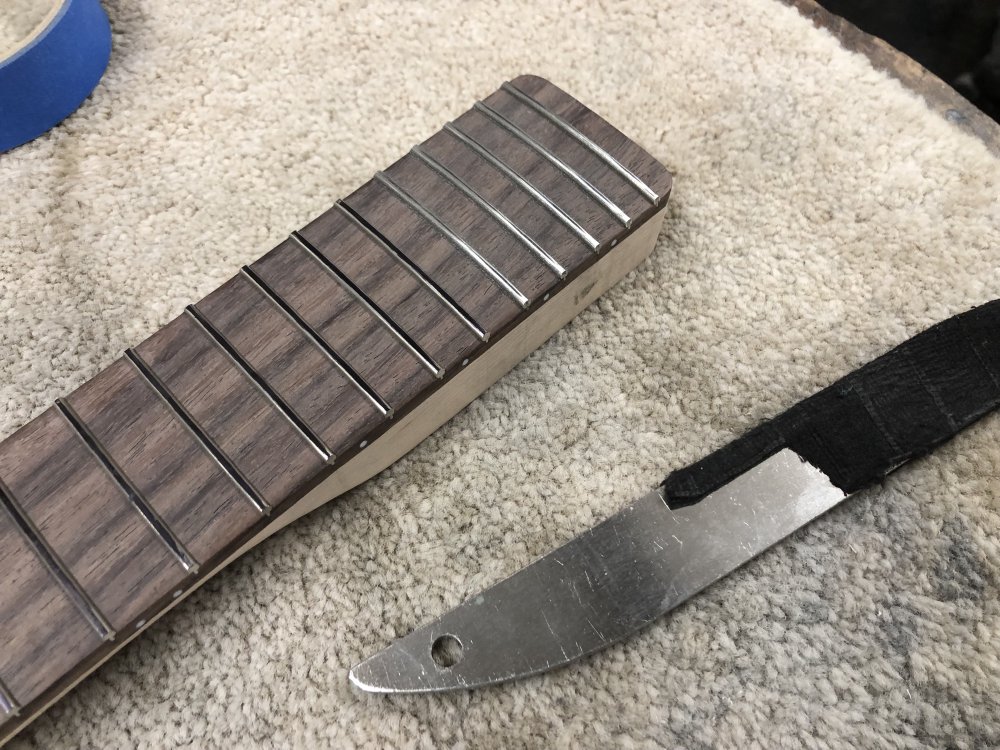
First up I got all the ends flush with the side of the neck, using a combination of fret-file and sanding bar, working away until I’m starting to work both the fret ends and the wood. I also add a slight chamfer to the ends here, so the ends are coming down at around 20 degrees from the side of the neck.
Once the sides are done, I also then use the sanding bar to level the frets. First I adjust the truss-rod in the neck to try and get the neck as straight as I can (putting the frets in will cause the neck to bow slightly), and then I mark all the frets with sharpie, and sand down until I get to where I can just see metal on all the frets. In the past, when I used to hammer the frets in, I’d start with the file for this, but using the arbor-press to insert the frets means they mean much less work at this stage, and so I can use less abrasive methods at this stage, which then means later on less removing abrasion marks. It’s nice when one small change at the start of a process makes all the subsequent stages much easier.
With the frets level, it’s crowning time, as the levelling process takes your nice rounded frets and flattens most of them to a degree. Here I’m using a 350 grit file, as the work is much less aggressive thanks to using a relatively high grit on the sanding bar.
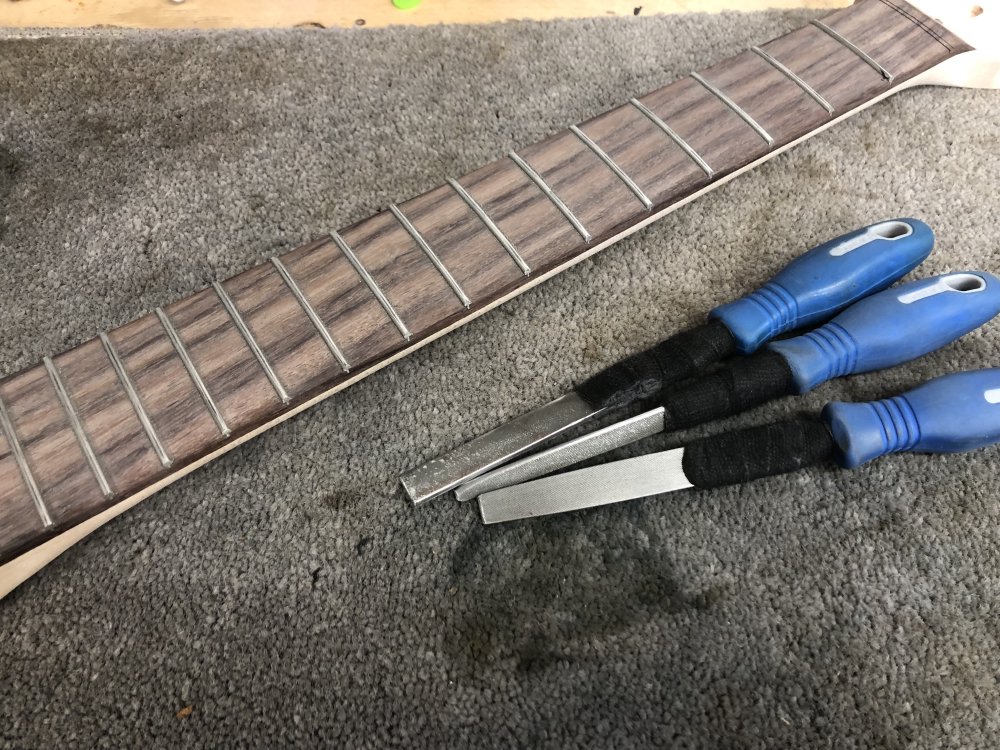
Next up I’m using a set of smaller files to dress the end of each fret. These files all have some of the edges ground smooth, so as not to damage the fretboard as I work on the frets, which is why I’m not taping up the fretboard to protect it. You still need to be somewhat careful, and the first time I used this approach I did inevitably leave some marks, but practice makes perfect, and this time I was very pleased with the results.
You’ll have noticed that the tools have black fabric tape on them, which is to project your hands. I spent a couple of hours doing the frets on this neck, and that was a lot of effort - frets are made from a hard metal that will last years of guitar playing, but that makes them less workable - but whilst I was doing this my workshop-mate Matt of Fidelity Guitars had just completed a batch of 8 necks, which is around 400 fret ends! At that point you can see why the tools in our workshop have been modified for comfort!
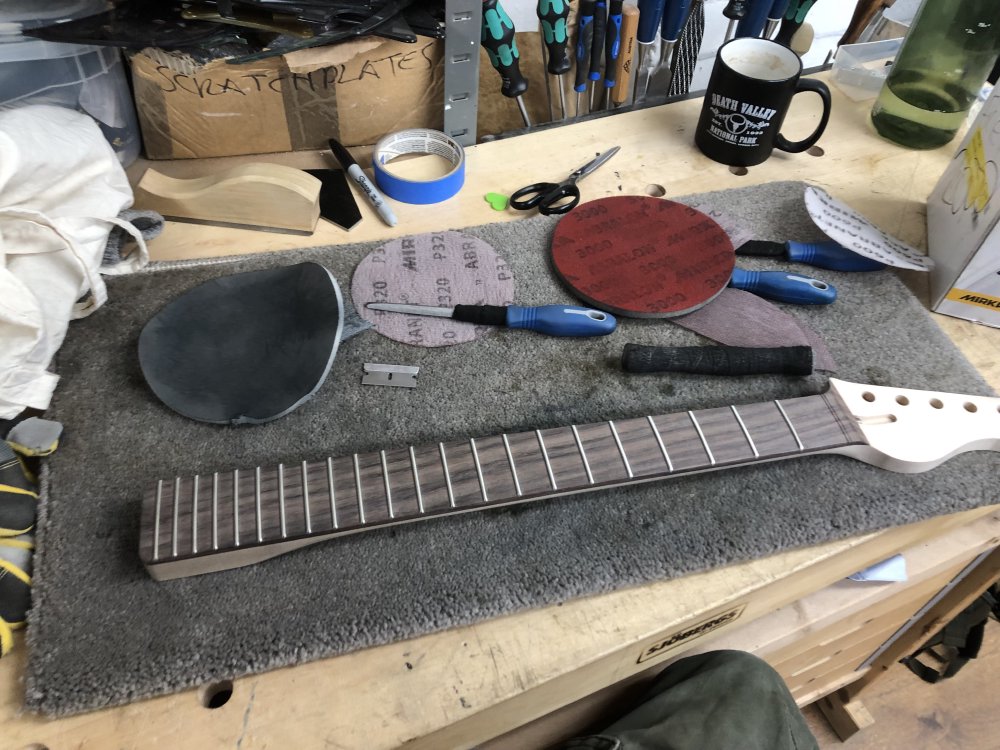
Finally, with the filing done we’re on to polishing. Here I’m both trying to polish the frets, but also sand the fretboard edge too, as the stages where I sanded the fret ends at the beginnign will have made the subtly rounded edge between the fretboard and the neck more pronounced, and I want that to feel smooth under the hand, not sharp.

It’s a lot of effort, but fretwork is something that always rewards effort and punishes shortcuts. I’m not a naturally patient person, and so I used to find fretwork very frustrating, meaning I’d rush it, and then just have to do it all again. Bad fretwork, where the frets aren’t properly level, make for something that isn’t an instrument and needs to be redone. But then it’s also the thing that, for me, differentiates a great guitar from an average one. Both my workshop mates, the aforementioned Matt and Jamie of Swannell Guitars have such a high level of fretwork on their guitars, and is a demonstration of what can be done if you put in the practice.
I’m really pleased with this neck - my personal goal, nae my top priority, with this second phase of my guitar building career was to get to where my fretwork was something I was proud of, rather than something I tried to just get through. I’ve a ways to go before I reach Jamie or Matt levels, but they’ve both built an awful lot more guitars than me, but being around them, and thanks to their generous advice, I’m getting there. When I run my hand up and down this neck, I can feel how much better it is than what I’ve done before, and is both something I’m proud of now, and I look forward to improving yet further on in each build.
Älgen
We can switch gears from me being proud about one thing to feeling sheepish about another, so back onto more familiar territory :) Last week I wrote about how I ordered some screws for Älgen’s unusual bridge - needing some imperial gauge screws when all my usual trusted suppliers only dealt in metric. You’ll be pleased to know I messed the order up. Twice. 🤦♀️
First time I ordered pan head screws rather than countersunk, and then the second time I forgot in my eagerness to get an oder in before the close of day to check the length, and it turns out the countersunk versions only come in a length too short for what I need. Doh.
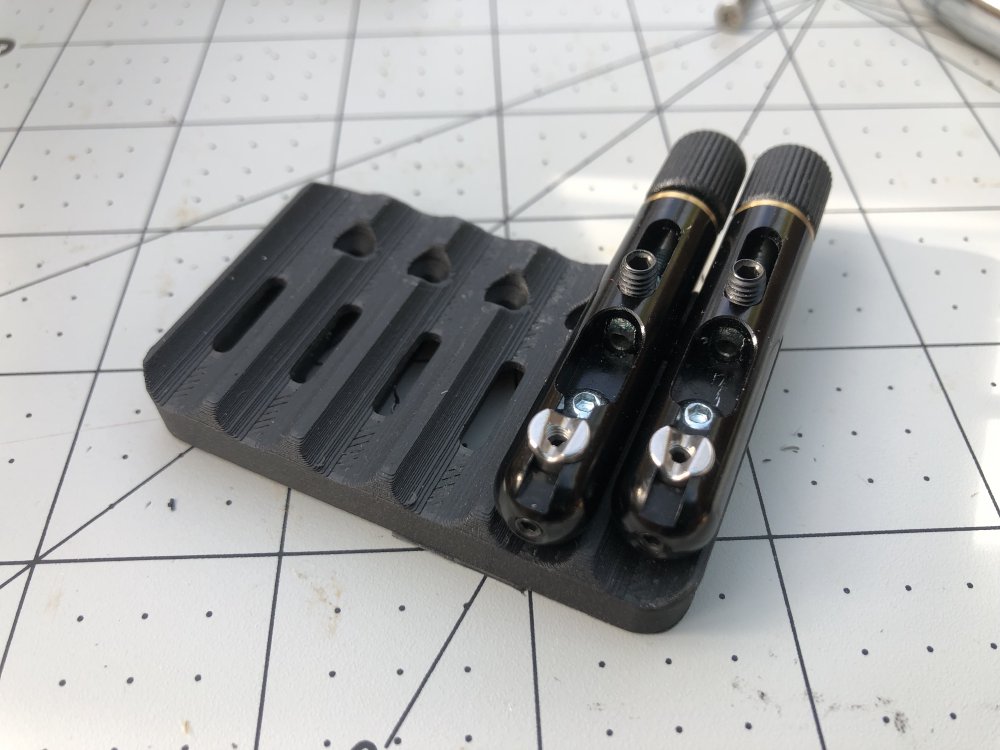
So, I’m still hunting for where to get the right screws from, and this has meant that I’ve gone back to more seriously looking at using my own 3D printed base for the Mera Submarine bridge. Last week I showed you this model of my alternative base that would use fewer, and more importantly metric, screws:
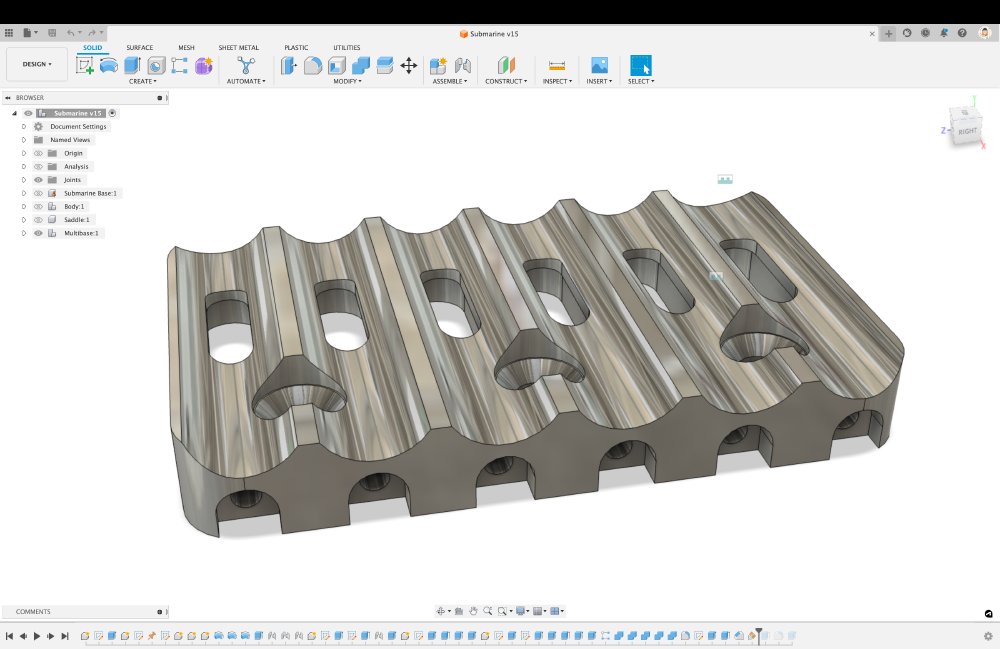
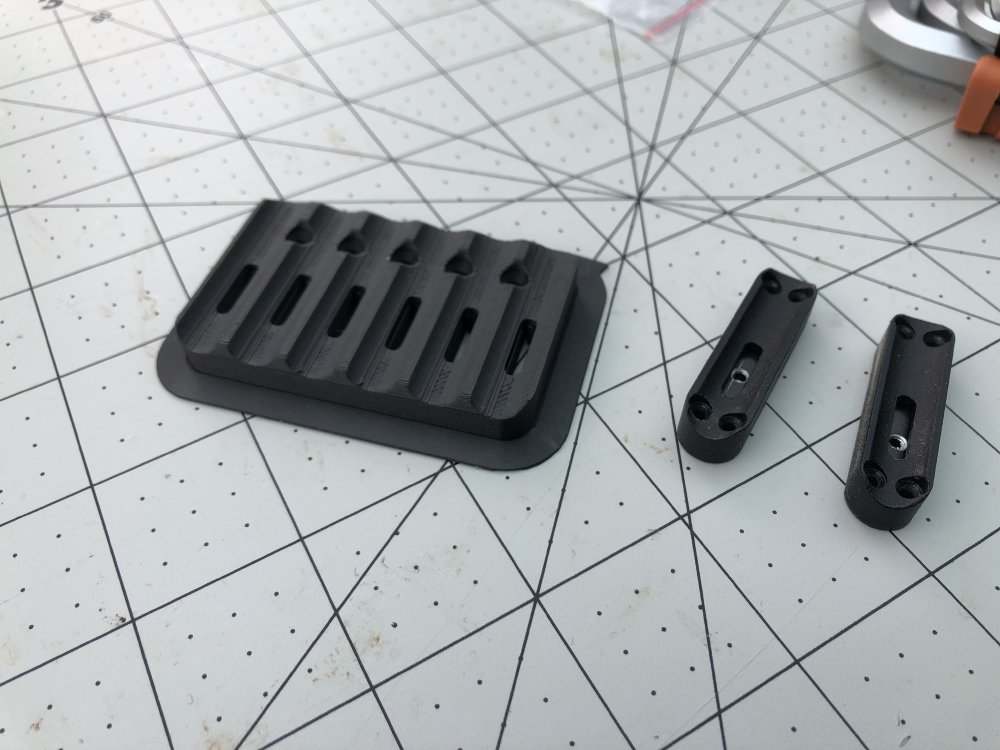
After some more measurement of the Mera per-string base, I had to tweak the design a bit, as there wasn’t room to use M3.5 screws as most guitar bridges uses, so instead I’ve swapped over to using five M3 screws which just fit, and I added a bunch more filleting to make the plate feel nicer in the hand. So a quick trip to the local makerspace to do some printing, and I now have a prototype I printed out for test fitting:
Often people assume that 3D printed parts just plop out the printer ready to go, but in general they need quite a bit of fettling for a print of any complexity. Here is the piple of support materials I had to remove from my print to just get the shape I had designed:
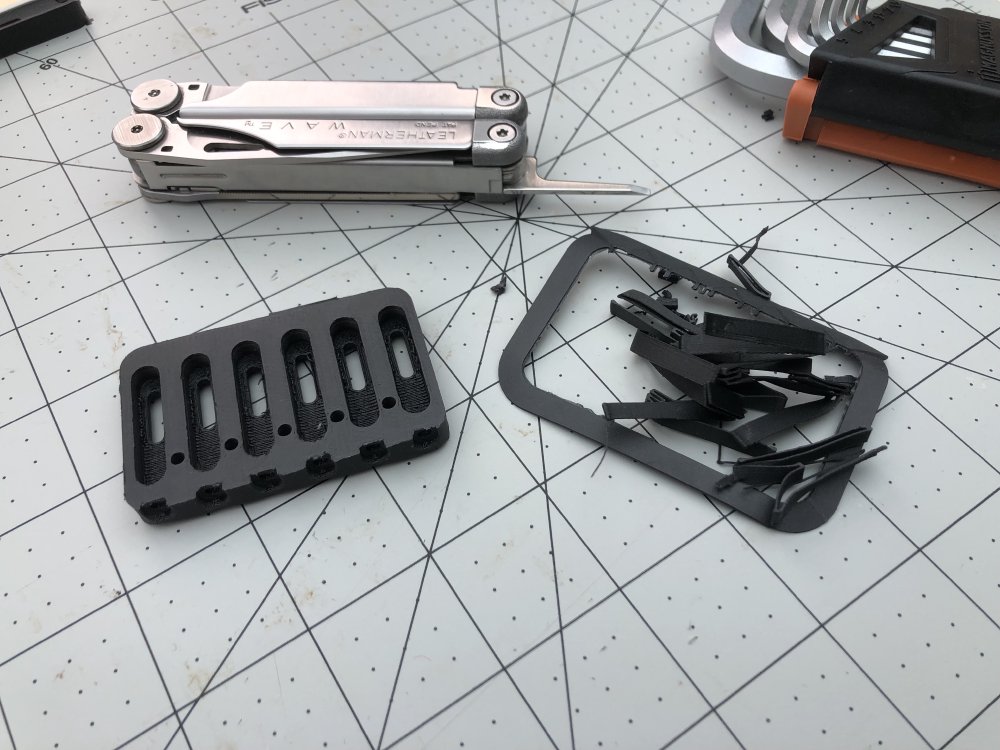
I also had to re-drill the horizontal running screw-holes in the piece to adjust them for a slight sag due to gravity during printing (despite the support material) and just general print accuracy limitations (I have quite tight tolerances on this part).
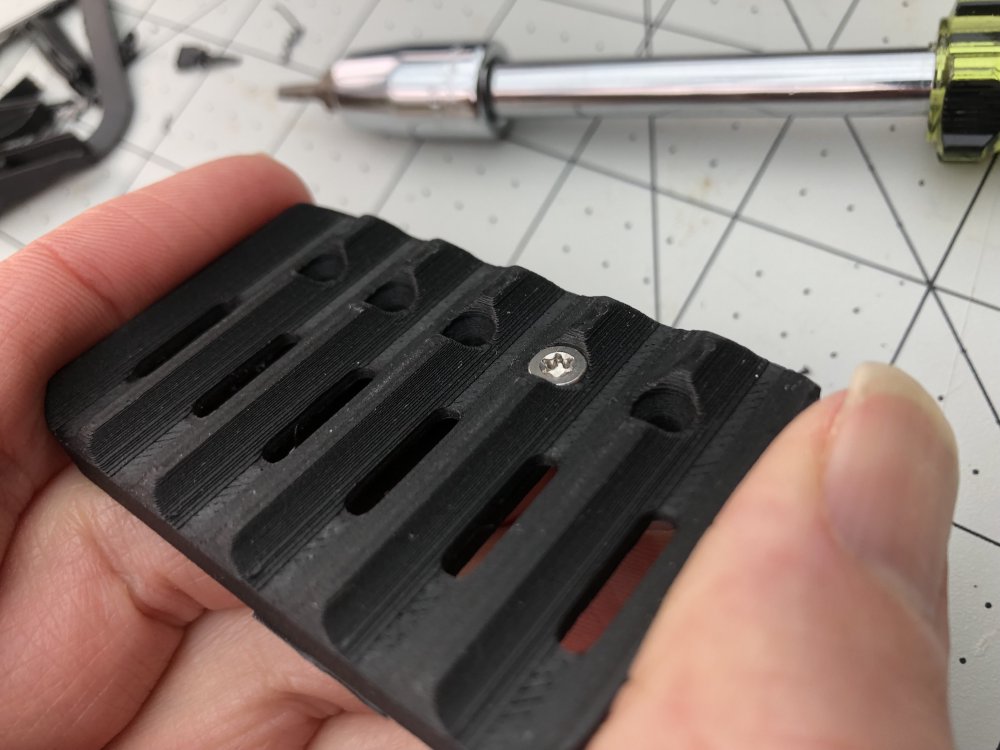
This first prototype showed me that the countersunk hole I made for the M3 screws wasn’t countersunk enough, as the screws just sit proud and interfere with the bridge units, so I’ll need to make a V2 to fix that.
But rest of the print shows my design does work. Here’s a version with two of the bridge units installed:
I’ve now tweaked my design, and I’ll kick off a V2 print. This one I will print with a carbon-fibre layer with the hope that it’ll be strong enough to let me string it up, but assuming everything fits then I’ll also order a metal print of the same part from shapeways using their steel/bronze material to act as the final part.
I will, at the same time be trying to find more imperial screws, but I have to confess that now I’ve done more of the design, the new 3D-printed part just makes me happier: it simplifies the overall build process for the future, it is in keeping with Älgens nature, it removes some complexity from the design.