A week in the shop
3 Feb 2020
Tags: 3d printing, squire bass iv, the green tiger
It’s nice to finally get to say that the troubled commission #10 build is complete - ship it!
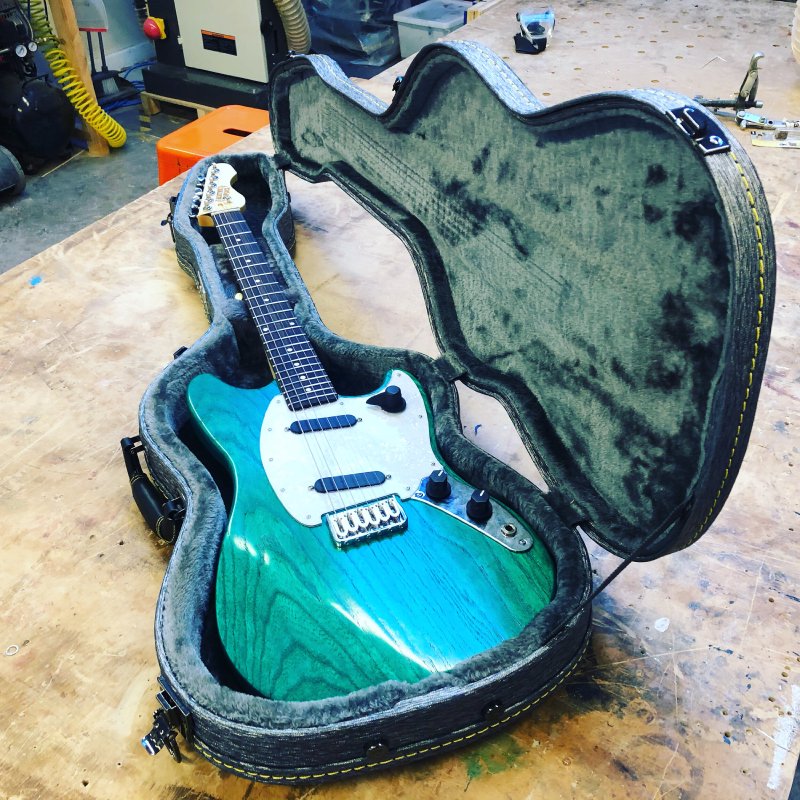
This week it was just working on the finishing touches on this guitar, notably getting a set of 3D printer controls on it that had a suitably good finish on them to do justice to the rest of the guitar. Using an extrusion printer as I was here, the finish isn’t what I’d consider production ready (which is fine, as the Ultimakers I’m using are meant more for hobbiests and prototyping). However, with a bit of elbow grease I managed to achieve a good finish on the ABS printed parts after an hour or so working up through the grits on the top surface (240, 600, 1000, 1500, 2000) and then finally giving a wet “sand” an all over with some light scouring pad material and then 0000 wire wool. It’s not quite as good as I got with the old FormOne resin prints in the past, but it’s an awful lot better than what came off the print bed.
The observant of you will note the pick-guard looks a little ragged in the above picture - don’t worry, that’s just the protective plastic sheet that’s still on there, keeping it nice and safe until the client gets the guitar!
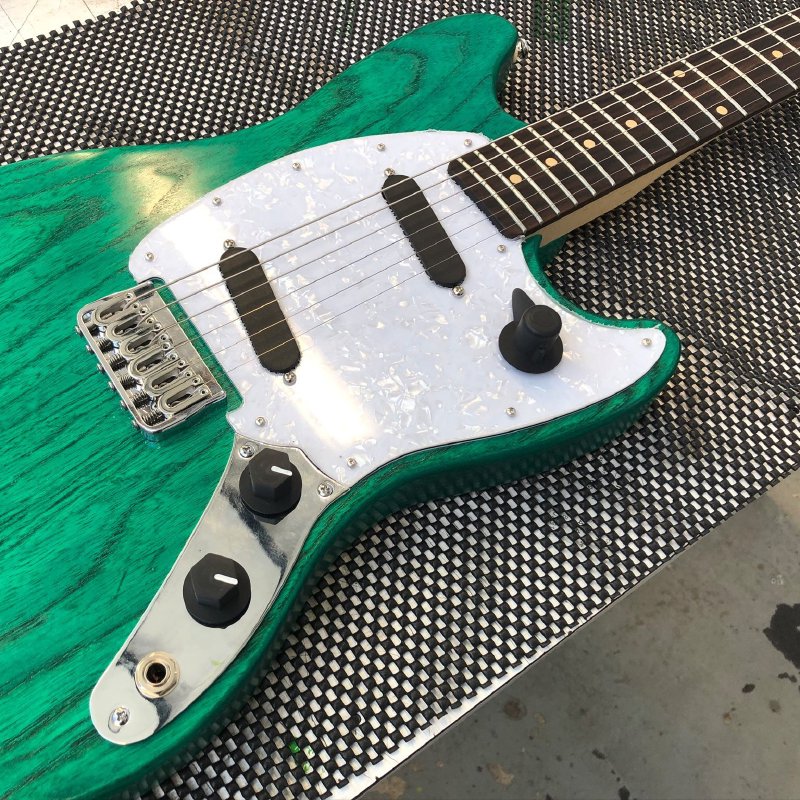
With the volume and tone controls, it’s amazing how much better they seem just by painting on the white line (which takes a few coats to build up to a strong solid finish). It’s an easy detail to add, but it really does elevate the perception of the 3D printed part.
Once the controls were installed I did a quick run over the guitar again to make sure everything is still tight and snug, and it’s now ready to ship to the client!
This build really has gone off the path in a way no other has done, but now I finally hold the finished item in my hand, it’s worth it - this is a great guitar that I can be proud of, and I really look forward to the client’s feedback on it.
So with that build complete, what’s next? Well, I have two more builds to complete on the go at the moment, but those will be after I move to a new workshop. I’ve had a chat with a friend, who builds guitars full-time, who has a workshop, and he’s generously offered to rent me out a corner of his workshop. Moving on from Makespace, the community workshop that’s been my guitar building home for the last three years or so is sad, but I’m also keen to see what I can make of this move.
The first thing I need to sort out is a workbench, so I’ve started shopping for one of those. Several people have advised me to make my own, and whilst that’d be a fun project, I really need to be building guitars, so I’m going to skip on the self-build this time. I’m also going to just accept that to get a good workbench quickly isn’t going to be cheap, but I’d rather just get up and running without having to either fight a substandard workbench or spend ages looking around until I find a bargain. To me its more important just to get building again - my guitar output was well below what it should have been in 2019, and I really want to turn that around in 2020.
Currently I’m looking at things like Sjoberg’s Scandi Plus workbenches with storage as something that’ll be robust and practical and let me just plough on, even if the cost is a tad higher than I’d expected to spend. If you have any ohter workbench recommendations that might fit the bill, do let me know!
I gave the Squire Bass VI that is in repair a bit more love this week. In general, I try to put off subtractive modifications on a setup as long as I can, but this week I really did need to remove some bits of the guitar at one end, and then add some back at the other end.
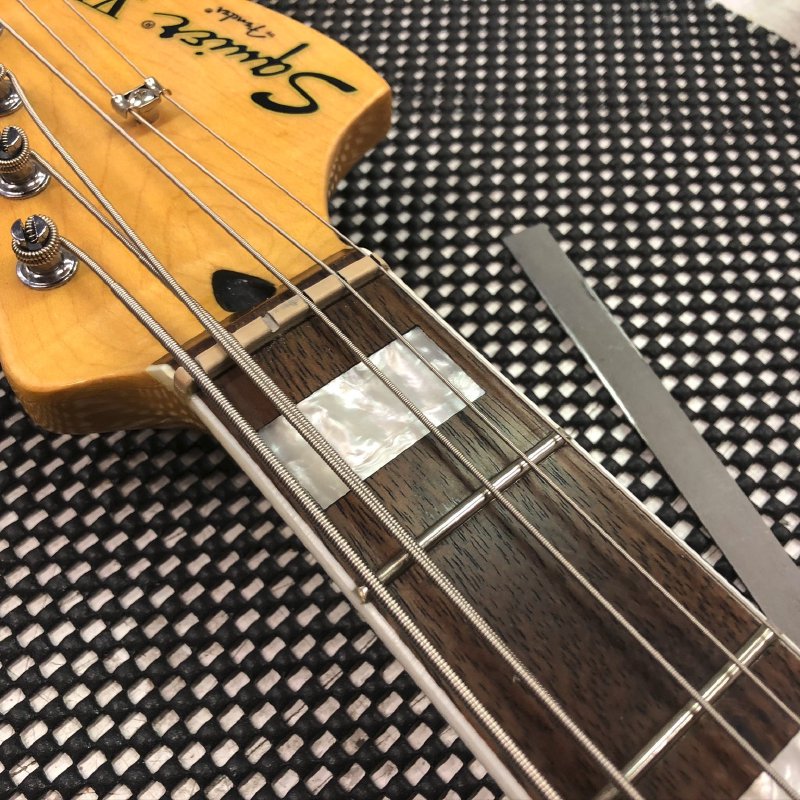
Despite adjusting the bridge and the neck heights last week, the action was still way too high, so I finally had to turn my attention to the nut, which was just not right:

In case it’s not clear from the picture, this nut does have string slots cut in it, but they’re just way too small, so the strings are just sitting over those slots rather than being in the slots. It’s almost like this shipped from the factory with a regular guitar nut on it rather than one cut for the thicker bass strings on this short-scale bass - it really is quite disappointing to think a player could end up with something this badly set up.
Even with the bridge as low as I could make it, with the strings sat on top of the nut like this I had about 5 to 6 mm of clear air between the top of the 12th fret and the strings, when really want that to be 2 to 3 mm. So it was out with my nut files to make things better:
This let me get the string heights down to around 3mm over the 12th fret; I’d have liked to go lower, but the nut is as low as practical, and if I lower the bridge any more I get string buzz. So it’s not perfect, but it certainly is a lot easier to play now.
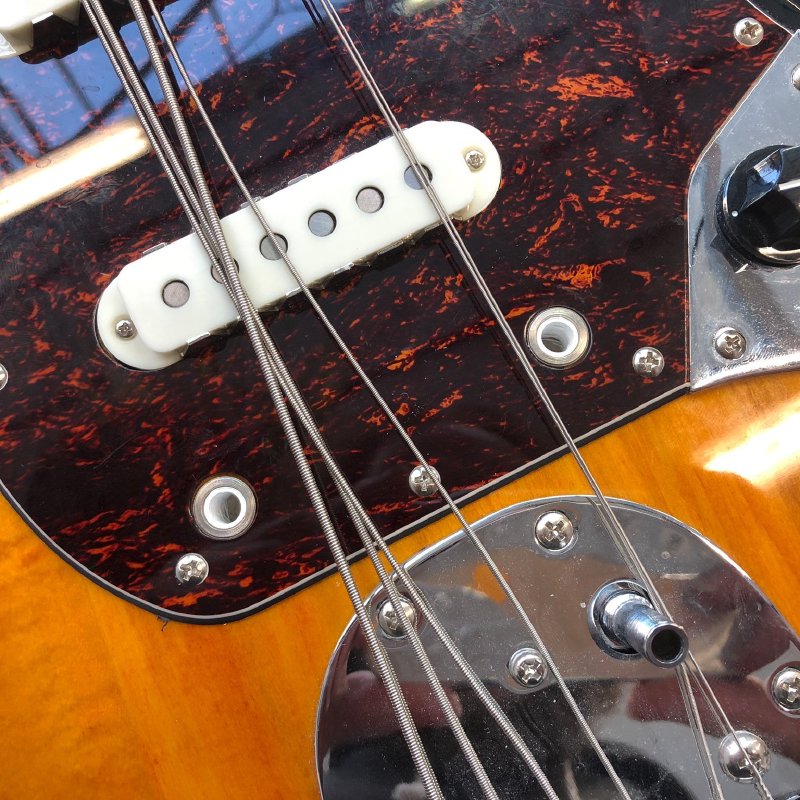
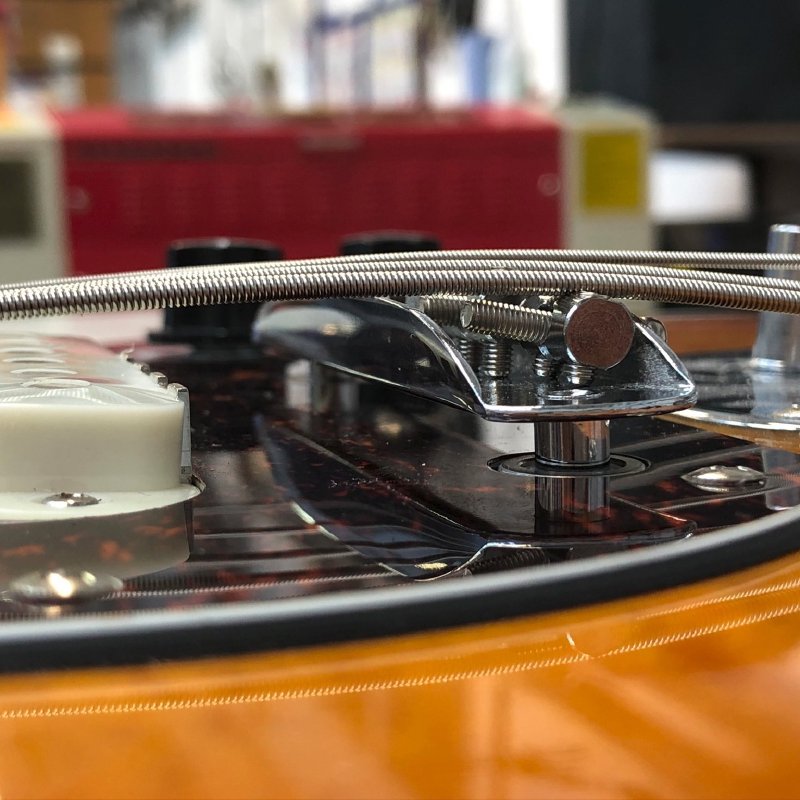
Speaking of the bridge, the floating bridge was driving me a little mad, so I decided to fix that in place by making some sleeves for the posts that hold the bridge up. In theory, these are meant to wobble back and forth as you use the dynamic vibrato. However, in practice all this means is that because the bridge can move the guitar is just too easily made out of tune (and just as importantly, intonation) if you accidentally knock the bridge.
To fix this, I measured the holes the bridge sits in and the posts on the bridge and then made some sleeves to fit. Normally people use rubber tubing for this application, but I failed to find any in the workshop, so I instead 3D printed some :)
Making sleeves like these is really quite easy: first, you measure the existing pillar diameter and the hole in which you want it to fit using some calipers. From this you can make a simple 3D model like so:
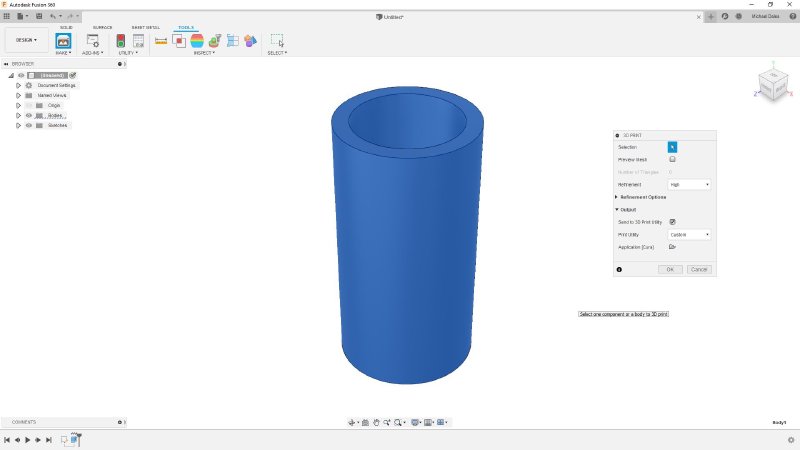
I’m using Autodesk Fusion 360 here, which nicely lets me export my design straight to the software that drives the Ultimaker 3D printers we’ll be using:
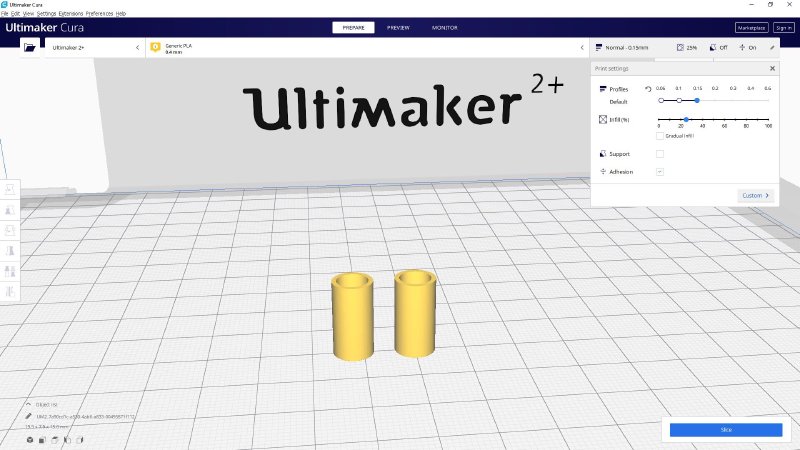
And then eleven minutes later I have some sleeves:
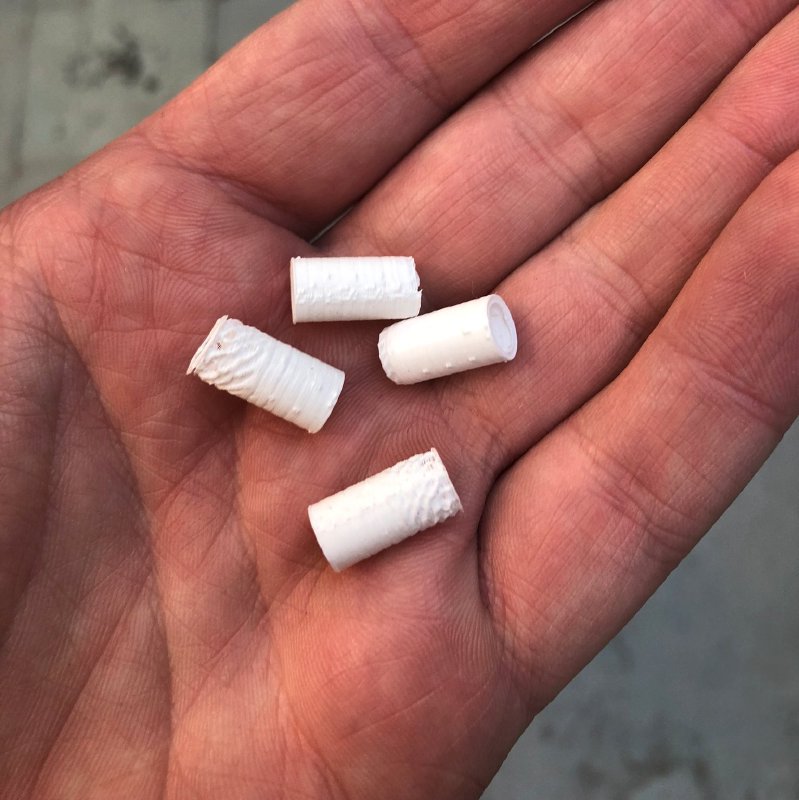
It took a couple of prints to get this right (3D prints always shrink a little bit compared to the original design), but small parts like this print relatively quickly, so it didn’t take long to get a pair that fitted just right:
An now the bridge sits nicely in place, letting me get it properly intonated and, more importantly, getting it to stay that way:
This is quite a mundane use of a 3D printer, but I’ve always felt that’s where they’re more interesting. You can make some weird and wonderful things with a 3D printer, and that’s cool too, but I am more fascinated by the application like this of solving small niggles with a just-right solution.
I fear this is now as good as I can get the physical setup on this guitar (I’ve also done some truss-rod adjustments, and I cleaned and re-oiled the fretboard). The action is still a little high, but as I say, if I lower the strings the buzz is too annoying, and it’s still a long distance better than it was when it first came in.
The next task is to turn my focus on the electronics: the neck pickup doesn’t seem to work (most likely a bit of soldering has gone), and the pots are very scratchy, so I might need to swap those out for a better pair.