Getting started on a build: Somebody has set up us the BoM
Published 25 Jan 2018
A long time ago I worked on a project where we had to ship an electronics hardware box (I was delivering the software to sit alongside said box), and I had the good fortune to work closely with the guy managing getting the hardware from concept to production. One of the main lessons I took from that experience was the importance of you Bill of Materials, or BoM for short. It impressed me sufficiently that even when building my very first guitar as a hobby project I still made a BoM, and everything that Electric Flapjack has built today has always had a BoM attached.
A friend of mine I spoke to recently who was building a small electronics project had never come across this tool, so in the spirit of sharing the tools I used to build guitars, I’d like to use this post to explain what a BoM is, and why it’s such a useful tool for anyone building a hardware thing: regardless of whether you’re doing so as a commercial product or as a hobby, or whether you’re building a single item or a run of hundreds.
At its most basic, a Bill of Materials is just a fancy title for a document that lists all the things you need in a construction project. Usually it’s a spreadsheet, with one line per item you need, how many you’ll want, where you’ll get it from, how much it’ll cost etc. It’s nothing complicated, but as we’ll see, it’s a structure around which you can validate your design assumptions before you go spending money on the wrong things, and will let you track progress as you go along.
To help make this discussion easier to follow, he’s a link to the final BoM for the first guitar I built, which will hopefully provide suitable context for you as I explain how to make one as part of your design process.
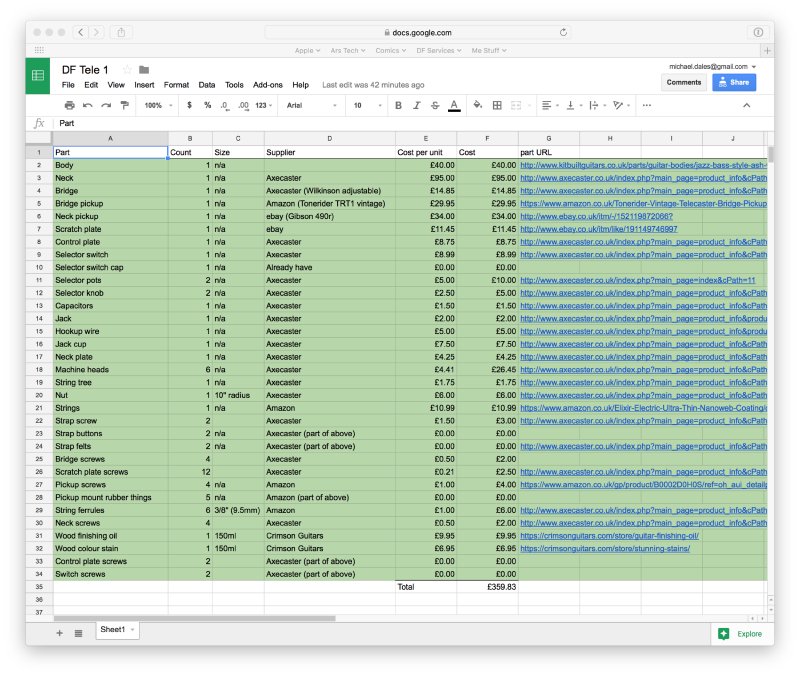
It’s probably not the best BoM in the world, and I could have picked better column titles, but it still served it’s purpose. This may look somewhat overwhelming if you’ve never made a BoM before, so let’s walk through how we get there, which in turn should convince you how useful it is.
Step 0: Make your design
Whilst I want to talk about the role the BoM takes in your design, you should start by having your design in mind already formed. In my case, I wanted a simple tele style guitar, and I knew what kind of pickups I wanted, what style of wood etc. Only once I had an idea of what it was I wanted to build did I start to make my BoM.
Step 1: Make a list of what you need
You don’t start with all the information in the BoM from day one: the BoM is a living document over the lifetime of the project. You start with just getting a list of the things you think you’ll need, and writing that down in the spreadsheet. This in itself is huge value, just knowing what the parts are before you start.
My example project here was a parts build guitar project, so I needed a guitar body, a neck, some pickups etc. Those are the fun and obvious bits: but the idea is to list everything you think you’ll need, so you keep going listing the minutiae too: screws to attach the neck to the body, the tiny screws to hold the scratch plate in, the oil for staining, strings etc. That little bit of felt that sits between the strap button and the body? Yep, that has to be on the list too.
Everything on the list should be an elemental component you need to acquire. For example, with my first guitar I bought the body pre-formed, and as such that appeared in my BoM as “guitar body”; but now that I make the bodies myself, I don’t list the guitar body, but I list the lumber I need to make the guitar bodies.
By the end of this exercise you should have a list of everything you need to acquire to make your project, and it’ll probably be longer than what you thought you needed before you started. It’ll also grow over time when you learn more about a project, but that’s okay. However, it’s important to save time and frustration down the line you make this list as complete as you can.
Step 2: Work out how to get what you need
Having worked out what you need, you can now work out how to get those things. I tend to do this in a few iterations. Firstly, I just go and find a supplier for each item, and don’t think too much about the cost. I don’t go silly, but the first thing is just to sanity check before you worry about price: can I actually get the things I think I want? Will someone actually sell you pickup screws made in gold-pressed latinum that your design needs? If not, you’ll need to go back to the design stage again, tweak your design, and then iterate your BoM.
At this point, you now have a list of all the things you need, where to get them, and a headline cost that tells you how much you’re about to spend in materials order to complete this project. This is a good point to decide if your estimates match reality, and it’s much better to find this out now, rather than get half the parts and realise you’ve already blown your budget. At this stage you can always decide it’s too expensive, and return to you design stage with this information and think about changes there, and then generate an updated BoM for the refined design.
You’ll find that sometimes you can order parts as a set, so what was four lines will come as a single purchase. I’d advocate that you still leave this as four items on your BoM, and just note that you got them as part of another BoM item: that way, should your supplier sell out and you need to get those bits otherwhere individually, you still have a record of all the bits you need.
Step 3: Do a cost reduction pass
Assuming I can find a supplier for everything on my BoM, I will next do a second pass on the BoM, which is a cost reduction pass, where I search the web, read catalogues, etc. to see if I can get a part cheaper than my initial supplier selection. In truth, you’re always doing this naturally, but I think it’s always a valuable thing having made a first pass just to now hunt around and see if you can find alternatives that are cheaper, as a little more effort usually does turn up a few deals here and there and bring your costs down.
Alternatively you may decide that your design is too expensive in it’s current form, but if you change say the pickup types you can bring the cost down, but that needs you to change the bridge part, etc. Basically you can again either just find cheaper parts without changing anything, or tweak your design to let you reduce overall costs, update your BoM, until you get to a point where you’re both happy with the design and the materials cost.
Step 4: Get acquiring and building!
At this stage, assuming you managed to find a happy place with the overall materials cost, you can start ordering parts and building your project. As I order each part, I go back to the BoM and mark that row in green to indicate I have it. I won’t necessarily order everything at once, in part due to storage space, and in part due to anticipation my design may evolve as I go along and learn new things, so marking in the BoM that you have ordered things helps you do some limited inventory tracking.
It is inevitable that as your project progresses you’ll realise you had an assumption wrong, or your design didn’t look so good in the flesh as you thought, and you’ll want to replace some parts with others. This is fine: go back to the BoM, update it for the new part and go through the above steps again. You can also copy the old line out of the main list to a second list if you want to keep a record of changes, letting you keep track of the cost not just for the finished product, but also the cost of changes too. If this is a paid for project, then depending on the arrangement with your client, this may be important for billing!
And that’s it. The BoM is a living list of everything material wise that goes into a project, and is a hugely useful way of managing any physical construction project. Don’t see it as a document, but as a tool to help guide your hardware from the design stage to construction, one that helps avoid costly mistakes should you get halfway through your design. In guitar building the most common phrase quoted at you is “measure, measure, cut”, and a BoM is just another example of that process.
I’m sure production experts probably have much better BoM methodologies, but I think the point here is less making the perfect BoM, but making a tool that can help you do better at your projects. A BoM is clearly very useful if you’re building may copies of an item, but I advocate that the discipline of having a BoM brings so many benefits that it’s a useful tool no matter how big or small your project is, which is why I always generate one for everything I build.