Catch-up notes: Taking it to the bridge
Published 1 Jul 2021
This week we’re looking at the new guitar design again, and trying to pin down some more features that let us convince ourselves that it is build-able. You can read more about the general design here, and then about some of the 3D parts needed for it here. And for reference, here’s the sketch I posted back then:
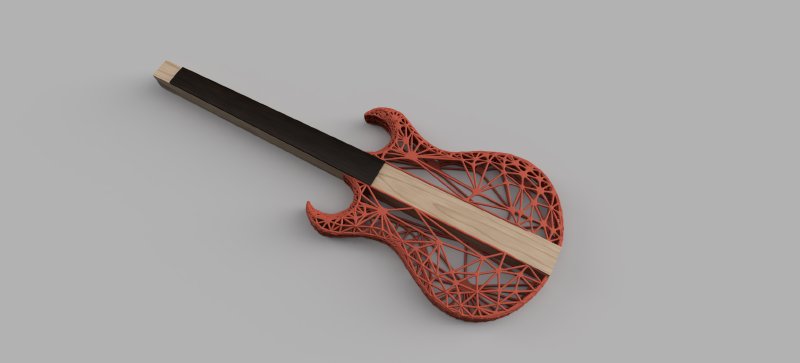
The challenge right now is refining this sketch into a detailed design I can actually build. But to do that I first need to fill in some gaps in terms of parts, most importantly I need to decide on a way to attach the strings to the guitar!
(Apologies if this week’s notes are a bit more scrappy than usual - I had my second vaccine jab before sitting down to write these!)
As mentioned before, this is going to be a headless guitar. That is that the tuning mechanism for the strings will be built into the bridge where the strings anchor to the body, rather than at the end of the neck. One of the most obvious examples of this design are the Steinberger Bass guitars, which dates back to 1979 (there are older examples too):
You can see here the way the strings are attached is effectively reversed: they anchor to the top of the neck, and then are tuned at the bridge.
The main reason I want to go for this approach is weight distribution. By 3D printing the body, without making any other changes I’m going to move the centre of gravity of the guitar up the neck, which then risks the guitar having a tendency for the headstock end of the neck to want to droop down when you play it standing up with a strap. This is a complaint of some standard looking guitars like the Gibson SG, but with my design I fear it’d be much more unbalanced. The headless design should bring that centre of gravity back down towards the player’s body again.
Despite headless designs pushing on 50 years old, they’re still relatively uncommon. Indeed, whilst Steinberger and Ibanez will sell you off the shelf headless basses, a quick look at Andertons shows no equivelent guitars. There are some popular custom shop brands like Kiesel who regularly make headless guitars, but overall it certainly isn’t that mainstream. This in turn presents a problem for someone wanting to make a headless guitar: getting parts is much harder.
Regular parts manufacturers like the ever reliable Gotoh do not make headless parts, and so you have to go a little off the beaten track. You can find parts on places like eBay, AliExpress, and Amazon, but whilst I’m sure they’d be good for experimenting with, my instinct based on reviews I’ve seen is that those parts are not built to a quality standard that I’d feel happy about putting on one of my guitars and have confidence it’d still be working in ten years time. Thus instead I spent a bunch of time looking at all the options that I saw other builders recommending.
A quick list of some of the popular options are:
- Hipshot guitars Headless System
- Tan Bridges
- ABM Headless Systems
- Meta Guitars Submarine III
- Technology 4 Musicians Headless Series
This list isn’t exhaustive, but certainly covers the most commonly cited examples. I was prepared to do a long winded review comparing all these different options, but since doing all that legwork I since came across this video by SHeath on YouTube where he bought one of each of the common options for headless bridges and does a nice detailed review of them; so to save you reading (and me writing) I’ll just recommend you watch that video there if interested:
At the end he does a comparison of some of the pros and cons of each to try and get a simple score to indicate which is better, but my criteria are somewhat different than his, so I’ve not followed that scoring system, but I still found it a valuable write up, in particular as you get to see the mechanical operation of each bridge which is otherwise hard to discern from pictures alone.
Whilst I’ve traditionally used Hipshot bridges on my guitar builds, as I find they’re a great mix of quality build vs price, in this shoot out I’ve selected the Mera Guitars Submarine III bridge and put in an order for a 6 string set:
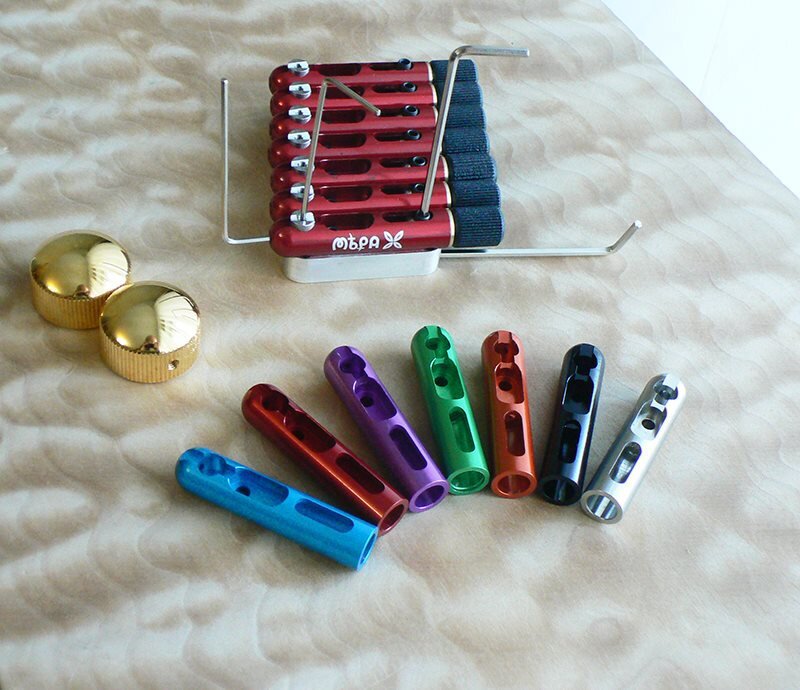
Of the bridges available this certainly is one of the more adjustable in terms of things like setting intonation and string height, and I like the design of the piece in general, and that it comes in different colour options that make it something a client can pick to suit their own personal preference when ordering a guitar.
Another thing that also swayed me is I wanted a system where you didn’t end up with the bare string ends poking out the top of the guitar neck for you to spike yourself with. It may seem a trivial detail, but I already find I jab my hands on string ends occasionally with conventional tuners, and I didn’t want to cause that to become a more common occurrence. However, most of the headless bridges use a claw system to grab the ball end of the string at the bridge end and then have a head piece at the top of the neck where you clamp the string with a grub nut and then cut the string outside the head piece, leaving a spikey bit of string exposed - I’m not a fan of that idea.
The Mera Submarine bridge turns that around - you attach the string ball end at the top of the neck into a head piece, and then use a grub screw to anchor the strings into the tuners (just like traditional locking tuners effectively). This means no spikey string ends to jab yourself on!
The only downside to this plan is that the head pieces that Mera sell just didn’t work for my design. The most fitting one was this:
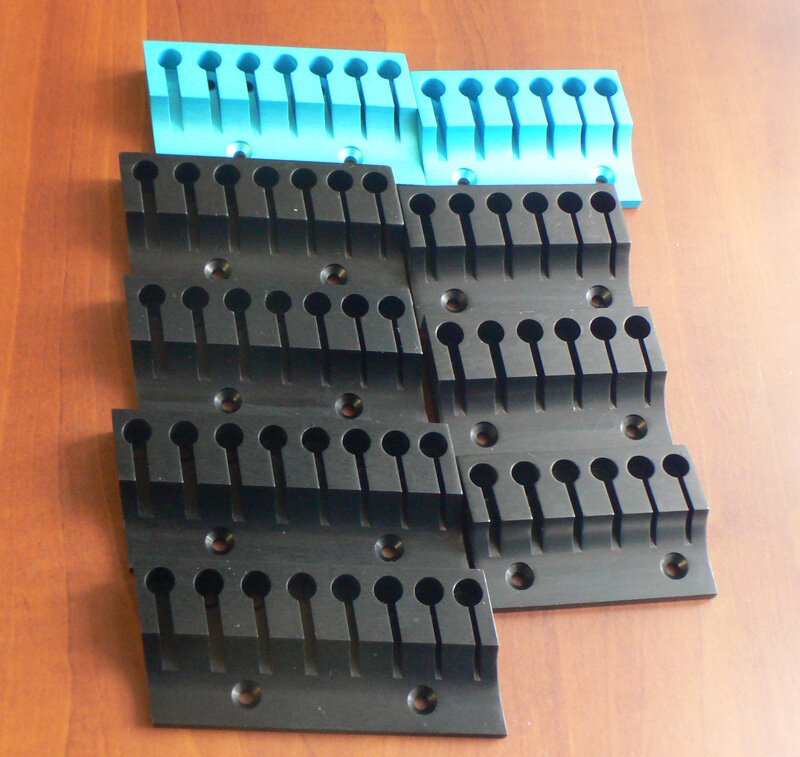
Whilst I like the overall aesthetic, what isn’t immediately obvious on the picture unless you look for it, is that they’re made with a 10 degree rake off true to suit a fan fretted (and right handed) instrument. For my guitar I wanted something a bit more like the hipshot ones, which sit squarer (but use the aforementioned grub screw).
So obviously it’s time to design my own :)
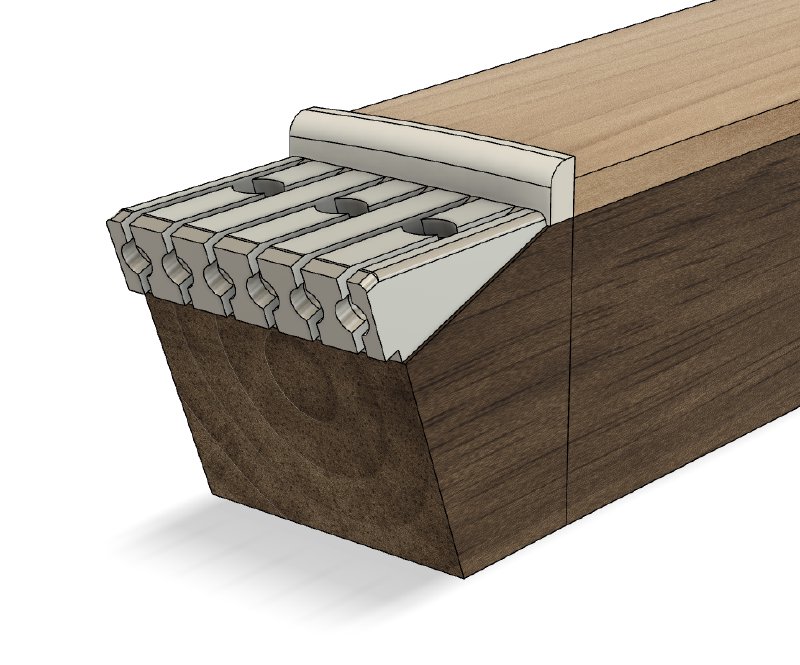
The first design I came up with was based on the idea that I’d have the headpiece mounted at an angle to ensure the strings are pulled down over the nut at the top of the neck, and has thimbles on the back edge for the ball end of the stings to sit in:
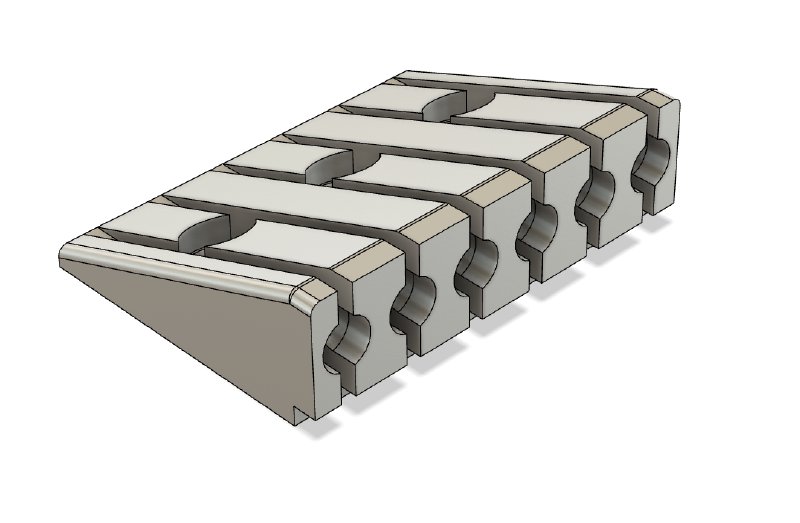
The idea is that it would sit at the top of the neck like this:
However, whilst this is a nice and practical design that could easily be milled, it didn’t feel like it fitter the overall aesthetic of the guitar I’m designing. As I was pondering this, a friend of mine with whom I collaborated with on some gaming projects way back in the early days of mobile gaming, was encouraging me to try to lean more into the digital construction side of the guitar to get an instrument that was more a mix of the two worlds that occupy my head these days, and so inspired by that, I thought I’d try my hand at using generative design to create a head piece with a more organic look to it.
Generative design is something I played around with a little bit back in late 2019 when Autodesk first added it to Fusion 360, which I wrote up here and here. Back then I was just playing with nonsense designs to get a feel for how it worked, in part because that month Autodesk had removed all charges from the feature making it free to experiment with. Now it’s a paid for feature, costing about £40 a run - not too expensive that it’s off putting to use, but definitely priced where you want to be reasonably confident of your design so that you don’t need to make too many iterations.
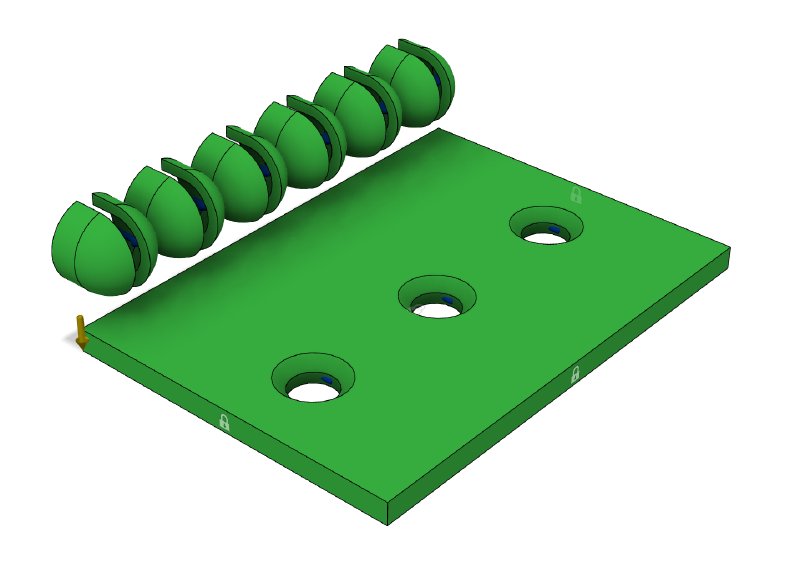
The first thing you need to do is go back to your design and work out what are the absolutely essential parts. For my head piece here it is the thimbles that hold the ball ends of the strings and the plate that will attach the the part to the guitar itself.
The next thing you need to do is tell Fusion where not to put material as it tries to build the structure for you. In this case I created channels for the strings, access to the screw holes, and then some parts around the general volume to constrain the shape a little:
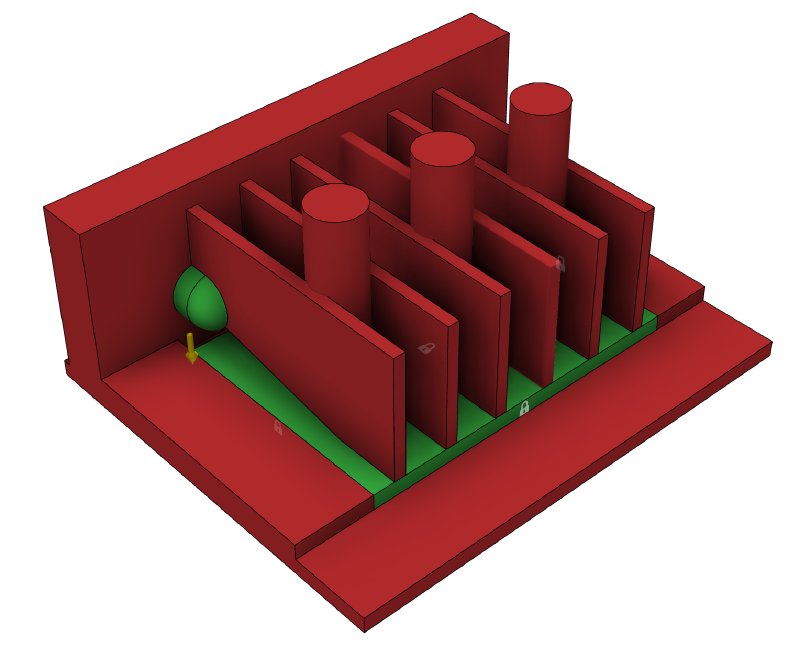
I find this sort of inside-out design fascinating: there’s more elements here in my design describing where the part isn’t going to be than where it will be - almost the inverse of traditional design!
Once you’ve done all this, then you need to specify the loads on the part, which I’ve illustrated on Fusion’s generative preview view as it’s easier to see where the forces are applied in a single screenshot:
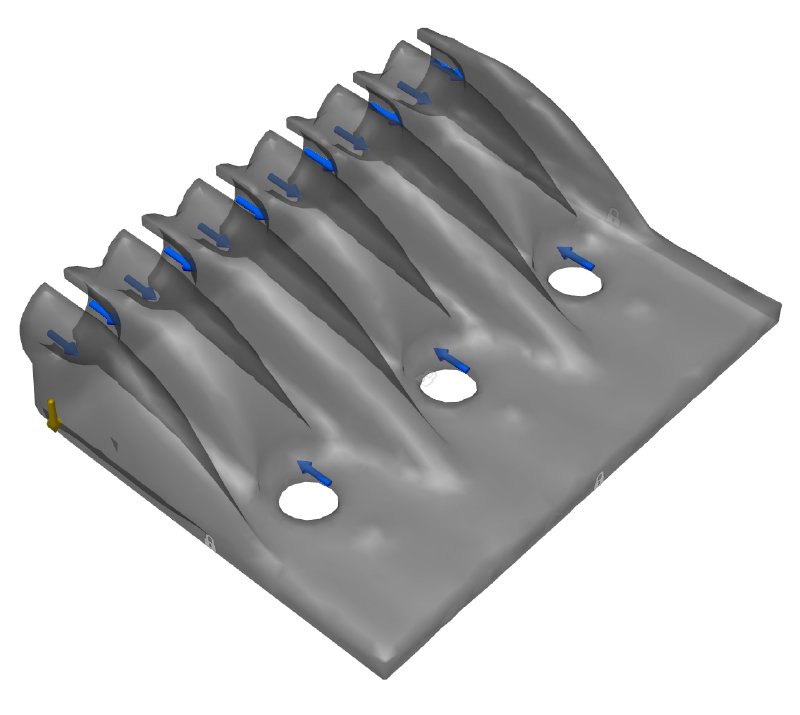
You can see that because I’ve split the thimbles for the string into two halves I have a total of twelve parts in my design with the string load on them, and then I need to specify the inverse string load on the screw mounts as that is what’ll be working against that force.
Once you’ve specified all the forces, Fusion ca generate a quick preview for you, so you have a rough idea of what you’re going to get, and that’s what you see above. Looking this preview it looked kinda like I expected: similar in volume and shape to what I’d drawn originally, only more minimal and optimised. So, based on this preview I was happy that I was in the right ball park, and duly submitted my design to Autodesk’s cloud computing and had it churn away for a while to build me a design.
Unfortunately, this is what I got back:
Turns out I put too much faith into the quick preview, which didn’t reflect that I’d mis-specified the forces by an order of magnitude due to misunderstanding the UI. I thought I wanted to specify the load on each blue arrow, rather than the load over the entire set of arrows in a given direction, so I’d specified 1/12th of the load. No wonder there’s so little material there.
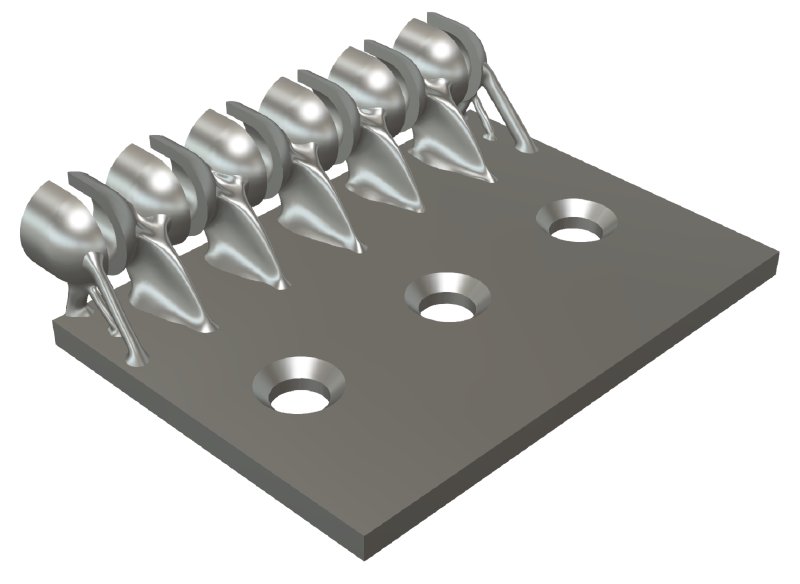
I went back and did some more research to convince myself I now understood what was needed (the documentation is not very clear unfortunately, at least to a novice like myself), and then I submitted a revised version. This is where the £40 per run can start to add up if you’re not careful. Thankfully I got it (seemingly) right the second time:
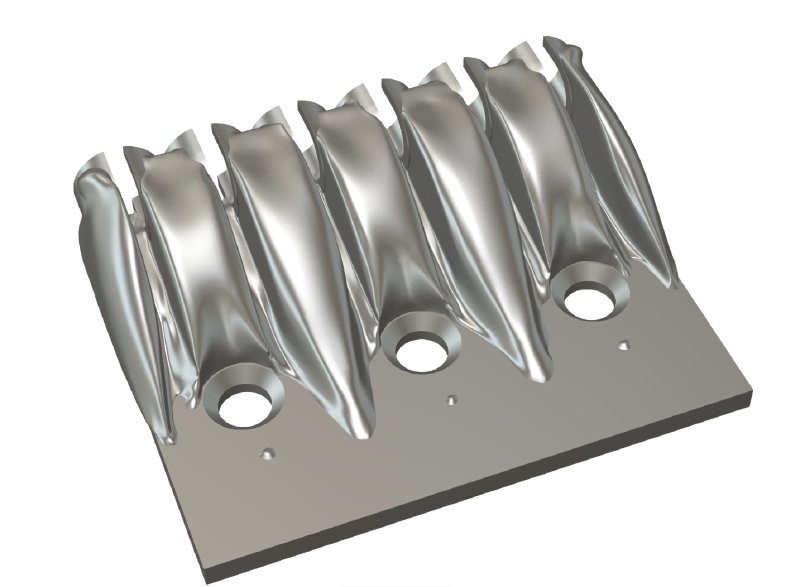
This looks more like what I’d expect based on other head pieces I’ve seen.
And I have to say I’m also very pleased with the look of the generated part, which matches the organic nature of the overall guitar design I’m going for much more closely.
One thing I’ve not explained is how will I get the part made? But perhaps the answer is obvious: I’ll get it 3D printed in metal.
In addition to printing in plastics, Shapeways will 3D print in a variety of metals. Whilst metal 3D printing is a lot more expensive than plastic 3D printing, the costs are actually inline with a lot of the head pieces I was looking at from various companies: the Mera part was quoted at $75, which was one of the cheaper ones, and the Hipshot part is $120. Asking Shapeways for a quote of my generated design it says $90 in Aluminium, $50 in Steal, and $190 in Brass - so an Aluminium print would be keeping in line with what I’d be paying anyway.
It was nice to note that the generative design comes in cheaper to 3D print than my hand design, using less material as it does. Overall the generative design saves about 10% off the volume of material vs my hand drawn version, and that is reflected by a 10% reduction in 3D printing costs.
However, before I spend that money I want to know what the part feels like and whether it’s a good fit for the strings, so I ordered a plastic print of both the generative design that I’ll use, and for personal interest the version I drew myself for comparison.
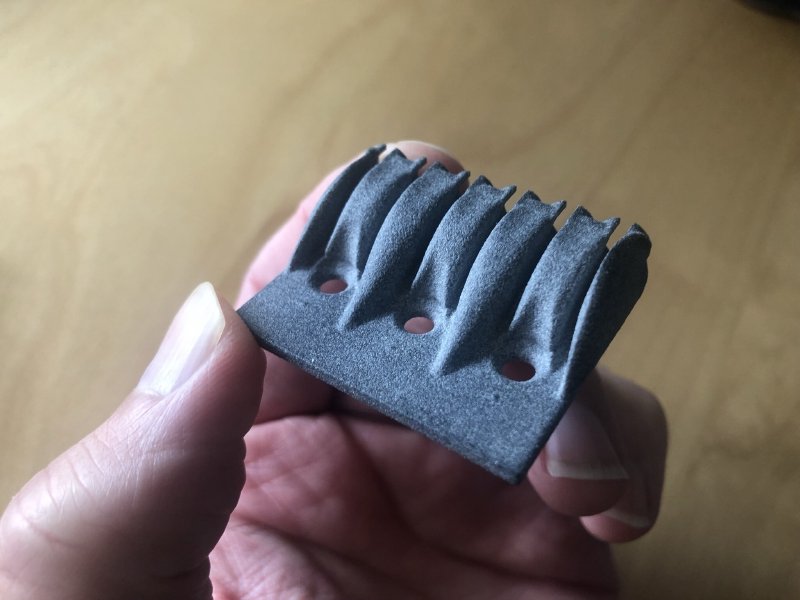
They just turned up, so I’ve not had time to do much with them, but it’s really still a magical thing to design a thing like this and get a high quality print turn up a week later in the post (for those interested, I used the multi jet fusion material from shapeways).
In theory I could have printed these myself on the Ultimaker 3D printers I have access to at the local makerspace, but for something this small with fiddly detail and gaps of a precise size, I think I’d just end up fighting the Ultimakers too much to make it an efficient use of my time - dealing with support materials, accidental material bridging, and also shrinkage as the part cools. This part cost £7 to print, which I’m happy with given the accuracy and heartache saved (plus postage, which was about £15, and so best get multiple prints done in a run if you can).
Now I know how I’m attaching the strings to the guitar design, the next thing I’ll turn my attention to is how to mount the electronics. But that’ll have to be in a future post, so stay tuned!